Adding a Widget to a SwiftUI app
Learn how to add a simple widget to a SwiftUI app.


Widgets are valuable extensions of your app that enable developers to display useful information about the app directly on the Home Screen for quick user access.
Your app can offer different types of widgets, each designed to provide pertinent information at a glance. When a user taps on a widget, they should seamlessly transition to your app, landing on a relevant page that offers more detailed information about the content they just viewed.
WidgetKit is the framework that we are going to use to create dynamic and interactive widgets entirely written in SwiftUI.
In this tutorial, we will explore the basic concepts of WidgetKit by developing a simple app featuring a widget offering water tips.
By the end of this tutorial, you will be able to create a basic widget displaying informative content.
Before we start
To follow this tutorial you need a basic understanding of SwiftUI and be comfortable writing code using the Swift programming language. Download the following project as the starting point of this tutorial:
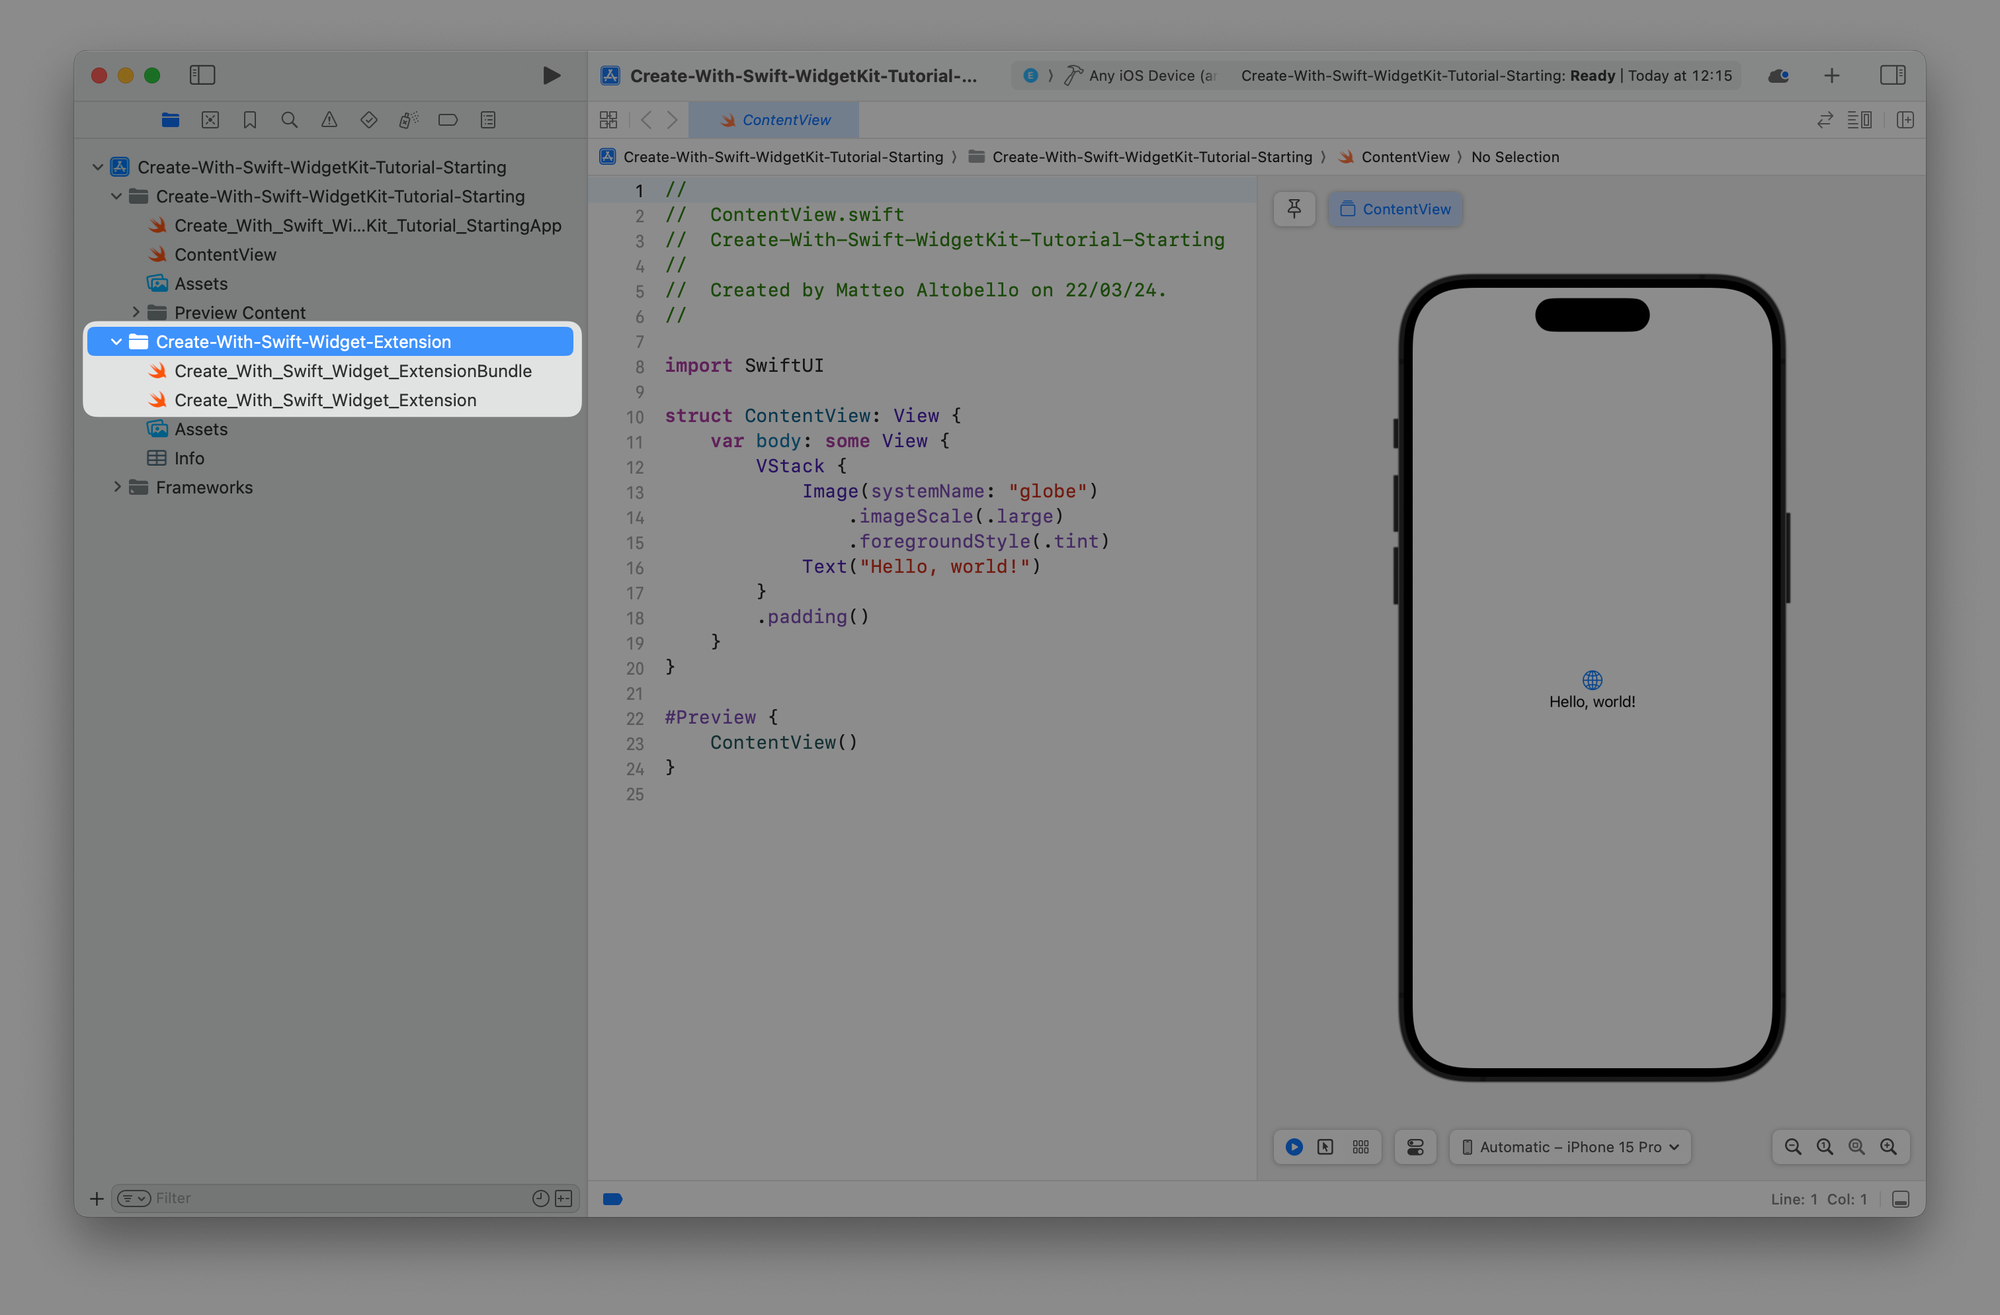
Step 1 - Create a Widget Extension
The first step is to add a Widget Extension to our Xcode project. You can do it by going to File → New → Target at the menu bar of Xcode.
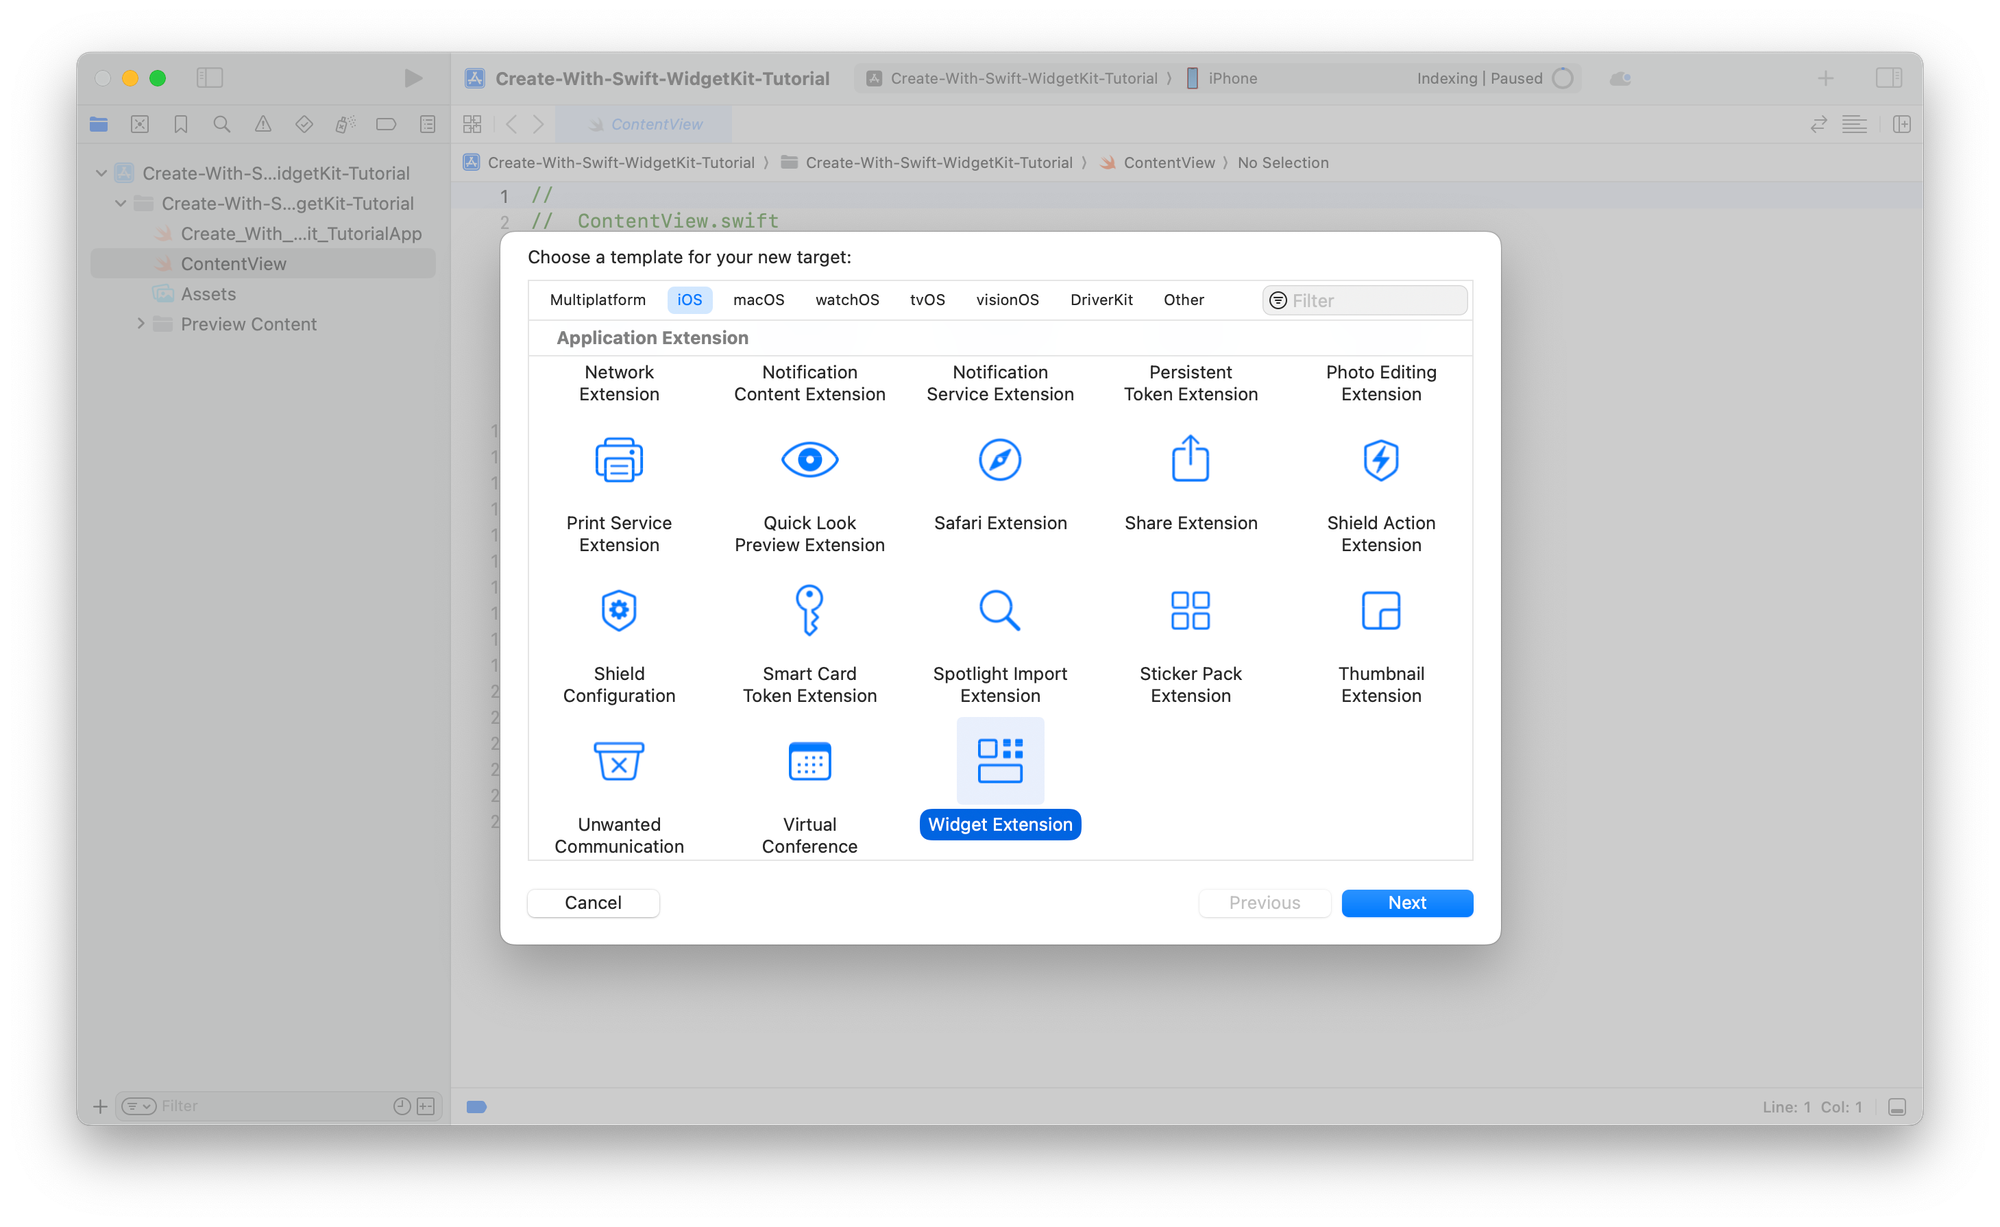
From the Application Extension group, select Widget Extension and click Next.
Once completed:
- Enter the name of our widget extension like
WaterWidget-Extension - If the
Include Live ActivityandInclude Configuration App Intentcheckboxes are selected, be sure to deselect them. Since this is a sample project with minimal requirements, we will opt for a basic configuration without these capabilities
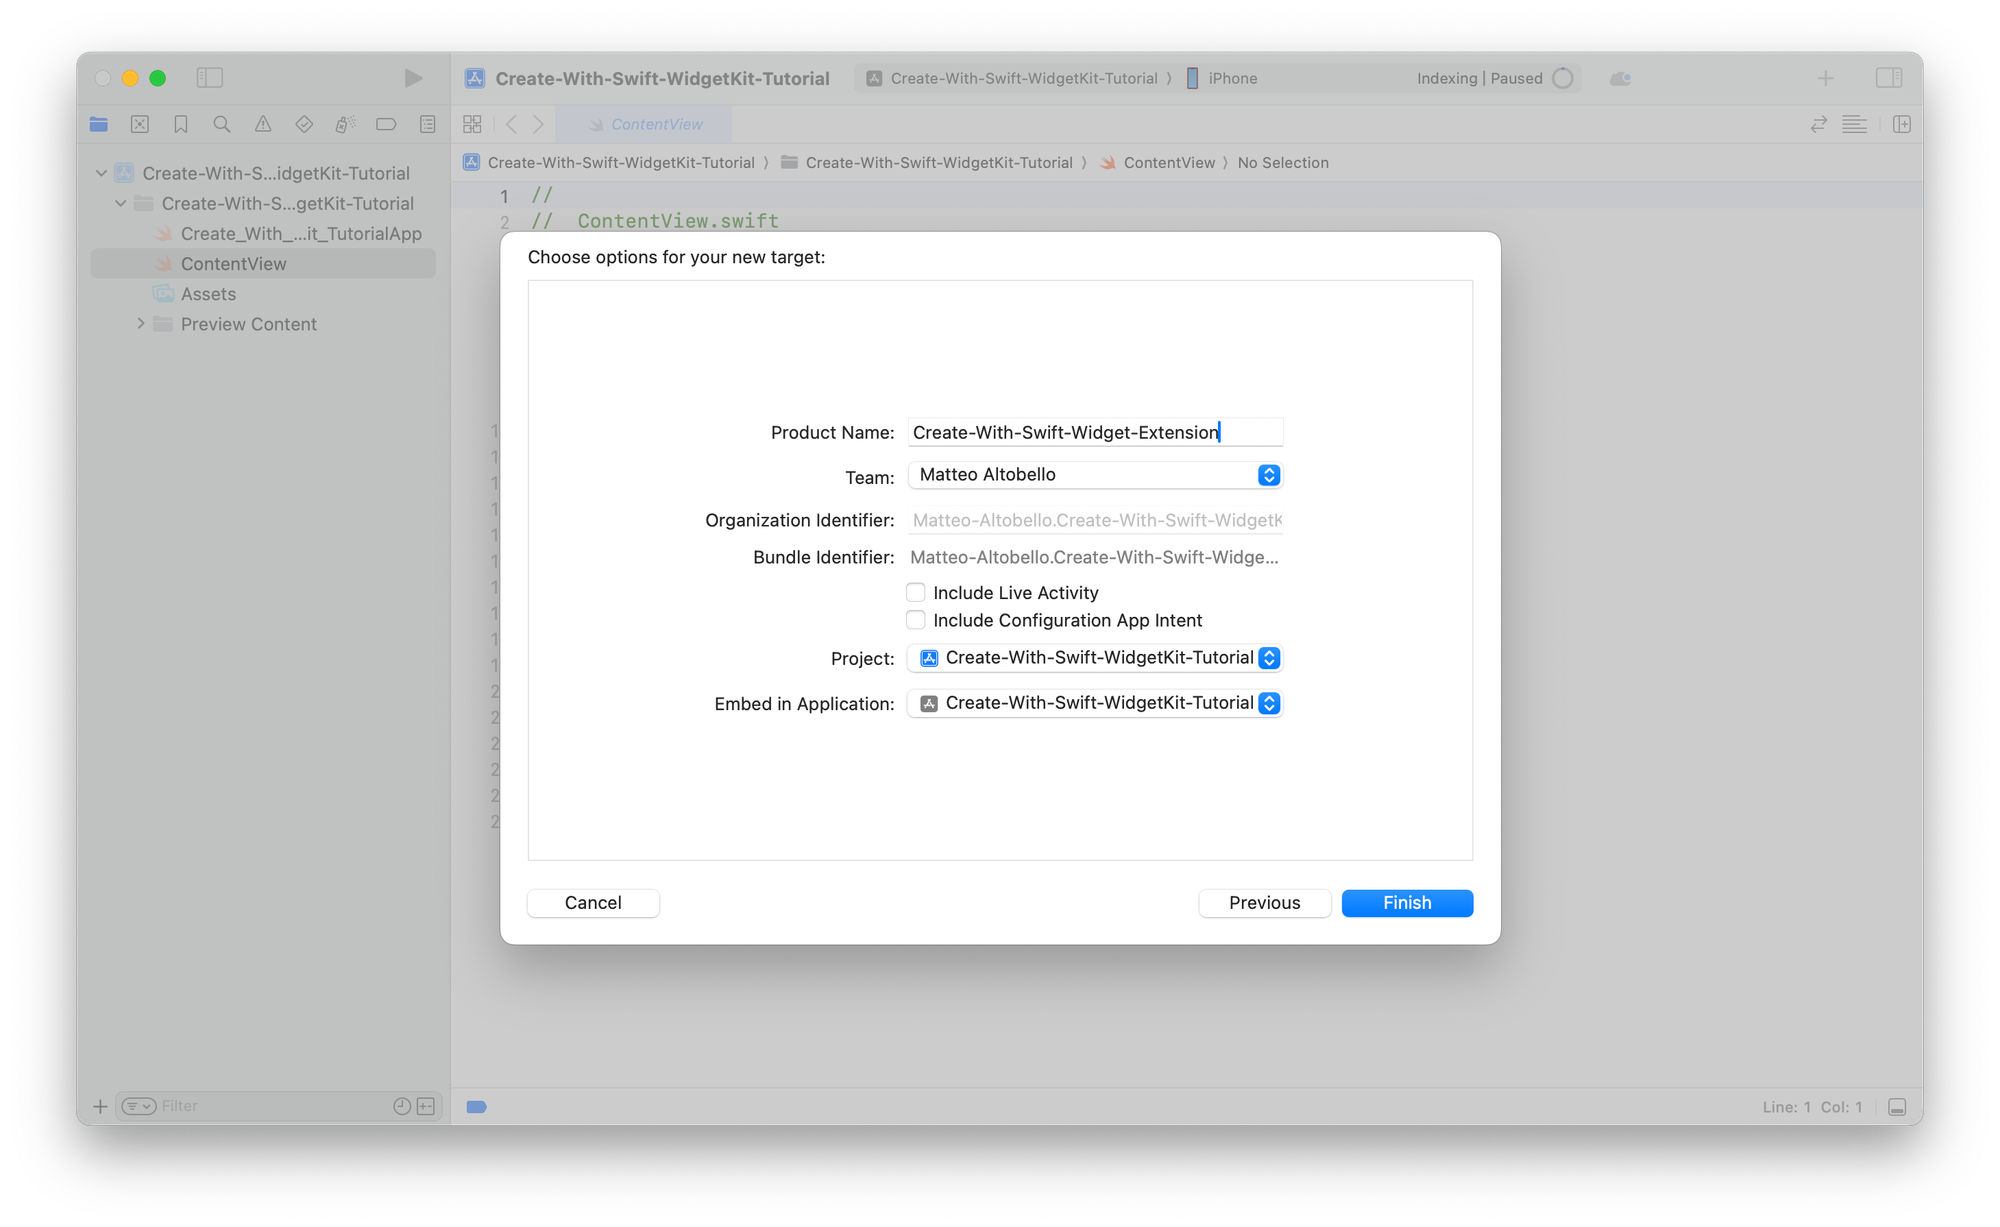
- A new window will appear asking for activating the extension. Just click on activate and you are ready

After generating the widget extension some code will automatically be added to our project. The first file is the entry point of our widget while the the second file includes a pre-build implementation of a Widget.
To have a better and structured understanding of WidgetKit we will not consider the auto-generated code.
- Delete the files highlighted in the screenshot below by right-clicking on them and selecting the Delete option. Be sure to click on Move to Trash when prompted.
It is also important when we create new files to ensure they are part of the widget extension folder.
Step 2- Defining the timeline entries
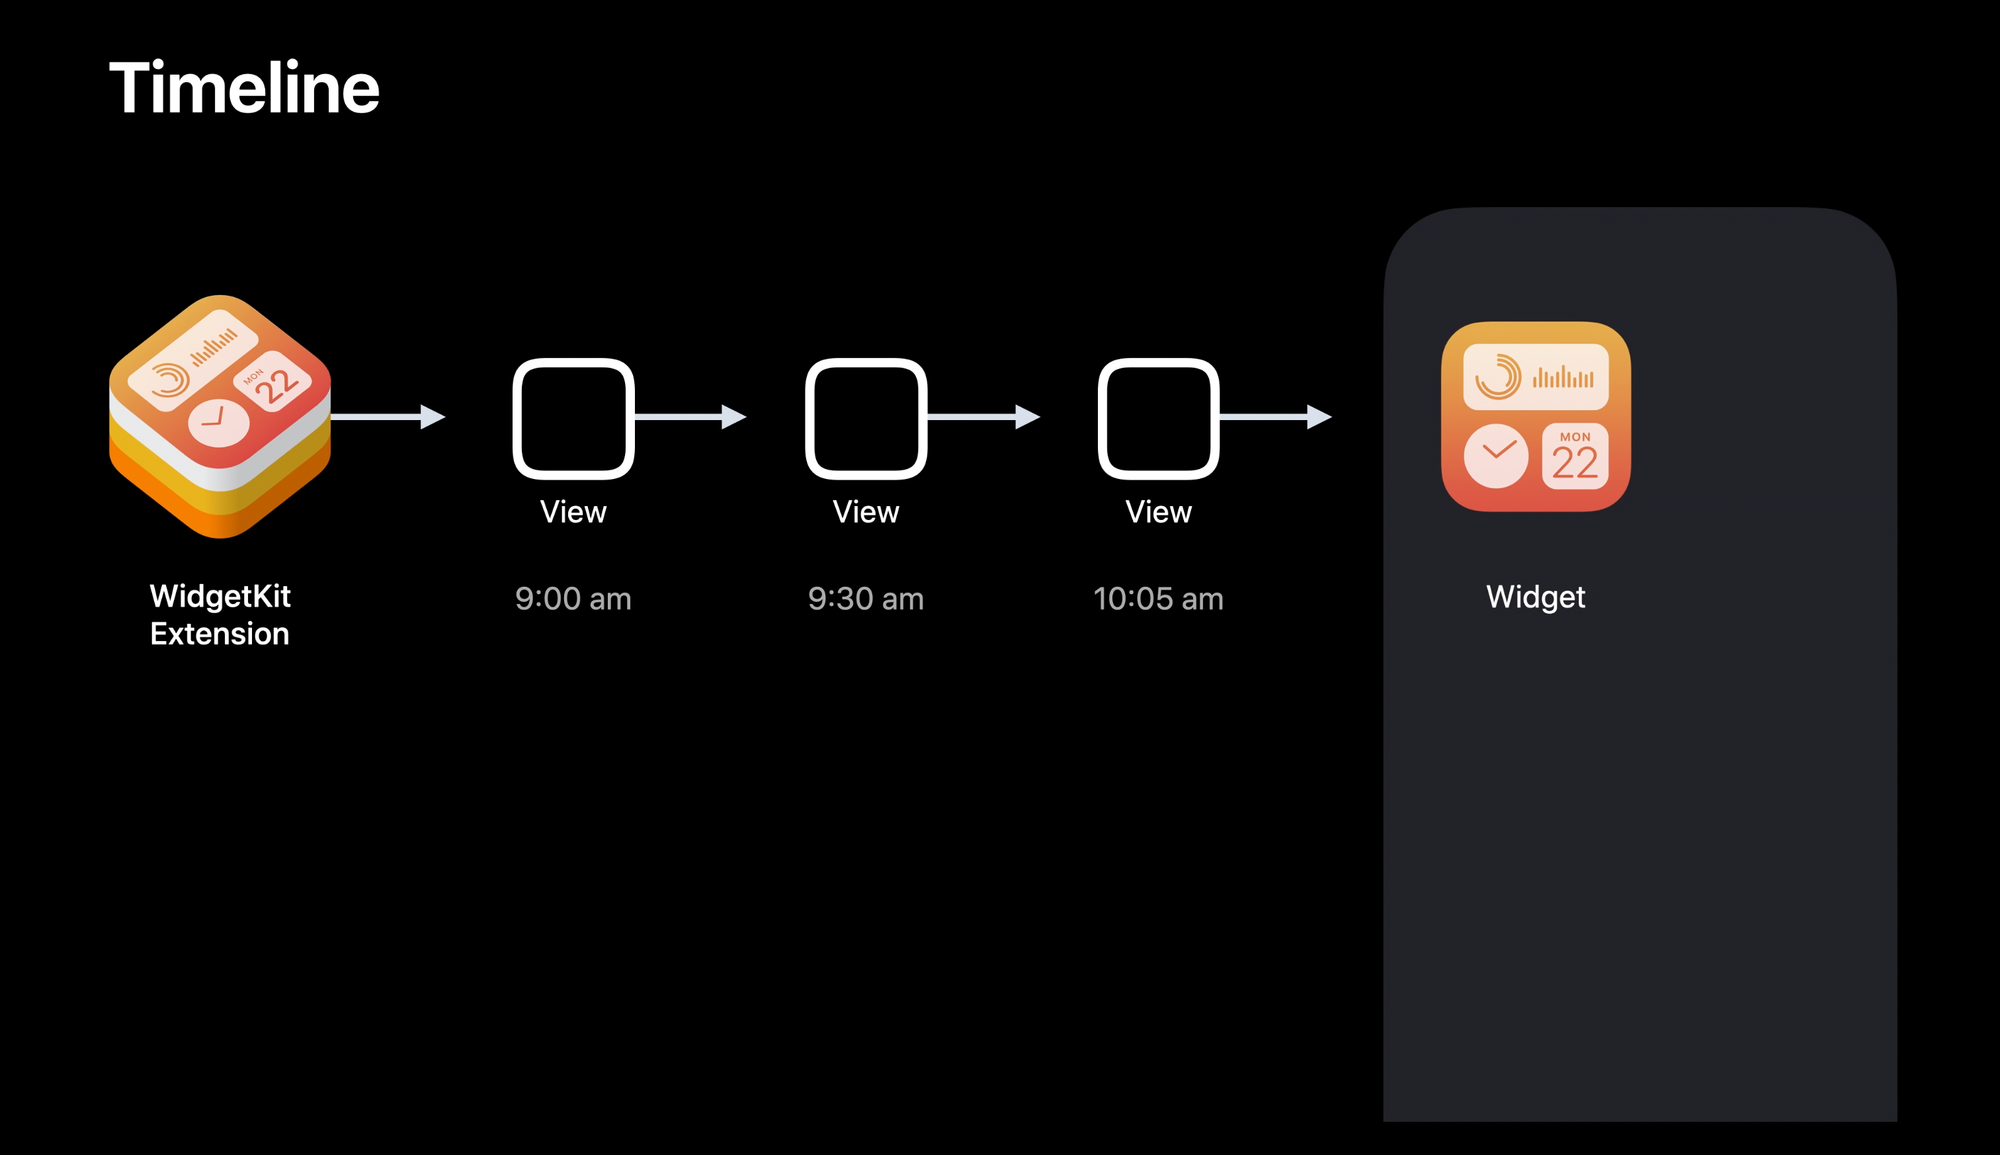
WidgetKit manages the information that needs to be presented using a timeline.
Within this timeline, various entries are recorded. Each entry specifies the date and time for updating the widget's content and includes the data necessary for the widget to render its view.
We will start by defining the structure of the entries that will create our timeline. Create a new Swift file named WaterEntry.swift.
// 1.
import WidgetKit

// 2.
struct WaterEntry: TimelineEntry {
	// 3.
    let date: Date
    let waterTip: String
}
- Import the
WidgetKitframework - Create a new struct named
WaterEntrythat conforms to theTimelineEntryprotocol - Add the properties
dateandwatertipas variables of the typeDateandString, respectively
In this case, the date property will tell the system when to update the widget while the waterTip property will represent the single tip in our widget.
Step 3 - Creating a collection of tips
Our app will display different tips about water, so we need to define a collection of tips to be used in our widget. Create a new Swift file named Tips.swift.
import Foundation

// 1.
struct Tips {
    // 2.
    var tipsList: [String] = [
        "Stay Hydrated: Drinking an adequate amount of water daily is crucial for maintaining overall health and well-being. Aim for at least 8 glasses (64 ounces) of water per day, but individual needs may vary.",
        "Listen to Your Body: Pay attention to signals like fatigue, mood changes, or changes in appetite. Your body often communicates its needs, and listening to it can help you maintain good health.",
        "Prioritize Sleep: Quality sleep is essential for physical and mental health. Aim for 7-9 hours of sleep per night to support your body's natural healing and rejuvenation processes.",
        "Eat a Balanced Diet: Focus on consuming a variety of nutrient-rich foods, including fruits, vegetables, lean proteins, whole grains, and healthy fats. This helps ensure you get essential vitamins and minerals for optimal health.",
        "Move Your Body: Incorporate regular physical activity into your routine. Whether it's walking, jogging, yoga, or weightlifting, aim for at least 30 minutes of exercise most days of the week to support cardiovascular health, muscle strength, and mental well-being.",
    ]
}
- Define a new struct named
Tips - Create a new variable property named
tipList. It is an array ofStringvalues
Step 4 - Defining a Timeline
Time to define the custom timeline. Let’s start by creating a new Swift file named WaterProvider.swift, define the WaterProvider structure, its properties and conform it to the TimelineProvider protocol.
// 1.
import WidgetKit

// 2.
struct WaterProvider: TimelineProvider {
		// 3.
		private let waterTips = Tips()
    // 4.
    private let placeholderEntry = WaterEntry(
        date: Date(),
        waterTip: ""
    )
}
- Import
WidgetKit - Create a new struct named
WaterProviderthat conforms to theTimelineProviderprotocol - Create an instance of the
Tipsstruct - Define a placeholder entry of our widget. This entry will be the one displayed in the widget collection of the system so be sure to not insert any temporary information related to the app
At the moment you might get an error about the WaterProvider not conforming to the TimelineProvider protocol. Don’t worry, this error will go away after you finish implementing the next step.
Step 5 - Define the behavior of the timeline
When we conform WaterProvider to the TimelineProvider protocol we need to define three functions inside the struct responsible for managing the presentation and the update of the timeline.
struct WaterProvider: TimelineProvider {

    private let waterTips = Tips()

    private let placeholderEntry = WaterEntry(
        date: Date(),
        waterTip: ""
    )

    // 1.
    func placeholder(in context: Context) -> WaterEntry {
        return placeholderEntry
    }

    // 2.
    func getSnapshot(in context: Context, completion: @escaping (WaterEntry) -> ()) {
        completion(placeholderEntry)
    }

    // 3.
    func getTimeline(in context: Context, completion: @escaping (Timeline<WaterEntry>) -> Void) {
        let currentDate = Date()
        var entries : [WaterEntry] = []

        for minuteOffset in 0 ..< 60 {
            let entryDate = Calendar.current.date(byAdding: .minute, value: minuteOffset, to: currentDate)!
            let tip = waterTips.tipsList[Int.random(in: 0...waterTips.tipsList.count-1)]
            let entry = WaterEntry(date: entryDate, waterTip: tip)
            entries.append(entry)
        }

        let timeline = Timeline(entries: entries, policy: .atEnd)

        completion(timeline)
    }
}
- The
placeholder(in:)function is used to show a generic visual representation of the widget with no specific content. This can be called when the widget is loading at startup, for example - To show your widget in the widget gallery,
WidgetKitasks the timeline provider for a preview snapshot that displays generic data. WidgetKit makes this request by calling the functiongetSnapshot(in:completion:) WidgetKitcallsgetTimeline(in:completion:)to request the timeline from the provider
A timeline consists of one or more timeline entries and of an object of type TimelineReloadPolicy that informs WidgetKit when to request the next entry of the timeline. On the code above, the reload policy is set as .atEnd. It means that the widget requests a new timeline entry after the date of the previous timeline entry passes.
With this implementation, a new entry will be provided by the timeline every one minute.
Step 6 - Designing the widget view
In this step, we are going to define the visual appearance of our widget. Create a new SwitftUI View file named WaterWidgetView.swift and enter the code below:
// 1.
import WidgetKit
import SwiftUI

struct WaterWidgetView: View {

    // 2.
    var entry: WaterProvider.Entry

    // 3.
    var body: some View {
        VStack(alignment: .leading){
            HStack{
                Image(systemName: "drop")
                Text("Tip of the day")
            }
            .font(.title3)
            .bold()
            .padding(.bottom, 8)

            Text(entry.waterTip)
                .font(.caption)

            Spacer()

            HStack{
                Spacer()
                Text("**Last Update:** \\(entry.date.formatted(.dateTime))")
                    .font(.caption2)

            }
        }
        .foregroundStyle(.white)

        // 4.
        .containerBackground(for: .widget){
            Color.cyan
        }
    }
}
- Import
WidgetKitandSwiftUI - The
entryvariable that is used to display the current entry provided by the timeline - Here we create a simple
SwiftUIview to display our timeline entry represented by theentryproperty. Feel free to be creative! - The
containerBackground(for:)allows the definition of the background view of a widget, making it easier for the system to adapt to different contexts
Step 7 - Defining the entry point of the widget
The last step is defining the entry point of the Widget Extension. At the beginning of the tutorial (Step 1) you deleted two files that were generated automatically by Xcode when we added a Widget Extension target to the project.
One of those files had the @main entry point of the widget. Now we need to recreate it.
Create a new Swift file named WaterTips_Widget_Extension.swift. Enter the code below:
// 1.
import WidgetKit
import SwiftUI

// 2.
@main
struct WaterTips_Widget_Extension: Widget {
    // 3.
    let kind: String = "Create-With-Swift-Example_Widget"
    var body: some WidgetConfiguration {

        // 4.
        StaticConfiguration(
            kind: kind,
            provider: WaterProvider(),
            content: { WaterWidgetView(entry: $0) }
        )
        // 5.
        .configurationDisplayName("Water tips")
        // 6.
        .description("Some little tips about water that will change your life!")
        // 7.
        .supportedFamilies([
            .systemMedium,
            .systemLarge
        ])
    }
}- Importing
SwiftUIandWidgetKit - Creating a new structure marked by the
@maintag to indicate this struct as the entry point of the widget target - Define a
kindvariable. It will serve as an identifier for the widget - The
StaticConfigurationis an object describing the content of a widget it requires:kind: a unique string to identify the widgetprovider: an object that determines the timing of updates to the widget's viewcontent: a view that renders the widget
- Sets the localized name shown for a widget when a user adds or edits the widgets in the widget gallery
- Set the localized description shown in the widget gallery
- The supported sizes of the
Widget, you can find all the widget families in the documentation ofWidgetFamily.
In this case, we are using the StaticConfiguration object because this widget has no user-configurable options. If your application requires a user-configurable option, like in the Stocks app which allows the user to choose which stocks to show in the widget, use IntentConfiguration.
Step 8 - Test the widget
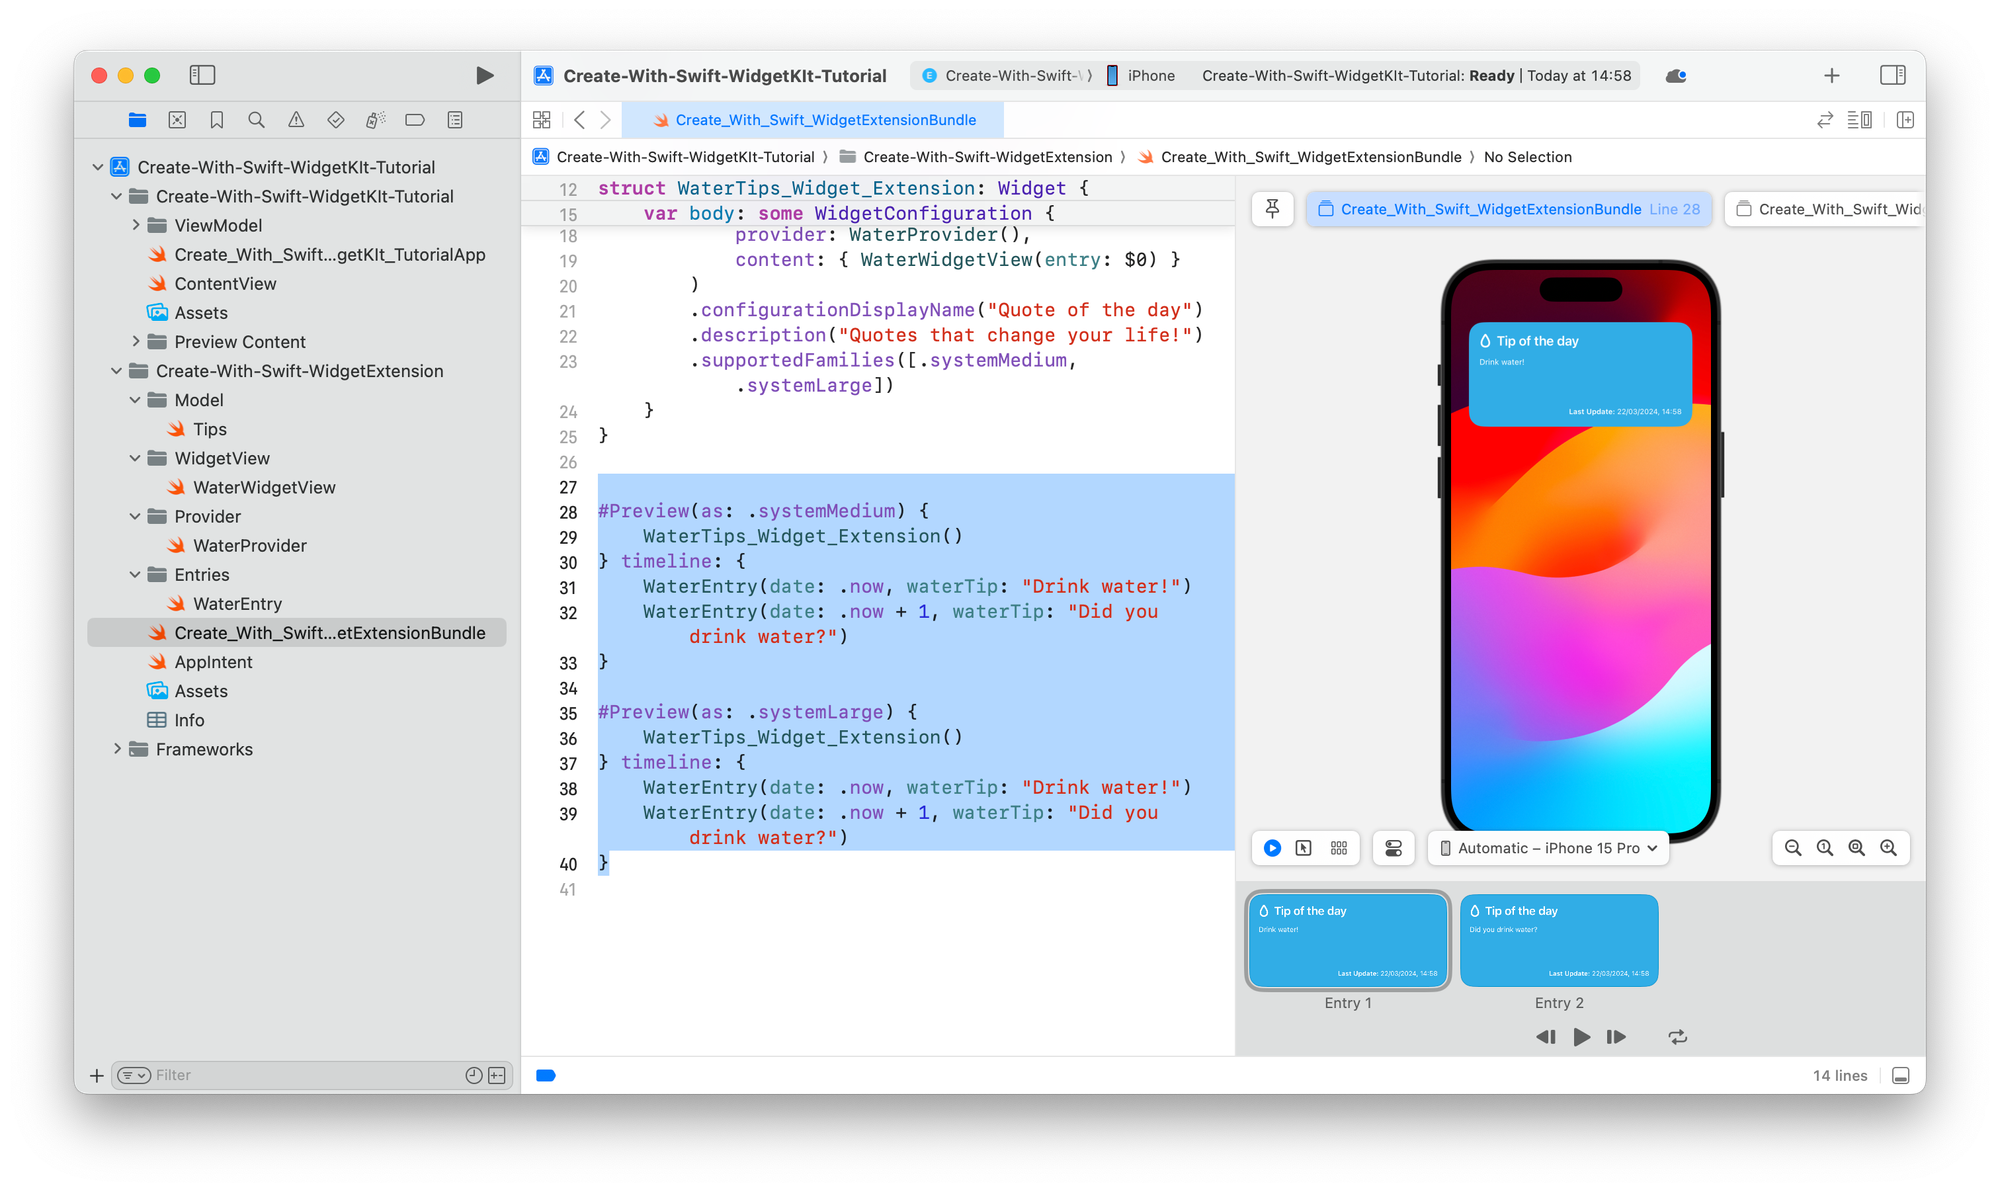
We have defined everything that we need to support a widget for the app. Let’s test how it will appear on the Home Screen of the user using the Xcode Previews.
Still in the WaterTips_Widget_Extension.swift file, add the following code:
import WidgetKit
import SwiftUI

@main
struct WaterTips_Widget_Extension: Widget {
		...
}

// 1.
#Preview(as: .systemMedium) {
    WaterTips_Widget_Extension()
} timeline: {
    WaterEntry(date: .now, waterTip: "Drink water!")
    WaterEntry(date: .now + 1, waterTip: "Did you drink water?")
}

#Preview(as: .systemLarge) {
    WaterTips_Widget_Extension()
} timeline: {
    WaterEntry(date: .now, waterTip: "Drink water!")
    WaterEntry(date: .now + 1, waterTip: "Did you drink water?")
}
- Using the
#Previewmacro we can test our widget in the desired size passing also an example timeline.
In the Canvas you simulate the behavior of the timeline by clicking on the different entries or by clicking on the Play button to start playback.
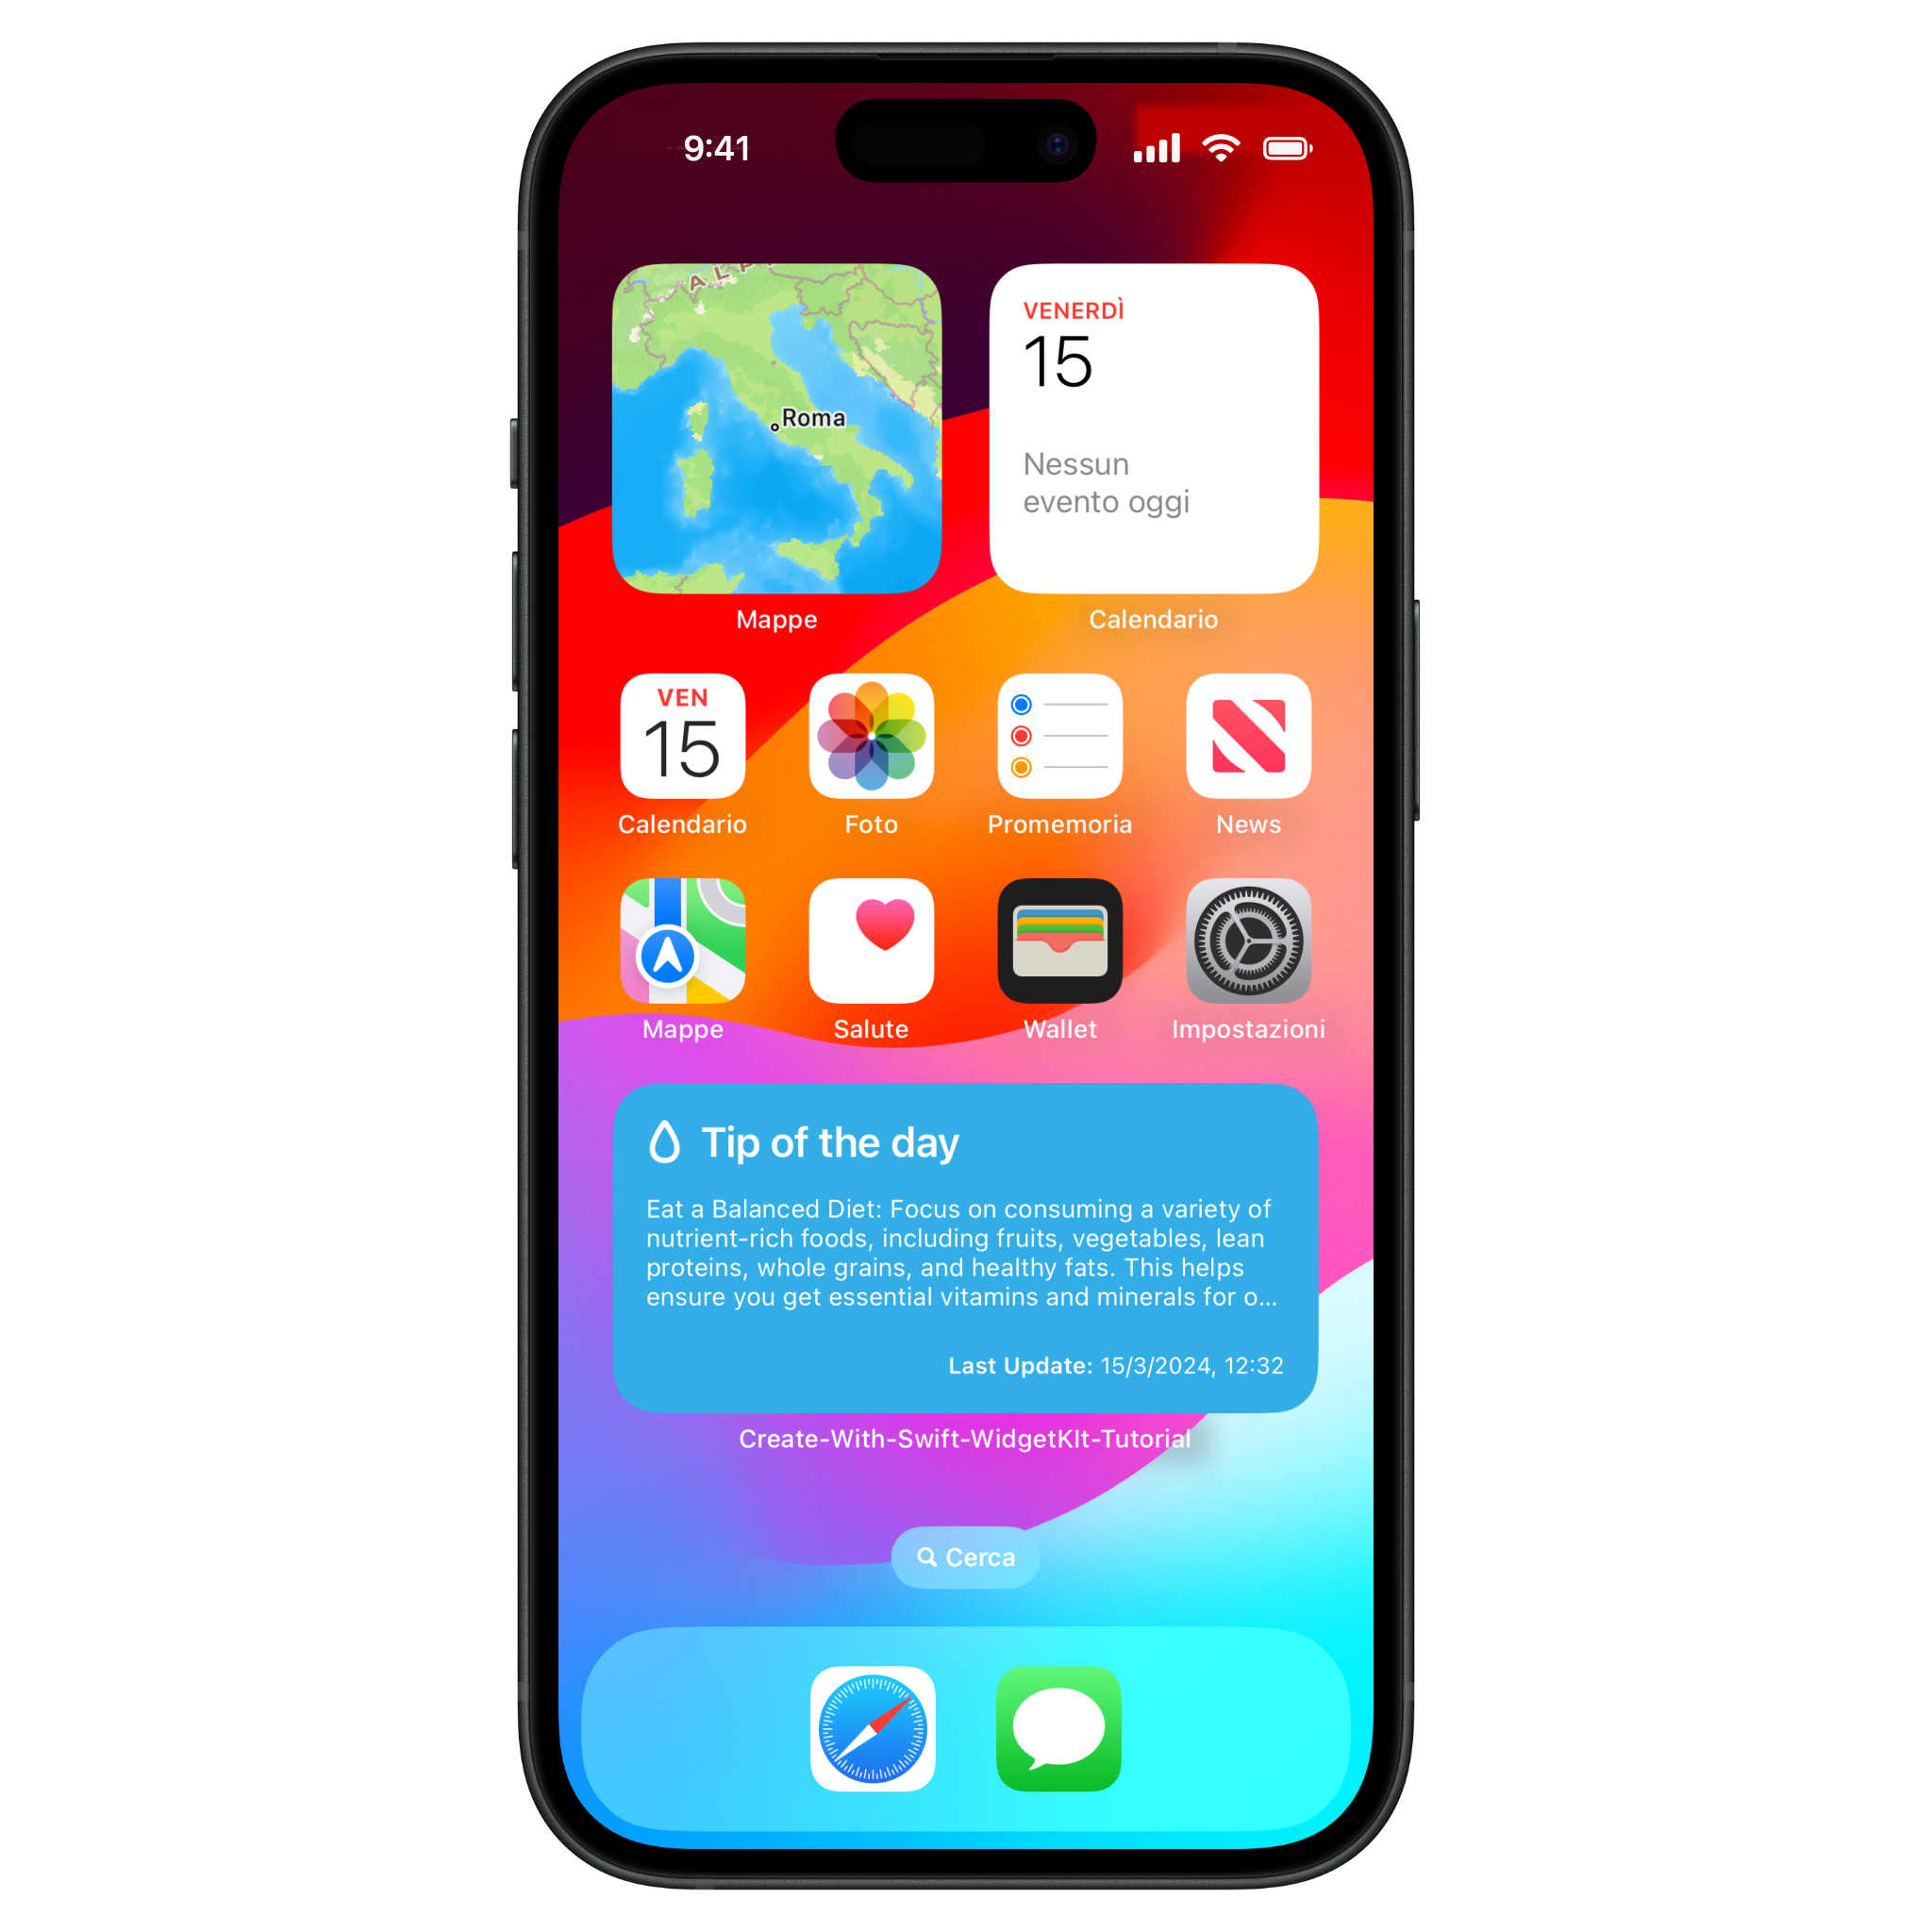
Final Result
If you followed all the steps now you are ready to run the app on the simulator or on a device and add your beautiful water info widget on the Home Screen.

You can download the complete project following this link:
WidgetKit provides a very simple process for creating widgets for your app. Don’t forget to take a look at the Human Interface Guidelines. These guidelines offer insights and tips so you can ensure that your widgets are perfectly integrated into the system.
