
Create a web AR experience with AR Quick Look
Learn how to provide an improved spatial experience within a website on Safari with AR Quick Look.

In this quick tutorial, you will be guided through the process of integrating a 3D model that anyone can view in their real-world environment using Safari and AR Quick Look right from a website.
Imagine placing your CV directly onto a table, no paper, no screen, just your experience, achievements, and personality floating in your space through the lens of your iPhone or iPad directly from your personal portfolio website.
With AR Quick Look, your resumé becomes more than just a PDF, it becomes an experience. Whether you're a student, designer, developer, or creative professional, showcasing your work in augmented reality is no longer futuristic, it's now just a few lines of code away.
The following video shows the AR experience we will develop together by the end of this article.
The things you need before getting started are:
- A 3D model in the USDZ format.
- A code editor to create an HTML file and implement the model.
You can download the assets here for educational purposes. The 3D model has been created by using Reality Composer for iPad.
Creating a HTML boilerplate
To begin, open your preferred code editor and create a new HTML file. Name it as index.html, open it and type the following code:
<!DOCTYPE html>
<html lang="en" dir="ltr">

  <head>
    <meta charset="utf-8">
    <meta name="viewport" content="width=device-width, initial-scale=1.0">
    <meta http-equiv="X-UA-Compatible" content="IE=edge">

    <title>AR Quick Look</title>

    <link rel="stylesheet" href="">
  </head>

  <body>

  </body>

</html>
This boilerplate provides the standard structure that our HTML page needs, including the following tags:
<!DOCTYPE html>: Declares the document type.<html lang="en" dir="ltr">: Root of the HTML document with language and text direction.<head>: Contains metadata like character encoding, viewport settings, and title.<body>: The visible part of the web page where the content will go.
Integrating an immersive AR experience
At this stage, we need to integrate the 3D resume model in AR into the HTML file. Insert the following code snippet between the <body> tags. This represents the minimal HTML setup required to launch an AR experience in Safari using AR Quick Look.
<body>
  <div>
    <a id="ar-link" rel="ar" href="cv.usdz">
      <img src="image.png">
    </a>
  </div>
</body>
Let’s explain the code step by step:
<div>represents a container element. It doesn't affect functionality here, but it's often used to group and style content.<a rel="ar" href="cv.usdz">: This is a link element with attributes.
rel="ar": This tells Safari on iOS that the linked file is an AR Quick Look experience and it decorates such links with a 3D-Cube badge in the top-right corner in order to show the user that there is an AR experience. It enables the system to preview.usdzfiles in AR directly.id="ar-link": this is an identifier for JavaScript or CSS targeting.href="cv.usdz": This is the actual path to the USDZ file, which is our 3D model, in this case, a CV in AR format. When the user taps the image (inside this link), Safari will launch the AR experience.
<img src="image.png">: This is an image used as a thumbnail or preview and points to the image that visually represents the AR object.
After adding this snippet, your complete HTML code should look like this:
<!DOCTYPE html>
<html lang="en" dir="ltr">

  <head>
    <meta charset="utf-8">
    <meta name="viewport" content="width=device-width, initial-scale=1.0">
    <meta http-equiv="X-UA-Compatible" content="IE=edge">

    <title>AR Quick Look</title>

    <link rel="stylesheet" href="">
  </head>

  <body>
    <div>
      <a id="ar-link" rel="ar" href="cv.usdz">
        <img src="image.png">
      </a>
    </div>
  </body>

</html>
Once this html page and assets are uploaded to a server, the AR experience will be accessible by using iPhone, iPad or Vision Pro. You can test it locally by opening the html page with Safari.
Provide a banner with a custom action
Sometimes, you may need to integrate a banner with a custom action inside the AR experience. The real question is: “what is a banner?”
A banner is a visual element, usually a rectangular section, used to show information, promote content or prompt the user to take an action ( ex.: like opening a link / product page, video, sending an email etc…).
Let’s look at a visual example of how to create a banner within our AR experience:
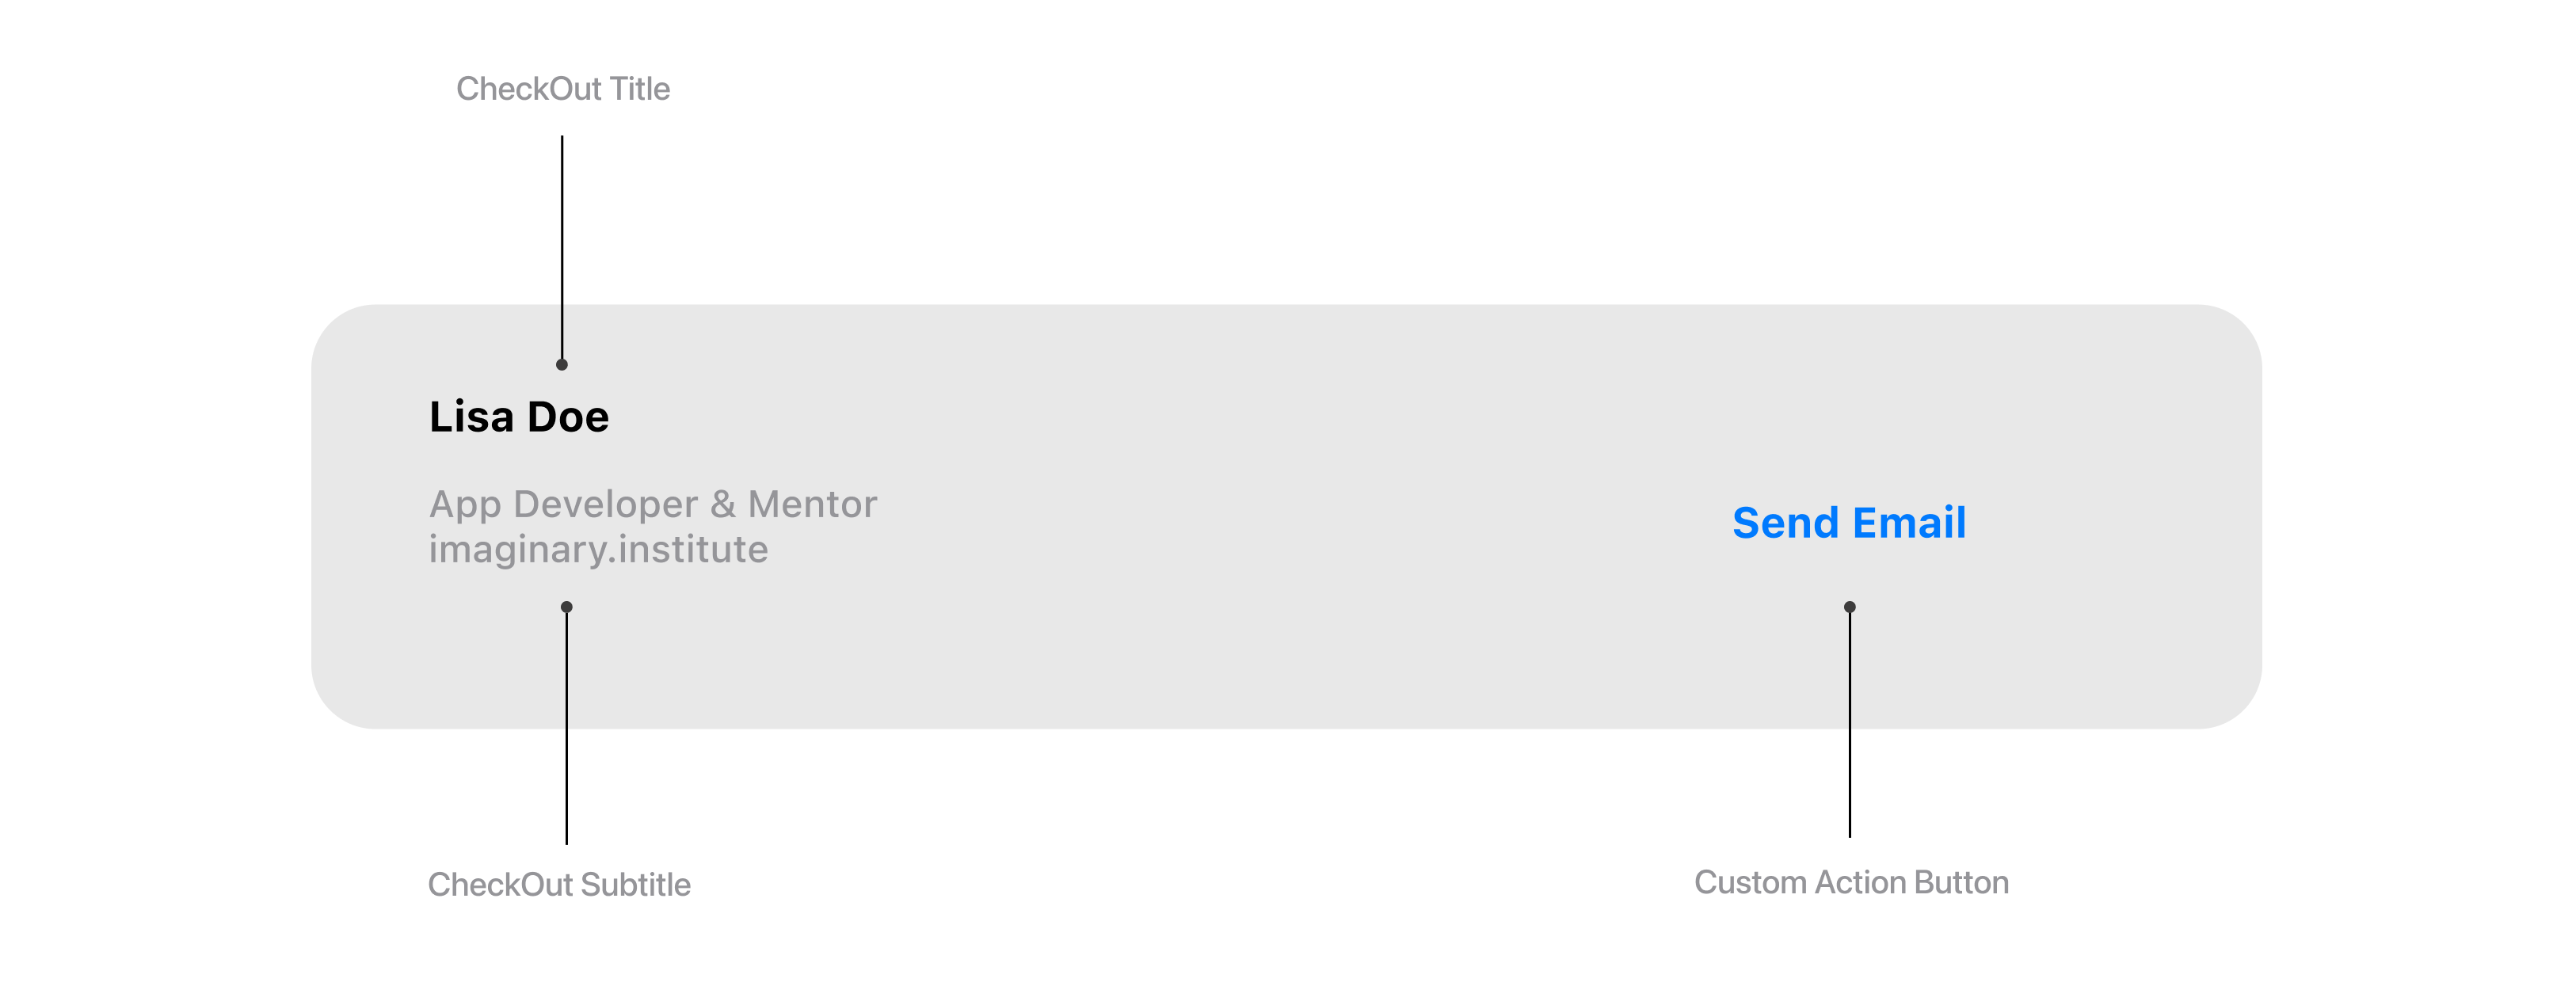
As shown in the figure, a banner is made up of the following elements:
CheckOutTitle:A title representing, for instance, your full name.CheckOutTitle:A subtitle illustrating, for instance, a short info.Custom Action Button:A call to action, for instance, to send an email.
Implementing these elements is simple, you can add the callToAction, checkoutTitle, and checkoutSubtitle directly in the href attribute using URL fragment identifiers (the part after the #). These parameters are interpreted by AR viewers like Quick Look on iOS to display a custom banner when previewing a USDZ (AR) file. Let's try to integrate them:
<div>
    <a id="ar-link" rel="ar" href="cv.usdz#callToAction=Send%20Email&checkoutTitle=Lisa%20Doe&checkoutSubtitle=iOS%20Developer%20and%20Mentor">
        <img src="image.png">
    </a>
</div>
Here’s a breakdown of each part:
callToAction=Send%20Email: This defines the label of the button that appears in the AR Quick Look viewer.%20is a space character URL-encoded, so the button will show “Send Email”.checkoutTitle=Lisa%20Doe: This sets the bold main title in the banner overlay, typically used for a name or primary info.checkoutSubtitle=iOS%20Developer%20and%20Mentor: This sets the subtitle text in lighter style, used for roles or descriptions.
Bind an action to the button
To enable interactivity within the AR experience, such as responding when the user taps the custom Call To Action button, we need to add a <script> element at the bottom of the HTML file, just before the closing </body> tag. This script listens for a special message event that is triggered when the user taps the button in the AR Quick Look viewer.
Here's how you can integrate it:
<script>
  const linkElement = document.getElementById("ar-link");

  linkElement.addEventListener("message", function (event) {
    if (event.data == "_apple_ar_quicklook_button_tapped") {
      // Handle the user tap.
      window.location.href = "<mailto:hello@imaginary.institute>?subject=Hello&body=This is a real example of AR QuickLook";
    }
  }, false);
</script>
Let’s break it down step by step:
const linkElement = document.getElementById("ar-link");
This selects the<a>element with theid="ar-link"from your HTML. It’s the anchor tag that triggers the AR experience.linkElement.addEventListener("message", function(event) { ... });
We are adding an event listener that listens formessageevents sent from the AR Quick Look session running in Safari. This is how Quick Look communicates back to your web page when a specific user interaction occurs inside the AR viewer.if (event.data == "_apple_ar_quicklook_button_tapped")
This condition checks whether the event corresponds to the Call To Action button being tapped. Apple uses the special message string"_apple_ar_quicklook_button_tapped"to signal this interaction.window.location.href = "<mailto:hello@imaginary.institute>?..."
When the button is tapped, this line redirects the browser to open the user's default email client and pre-fills an email with subject and body. This is a useful way to let users contact you directly after experiencing your AR resume.
Below is the complete source code for the final project, containing all the necessary elements and functionality as implemented:
<!DOCTYPE html>
<html lang="en" dir="ltr">

  <head>
    <meta charset="utf-8">
    <meta name="viewport" content="width=device-width, initial-scale=1.0">
    <meta http-equiv="X-UA-Compatible" content="IE=edge">

    <title>AR Quick Look</title>

    <link rel="stylesheet" href="">
  </head>

  <body>
    <div>
      <a id= "ar-link" rel="ar" href="cv.usdz#callToAction=Send%20Email&checkoutTitle=Lisa%20Doe&checkoutSubtitle=iOS%20Developer">
        <img src="image.png">
      </a>
    </div>

    <script>
      const linkElement = document.getElementById("ar-link");
      linkElement.addEventListener("message", function (event) {
        if (event.data == "_apple_ar_quicklook_button_tapped") {
          // Handle the user tap.
          window.location.href = "<mailto:hello@imaginary.institute>?subject=Hello&body=This is a real example of AR QuickLook";
        }
      }, false);
    </script>
  </body>

</html>
Your AR experience is ready to go! Take it further by integrating it into your web pages and sharing it with the world.
You can download the entire project here.