
Creating a Custom App Launch Experience in SwiftUI with Deep Linking
This article introduces Deep Links and how you can use them for custom app launch experience with SwiftUI.
As a developer, it is crucial to provide the best possible user experience in our applications. Depending on the App we are developing, there are numerous ways to augment the user experience by creating different App Extensions, such as widgets, custom keyboards, and share extensions. We can also integrate services, such as Apple Pay, CloudKit, Sign in with Apple, or Push Notifications. Among the many extensions available out there, this article explores Custom URL Schemes, better known as Deep Links.
There are several articles online that explain in detail what Deep Links are, like this one, so let's explore how we can use them in our SwiftUI Apps.
How to use Deep Link
Deep Links can be used in many different ways, like embedding them within a web page or within NFC tags. They can be integrated into banner ads, used in email marketing, be indexed in search engines, and more.
As you can imagine they are an incredible tool for marketing your app, allowing you to create really interesting dynamics. Deep Linking 101, in chapter 5, lists some interesting use cases of deep linking, and 7 Key Benefits of Mobile App Deep Linking covers the importance of using deep linking to direct users to relevant content inside your app.
Deep Links can also be used to allow different applications in the system to talk to each other, allowing us to create new scenarios where applications can work together.
Practically all system applications integrate and accept Deep Links, to allow you to access the required resource at that very moment. To find out more details about which links to use for system apps you can read the article Complete List of iOS URL Schemes for Apple Apps and Services (Always-Updated) | by Justin Meyers | Medium.
As you can see, the possibilities are unlimited.
Defining a Deep Link in XCode

In Xcode to create a Deep Link, we need to add to the project info.plist, a key that defines a custom URL Type. In the latest versions, there is a dedicated section in the project file that allows us to manage these keys in a simplified way, replacing the previous info.plist file.
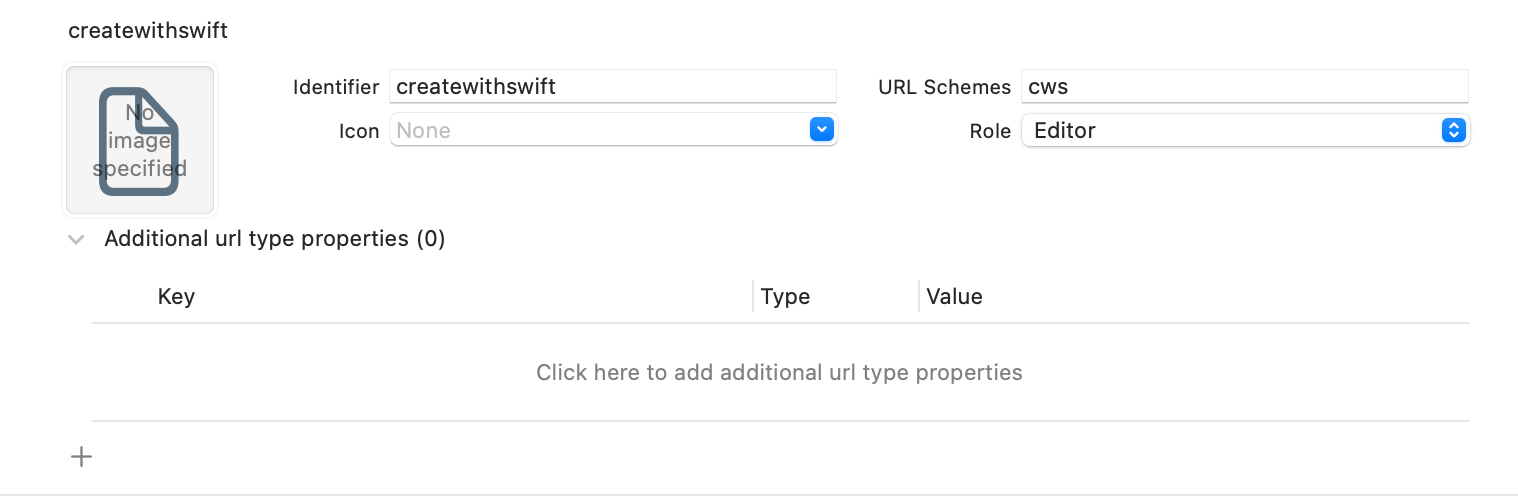
When creating a new URL we need to think mainly about three things:
- URL Schema: defines a sequence of characters that helps to identify the source unambiguously.
- Identifier: the identifier you provide with your schema distinguishes your application from others that declare support for the same schema.
- Role: either an editor role for the URL patterns you define or a viewer role for the patterns your app adopts but does not define.
It is also very important to remember that, as written in the documentation, URL patterns offer a potential attack vector to your app, so make sure to validate all URL parameters and discard any malformed URLs. Also, limit the available actions to those that don't put the user's data at risk. For example, don't allow other apps to directly delete content or access sensitive user information.
When testing your URL management code, make sure your test cases include improperly formatted URLs. So just as we think about validating parameters received from a server, with Deep Links we must also prepare for potential attacks.
Design a Deep Link API Interface
When we think about API interface design, there is not much difference between REST API and Deep Links to access our app. In general, an effective API design should be easy to read and work with, and most importantly effective for our app.
Let's see two examples to better understand this concept:
- Settings App: The purpose of this app is to display a series of categorized lists based on the type of setting desired. So for the users, it is essential to be able to navigate through the many pages of the app to be able to find what they need. So the API interface allows us to access directly the desired screen, defining the identifier in the link path.
- Bear App: The purpose of the application is to be able to create personalized notes on your device. Notes can be created, modified, deleted, and more. The API interface allows us to perform all these actions.
As you can imagine, it depends on what your application offers and the goal it is trying to achieve. Never forget that there are several key principles when creating an API, such as stability, consistency, flexibility, and security.
Manage Deep Link in SwiftUI
To manage the access through Deep Link, a handy modifier is available in SwiftUI, called .onOpenURL(). This modifier handles the reception of Universal Links and Deep Links. Inside the closure, we can manage the URL, execute validation of the received data, and so on.
ContentView()
	.onOpenURL { url in
       print(url)
    }
onOpenURL Modifier
For simplicity, consider as an example an application with two main scenes, a Home View and a Detail View. The Detail View will receive an identifier to show a specific product.
To manage the URL effectively, outside of the App file of the project, you can create a helper class that allows the verification of the URL and manages any actions associated with it.
class DeeplinkManager {

    enum DeeplinkTarget: Equatable {
        case home
        case details(reference: String)
    }

    class DeepLinkConstants {
        static let scheme = "cws"
        static let host = "com.createwithswift"
        static let detailsPath = "/details"
        static let query = "id"
    }

	func manage(url: URL) -> DeeplinkTarget {
        guard url.scheme == DeepLinkConstants.scheme,
              url.host == DeepLinkConstants.host,
              url.path == DeepLinkConstants.detailsPath,
              let components = URLComponents(url: url, resolvingAgainstBaseURL: true),
              let queryItems = components.queryItems
        else { return .home }

        let query = queryItems.reduce(into: [String: String]()) { (result, item) in
            result[item.name] = item.value
        }

        guard let id = query[DeepLinkConstants.query] else { return .home }

        return .details(reference: id)
    }
}
An example of a class that manages Deep Links in an application.
To figure out which page to present when the app opens, create an enum that keeps track of possible destinations.
enum DeeplinkTarget: Equatable {
     case home
     case details(reference: String)
}
Enumeration that represents the Deep Link targets
After that, create a function that allows the management of the URL and possibly perform validation of the data received if necessary.
func manage(_ url: URL) -> DeeplinkTarget {
        guard url.scheme == DeepLinkConstants.scheme,
              url.host == DeepLinkConstants.host,
              url.path == DeepLinkConstants.detailsPath,
              let components = URLComponents(url: url, resolvingAgainstBaseURL: true),
              let queryItems = components.queryItems
        else { return .home }

        let query = queryItems.reduce(into: [String: String]()) { (result, item) in
            result[item.name] = item.value
        }

        guard let id = query[DeepLinkConstants.query] else { return .home }

        return .details(reference: id)
    }
An example function that handles a URL
In this function, I am concerned with checking that the link that opened the application is exactly what I expect.
This function checks if the link that is opening the application is valid. If any condition is not respected, the Home view will be launched instead. On the other hand, if the link is valid or passes all checks correctly, it will open the determined destination, in our example the Detail View. Using the id information in the URL, the Detail View will be instantiated with the right parameter.
Now that we have a method to manage the deep linking, our App structure should look like the following code snippet.
@main
struct CreateWithSwiftApp: App {

    @State var deeplinkTarget: DeeplinkManager.DeeplinkTarget?

    var body: some Scene {
        WindowGroup {
            Group {
                switch self.deeplinkTarget {
                case .home:
                    HomeView(withDeepLink: true)
                case .details(let queryInfo):
                    DetailView(id: queryInfo)
                case .none:
                    HomeView(withDeepLink: false)
                }
            }
            .onOpenURL { url in
                let deeplinkManager = DeeplinkManager()
                let deeplink = deeplinkManager.manage(url)
                self.deeplinkTarget = deeplink
            }
        }
    }
}
The main file of your app
There are many ways to handle deep linking in an application. The provided example is using a state variable of type DeeplinkManager.DeeplinkTarget? that tells the application which View to use. In case it is nil, it assumes that the application has not been opened via a URL, otherwise, it launches the desired view based on the current value of the deepLinkTarget property.
Now we can test the application through the simulator using the following command:
xcrun simctl openurl booted "<URL>"
Through this, we can check that our Deep Link works and that it correctly opens our application in the desired View.
The following command opens the application in the Home View.
xcrun simctl openurl booted "cws://com.createwithswift"
While the following opens the Details View, passing as a parameter a specific id.
xcrun simctl openurl booted "cws://com.createwithswift/details?id=12345"
Wrapping up
Now you know how to create and manage Deep Links in a SwiftUI app. You can start thinking about how to organize your code and how to empower your marketing strategy using deep linking.
There are many possible use cases you can explore. Imagination is the only limit!
Written by Gianluca Orpello. Additional edits and formatting by the Create with Swift editorial team.