
Creating an Intent using AppIntent and AppEnum protocols
Learn how to create custom action for App Intents with a SwiftUI app.

AppIntents framework lets developers expose core app capabilities to system experiences such as Siri, Spotlight, and the Shortcuts app, turning in‑app features into system‑wide actions.
As we previously explored, developers can define standard actions that the system can invoke by leveraging AssistantSchemas patterns.

However, when it comes to custom actions not defined in these patterns, in order to integrate them into the system, developers have to rely on the AppIntent and AppEnum protocols:
AppIntentis responsible for handling the interface providing an app-specific capability.AppEnumis responsible for handling the interface displaying predefined static set of valid values of custom types.
In this short tutorial, we are going to demonstrate how to
empowering developers to shape and refine the user experience while leveraging system-level features.
Before we start
To address the topics we are going to leverage on a simple sample project: a book library app that lets you keep track of your books on your shelf.
This starter project contains:
- View folder:
BooksListView- shows the stored books as a listBookDetailView- presents the details of a stored bookAddBookView- handles the addition of a new oneWebView- rendering the file
- Model folder, collecting all the model files
Book- defines the book typeDataModel- data persisted usingSwiftData
- Manager folder
NavigationManager- handles navigation within the appDataManager- handles the data operations
- The
BooksShelfCustomIntentAppfile - the entry point of the app - Intents folder - collecting all files related to intents
BookEntity- handling theAppEntityfor theBookmodelOpenBookIntent- handling theAppIntentthat allows opening a specific bookShorcutsProviders- handling theAppShortcutsProviderconforming type that enables the invocation of the intents via vocal commandsSearchIntent- handling theAppIntentthat allows to perform research inside your app
The NavigationManager and the shared Modelcontainer are initialized at the app entry point. Launch the app and start storing your books; they will be needed to launch and test.
1. Create an intent using AppIntent protocol
One way to create intents is by using the AppIntent protocol, which, in contrast with the @AssistantSchemas approach, provides more room for customization as its set of rules to conform to are very simple and basic. It requires:
- a
titleasLocalizedStringResource - the
perform()method returning anIntentResult
Since it’s not adhering to any schema for standardized actions on standardized objects, it’s not expecting any specific domainEntity.
To explore how to use it, we will create an intent that allows adding a new book on the shelf - an action that is not offered in the BooksIntent set.
Step 1 - Create a new intent
Create a new AddBookIntent.swift file in the Intents folder.
// 1. The framework
import AppIntents

// 2. The type conforming to AppIntent
struct AddBookIntent: AppIntent {
    // a. The LocalizedStringResource
    static var title: LocalizedStringResource = "Add a Book to your Shelf"
    // b. The task to perform
    func perform() async throws -> some IntentResult {
        return .result()
    }
}
- Import the framework.
- Create a type
AddBookIntentconforming toAppIntentprotocol. You will be prompted with errors asking you to add stubs to conform to the protocol rules. To fix them, you will need to declare:- The
LocalizedStringResourcereferring to the intent title. Choose a text that addresses the goal of the intent. - The task to perform when launching the intent.
- The
Step 2 - Create the parameters
Since our intent will allow to add a new book in the database by calling the DataManager.createNewBook(book:), we will need the parameters to create a new instance of Book which are, for now, the title of the book and its author.
import AppIntents

struct AddBookIntent: AppIntent {

    ...
    // 1. Specify the parameter to ask
    @Parameter(title: "Title")
    var title: String

    @Parameter(title: "Author")
    var author: String

    ...
}
- Specify the parameters to ask.
Step 3 - Create the perform() logic
Once we have the parameters, we can proceed with the logic implementation in the perform() method.
import AppIntents

struct AddBookIntent: AppIntent {

    ...

    // 1. The dependency
    @Dependency
    private var navigationManager: NavigationManager

    @MainActor
    func perform() async throws -> some IntentResult {
        // 2. A new Book instance using the parameters' values
        let newBook = Book(title: title, author: author)

        do {
            // 3. Storing the new instance
            try await DataManager.createNewBook(book: newBook)
        } catch {
            fatalError("Unable to save the book")
        }

        // 4. Opening the detailed view on the newly added instance
        navigationManager.openBook(book: newBook)

        return .result()
    }
}
- Inject the dependency.
- Create a new
Bookinstance using the parameters' values. - Store it using the
DataManager. - Open the detailed view on the new added instance using the
NavigationManager.
2. Display a predefined set of values with AppEnum
The next step is to display custom types values in the intent interface using AppEnum .
In the AddBookIntent, we did not specify parameters for custom types like Genre and BookContentType optionally needed when creating a new Book instance.
Let’s try to address them now.
Step 1 - Add the custom types parameters
In the AddBookIntent :
import AppIntents

struct AddBookIntent: AppIntent {

    ...

    // 1. Custom types parameters
    @Parameter(title: "Genre")
    var genre: Genre

    @Parameter(title: "Type of book")
    var type: BookContentType?

    ...
}
- Add the custom types parameters.
import AppIntents

struct AddBookIntent: AppIntent {

    ...

    func perform() async throws -> some IntentResult {
        // 1. Use the parameters to create the Book instance
        let newBook = Book(title: title, author: author, genre: genre, contentType: type)

        ...

        return .result()
    }
}
- Use the parameters to create the Book instance.
Right after adding the custom types parameters, you will be prompted with some errors asking to conform to them '_IntentValue’.
Step 2 - Conform the custom types to AppEnum
To fix this we need to conform these types to AppEnum .
In the Book model file, apply the following changes.
// The framework
import AppIntents

// 1. Conform to AppEnum protocol
enum Genre: ..., AppEnum {

    // 2. Provide the TypeDisplayRepresentation for the type
    static var typeDisplayRepresentation = TypeDisplayRepresentation(name: "Book Genre")

    // 3. Provide the DisplayRepresentation for each of its cases
    static var caseDisplayRepresentations: [Self: DisplayRepresentation] = [
        .fantasy: DisplayRepresentation(title: "Fantasy"),
        .scienceFiction: DisplayRepresentation(title: "Science Fiction"),
        .romance: DisplayRepresentation(title: "Romance"),
        .mystery: DisplayRepresentation(title: "Mystery"),
        .horror: DisplayRepresentation(title: "Horror"),
        .selfHelp: DisplayRepresentation(title: "Self Help"),
        .biography: DisplayRepresentation(title: "Biography"),
        .history: DisplayRepresentation(title: "History"),
        .cookbook: DisplayRepresentation(title: "Cookbook"),
        .unspecified: DisplayRepresentation(title: "Unspecified")
    ]

    ...
}
First, import AppIntents framework.
In the Genre enum declaration:
- Conform it to
AppEnumprotocol. - Provide the
TypeDisplayRepresentationfor the type. - Create an array of
DisplayRepresentationcontaining an instance for each of its cases.
This information is needed to correctly display the type and its values in the intent interface.
// 1. Conform to AppEnum protocol
enum BookContentType: ..., AppEnum {

    // 2. Provide the TypeDisplayRepresentation for the type
    static var typeDisplayRepresentation = TypeDisplayRepresentation(name: "Book Type")

    // 3. Provide the DisplayRepresentation for each of its cases
    static var caseDisplayRepresentations: [Self: DisplayRepresentation] = [
        .physicalBook: DisplayRepresentation(title: "Physical Book"),
        .eBook: DisplayRepresentation(title: "eBook")
        ]
    ...
}
Do the same for the BookContentType too.
Step 3 - Test it
Now, run the app and open Shortcuts app: create the shortcut to add a new book and test that it correctly add a new book on your shelf.
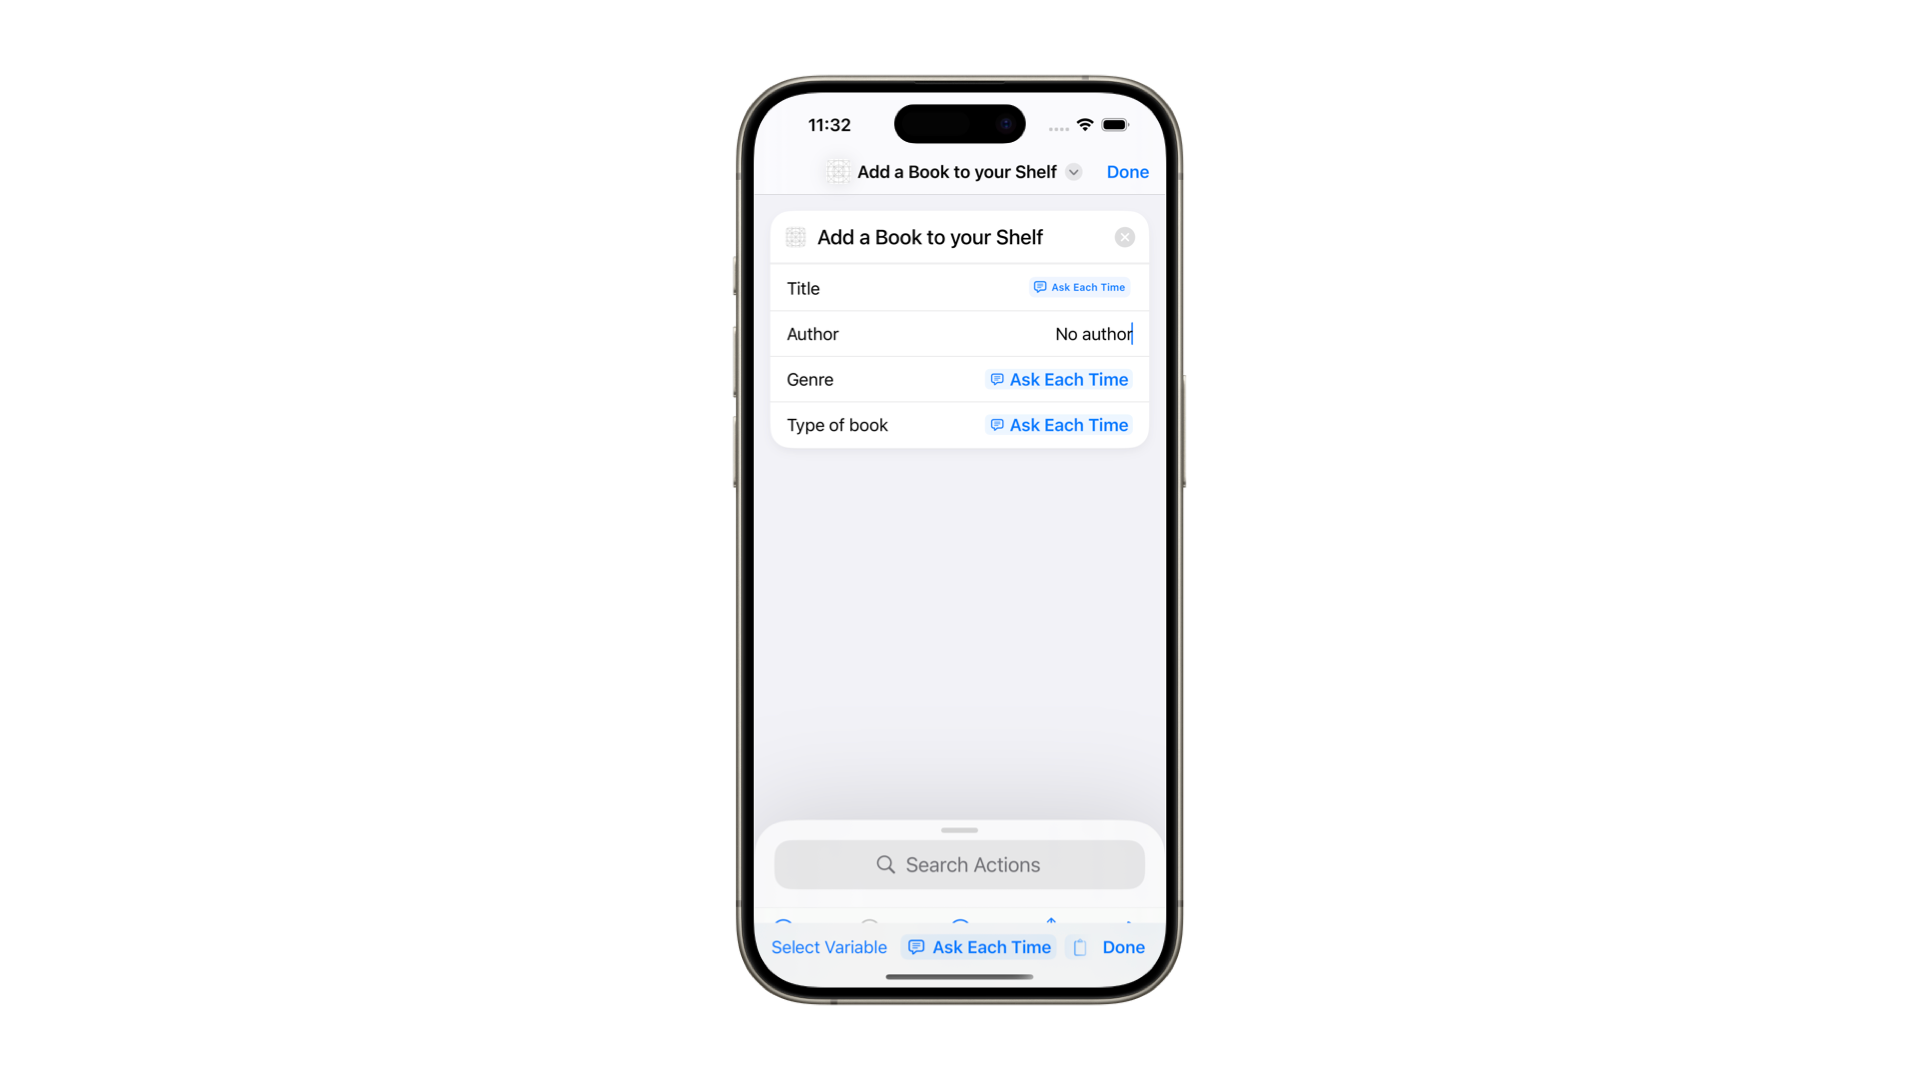
When creating the shortcut, set the parameter to be asked each time. When launching the intent there will be dialog asking for the values for them and you will be able to see how these custom types values are - handled - and displayed in the intent.
To recap, we have explored how to create an intent when not using the AssistantSchemas predefined intents by using AppIntent protocol and how to handle and display custom type values by using AppEnum one.
This is the final project.
In conclusion, by using the AppIntent protocol, you can create entirely custom actions - such as adding a new book - into Siri, Spotlight, and Shortcuts; and, with AppEnum, you provide clear and static choice lists - like genres or content types - that appear seamlessly in the intent UI. These protocols offer flexibility to define localized titles and prompts, getting precise user input, and trigger in-app navigation while maintaining a consistent and system-wide experience. These protocols provide room for customizing every aspect of an intent’s presentation and behavior, ensuring that the app’s actions feel both native and intuitive within the iOS ecosystem.