
Custom Parameters and Animation with Metal Shaders
Learn how to create and use parametrized shaders with Metal and SwiftUI.

Metal shaders in SwiftUI allow us to move beyond traditional view-based rendering and work directly at the pixel level. Instead of describing what a view should look like, we can describe how each individual pixel should behave.
At their core, SwiftUI shaders are small GPU functions that run once per pixel. SwiftUI automatically provides useful inputs like the pixel’s position and its current color, which already enables powerful effects such as gradients and color transformations.
For more information about this, check out the previous article about Metal Shaders:

Real creative control begins when we move past automatic inputs and start passing our own data into the shader.
In this article, we’ll explore how to pass custom parameters from SwiftUI to Metal, to build procedural patterns like a configurable chessboard, to drive shaders using time-based animation and to use mathematical functions to create smooth, continuous motion.
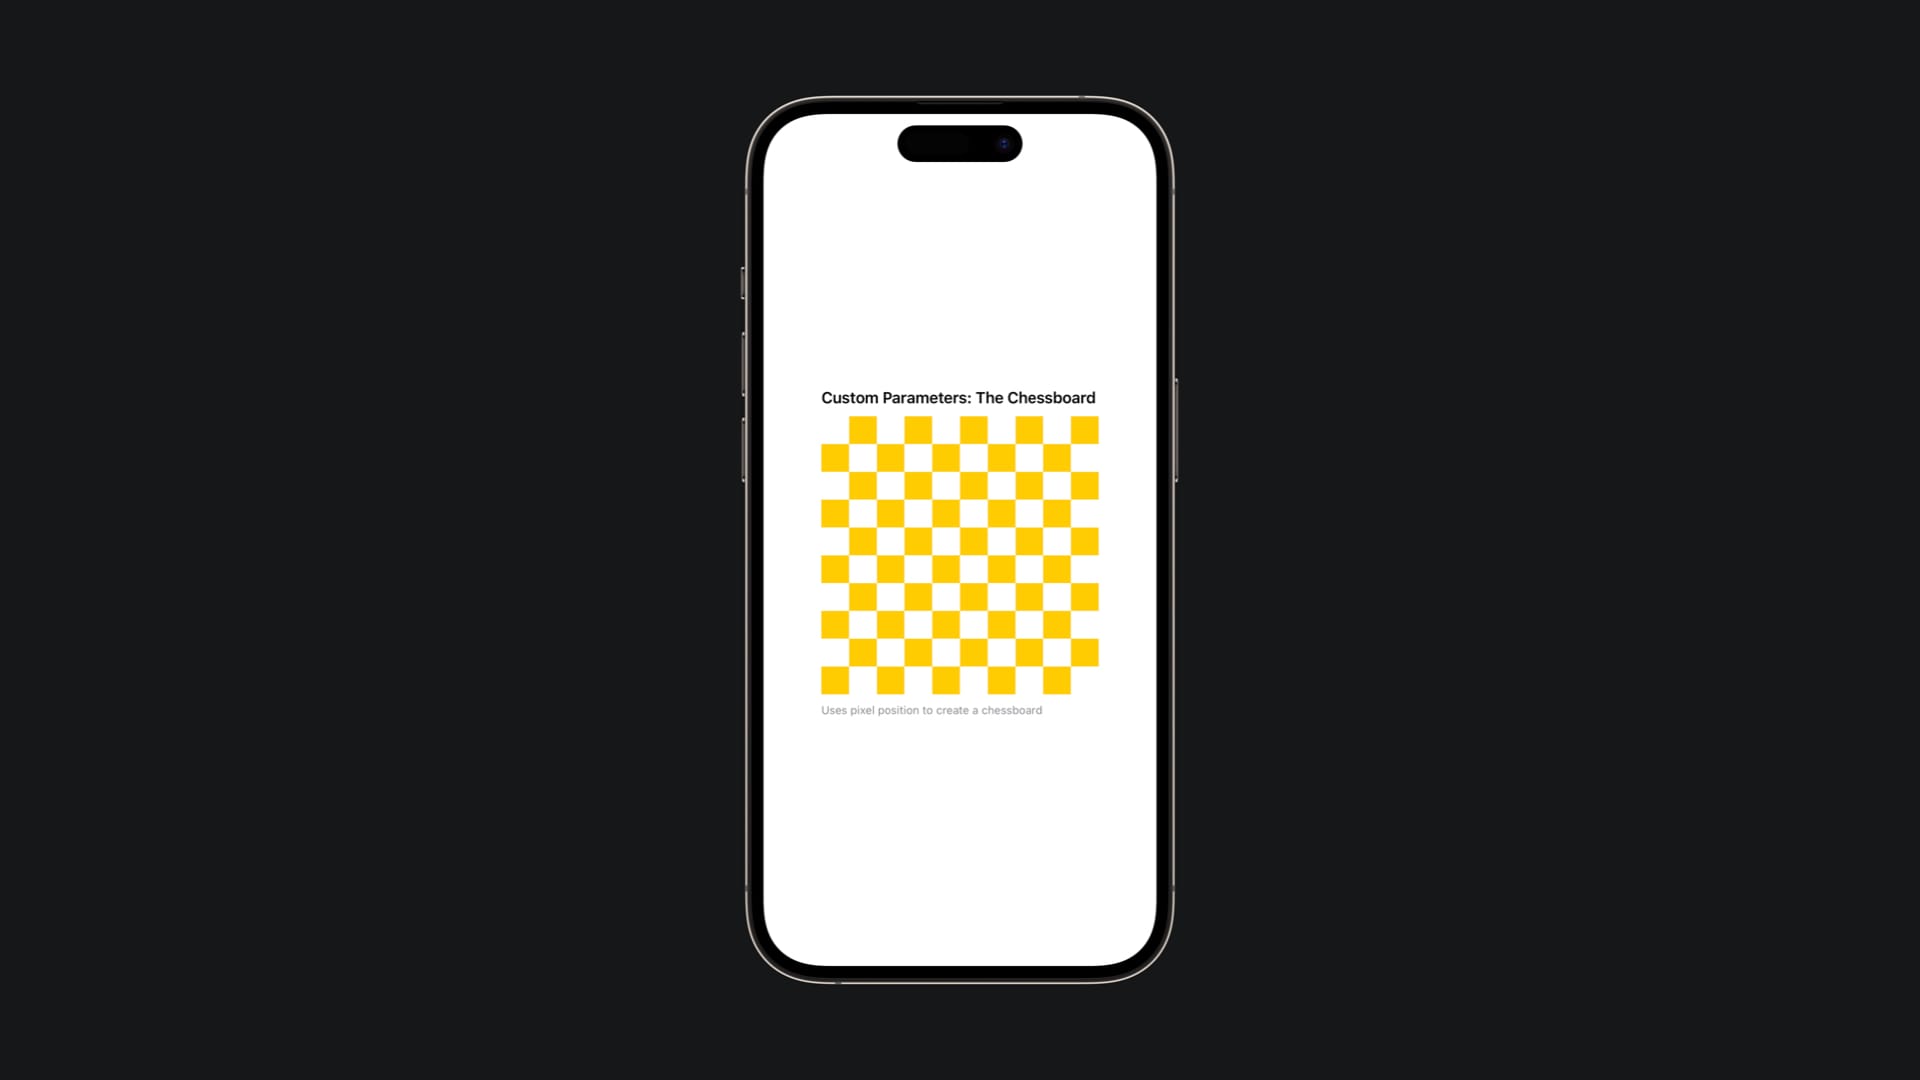
Custom Parameters: The Chessboard
When working with Metal shaders in SwiftUI, each shader function automatically receives useful inputs such as position (the pixel’s coordinates) and currentColor (the existing color at that pixel). These built-in parameters already allow us to create gradients and color transformations.
But shaders become far more powerful when we start passing our own data into them.
SwiftUI makes this easy by allowing you to pass custom parameters using special wrapper methods: .float() for numbers and .color() for colors. When you pass a SwiftUI Color type using the .color() method, it is automatically converted to a half4 RGBA value that your shader can use. The critical thing to remember is that parameter order is important: your custom parameters must come after the automatic ones, and they must match the exact order in your shader function signature.
Let’s put this into practice by building a configurable chessboard pattern where we can control both the size of the squares and their color.
And now, let's look at how the code could be:
#include <metal_stdlib>
#include <SwiftUI/SwiftUI.h>
using namespace metal;

[[ stitchable ]] half4 chessboard(float2 position, half4 currentColor, float tileSize, half4 fillColor) {
    uint2 gridCoords = uint2(position.x / tileSize, position.y / tileSize);

    bool shouldFill = (gridCoords.x ^ gridCoords.y) & 1;

    return shouldFill ? fillColor * currentColor.a : half4(0.0, 0.0, 0.0, 0.0);
}
Notice two new parameters after currentColor:
float tileSize: The size of each chessboard square in pixelshalf4 fillColor: The color to use for the filled squares
The Math Behind Chessboard
The key to creating a chessboard is figuring out which "cell" each pixel belongs to, then determining if that cell should be colored or not.
First, we divide the pixel position by the square size to find which cell we're in:
uint2 gridCoords = uint2(position.x / tileSize, position.y / tileSize);For example, with tileSize=10, a pixel at position (15, 25) belongs to cell (1, 2), and a pixel at (5, 5) belongs to cell (0, 0).
Next, we need to determine if this cell should be colored. The mathematical trick to achieve this uses bitwise operations:
bool shouldFill = (gridCoords.x ^ gridCoords.y) & 1;
The ^ operator (XOR) combined with & 1 creates exactly this alternating pattern. You don't need to understand the bitwise math deeply, just know that it gives us true for cells that should be colored and false for cells that should be transparent.
Finally, we return the appropriate color:
return shouldFill ? fillColor * currentColor.a : half4(0.0, 0.0, 0.0, 0.0);If the cell should be colored, we return fillColor (respecting any transparency). If not, we return fully transparent.
Using it in SwiftUI
Now here's where it gets different from the last shaders, seen that we need to pass those custom parameters:
import SwiftUI
import Metal

struct ChessboardView: View {
    var body: some View {
        Rectangle()
            .colorEffect(ShaderLibrary.chessboard(.float(30), .color(.yellow)))
            .frame(width: 300, height: 300)

    }
}
Notice the parameters inside ShaderLibrary.chessboard():
.float(30): This passes the value 10.0 to thefloat tileSizeparameter.color(.yellow): This converts SwiftUI'sColor.yellowto ahalf4and passes it tofillColor
Notice that as in the shader, the order matters in the SwiftUI implementation too.
In the shader, our parameters were: float2 position, half4 currentColor, float tileSize, half4 fillColor; but seen that the first two are automatically handled by SwiftUI, we only need to pass the parameters after the automatic ones, in the exact same order and we need to assign values to them.
Animations: Time-Based Shaders
The most exciting part of shaders is creating animations. To animate a shader, we need to pass it a continuously changing value, typically time.
SwiftUI'sTimelineView is perfect for this: it updates on a schedule (like every frame), giving us access to the current time. We can calculate the time that has passed since the view appeared, pass it to our shader as a .float()parameter, and the shader uses that value to compute colors that change over time.
For instance, when the user interacts with controls like sliders, we can use @State variables to pass those values to our shader in the same way, making the shader respond to user input in real-time.
But for now let's create a shader in which colors change smoothly using sine waves, without external manipulation by the user. The animation flows on its own over time.
Let's give a look at the implementation:
#include <metal_stdlib>
#include <SwiftUI/SwiftUI.h>
using namespace metal;

[[ stitchable ]] half4 animatedColor(float2 position, half4 currentColor, float time) {
    half r = half((sin(time) + 1.0) * 0.5);
    half g = half((sin(time + 2.0) + 1.0) * 0.5);
    half b = half((sin(time + 4.0) + 1.0) * 0.5);

    return half4(r, g, b, 1.0);
}
Understanding Sine Waves
The sine function (sin()) is perfect for animation because it oscillates smoothly in a wave pattern. It naturally goes up and down over time, creating smooth, continuous motion.
Sine functions normally produce values between -1 and 1, while colors need values between 0 and 1. So it needs adjustments:
half r = half((sin(time) + 1.0) * 0.5);The formula (sin(time) + 1.0) * 0.5 transforms the -1 to 1 range into 0 to 1. As time increases, this creates a smooth pulsing effect where the red value smoothly cycles from dim to bright and back again.
Phase Shifting
Notice that each color component uses a different offset:
- Red:
sin(time) - Green:
sin(time + 2.0) - Blue:
sin(time + 4.0)
In this way, each color channel peaks at a different moment in time. When red is at maximum brightness, green and blue are at different points in their cycles. This creates continuously shifting color combinations as all three channels cycle at their own pace.
Using It in SwiftUI with TimelineView
To animate shaders, we need to continuously update the time parameter. SwiftUI's TimelineView is perfect for this:
import SwiftUI
import Metal

struct AnimatedColorShaderView: View {
    @State private var startTime = Date()

    var body: some View {
        TimelineView(.animation) { timeline in
            Rectangle()
                .colorEffect(
                    ShaderLibrary.animatedColor(
                .float(timeline.date.timeIntervalSince(startTime))
                    )
                )
                .frame(width: 300, height: 300)
        }
    }
}
Let's understand each piece:
@State private var startTime = Date()
This store when the view first appeared so it's possible to calculate the time that has passed.TimelineView(.animation)
This creates a timeline that updates every frame (typically 60 times per second). The.animationschedule means continuous updates for smooth animation.timeline.date.timeIntervalSince(startTime)
This calculates how many seconds have elapsed since the view appeared. This value continuously increases, which makes our sine waves oscillate.
The animation loop works like this: TimelineView triggers an update (60 times per second), the new elapsed time is calculated, it's passed to the shader using .float(...), the shader recalculates all colors using the new time value, SwiftUI redraws the view with the new colors and then the whole loop starts again.
The result is a color animation that cycles smoothly through the spectrum.
And that's it! By introducing custom parameters and time-based animation, we’ve taken an important step beyond static pixel coloring. Shaders are no longer just reactive to position, they can now respond to application state, user input, and continuously evolving values like time.
At this point, we have all the essential building blocks: per-pixel computation, custom data flowing from SwiftUI to the GPU, mathematical control over color and motion, frame-by-frame animation using TimelineView
These concepts form the foundation for much more advanced techniques. Effects like distortion shaders, procedural noise, ripple animations, and interactive visual feedback all rely on the exact principles we explored here.
Metal shaders require a shift in mindset, from composing views to composing mathematics, but that shift unlocks extraordinary expressive power. Once you’re comfortable passing data and animating with time, the GPU becomes less of a black box and more of a creative playground.
And from here, experimentation is everything.