
Custom video player with AVKit and SwiftUI supporting Picture-In-Picture
With this article you will learn how to create a custom video player with AVKit and SwiftUI that supports Picture-in-Picture

Recently we explored how to support Picture in Picture in SwiftUI and AVKit, creating a View that represents an AVPlayerViewController, using UIViewControllerRepresentable.
While doing that we learned that there are some limitations with this approach:
AVPlayerViewControllersubclassing is not supported;- It adopts the styling and features of the native system players and we cannot change that.
So, how do we create a custom player, use it with SwiftUI, while keeping Picture in Picture support? Let's have a look.
A little bit of context
Before getting started, let's spend some words on two of the classes we are going to use in our project.
The AVFoundation framework provides AVPlayerLayer, a CALayer subclass that can be used to display the media of a player object. Apple documentation shows an example of how to use it in a UIView subclass:
class PlayerView: UIView {

    // Override the property to make AVPlayerLayer the view's backing layer.
    override static var layerClass: AnyClass { AVPlayerLayer.self }

    // The associated player object.
    var player: AVPlayer? {
        get { playerLayer.player }
        set { playerLayer.player = newValue }
    }

    private var playerLayer: AVPlayerLayer { layer as! AVPlayerLayer }
}
Example of how to use AVPlayerLayer as the backing layer for a UIView, from the AVPlayerLayer documentation by Apple.
In AVKit we can find AVPictureInPictureController:
A controller that responds to user-initiated Picture in Picture playback of video in a floating, resizable window.
With these things in mind, we are going to create a SwiftUI video player having custom controls that shows a list of media to play as Picture in Picture is activated.
Setting up the project
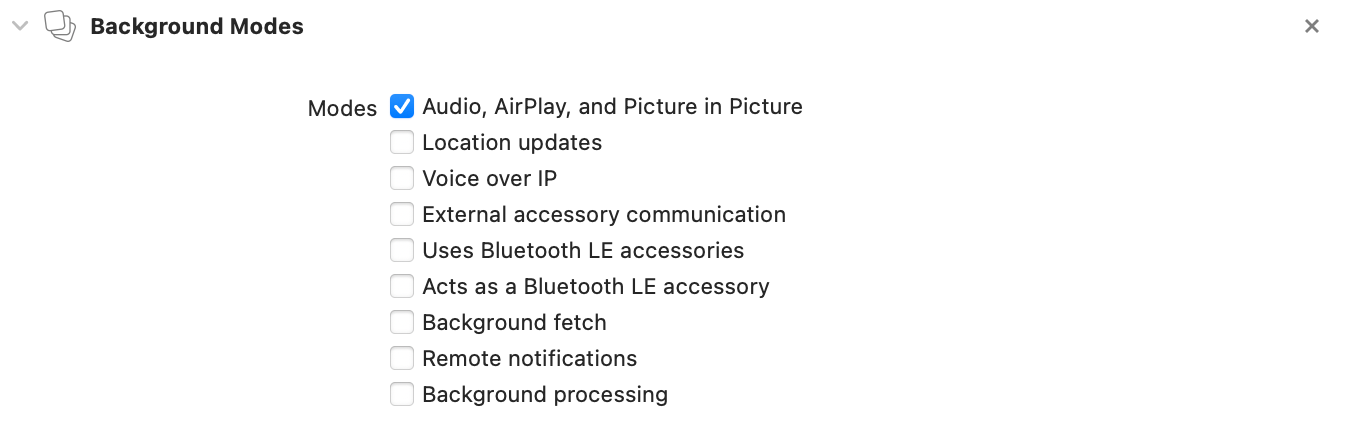
Let's create an Xcode project. We want to use PiP, so let's add the required capability:
Add capability -> Background Modes -> flag Audio, Airplay, and Picture in Picture.
We can start creating the PlayerView as shown above and its SwiftUI version:
struct CustomVideoPlayer: UIViewRepresentable {
    let player: AVPlayer

	func makeUIView(context: Context) -> PlayerView {
        let view = PlayerView()
        view.player = player
        return view
    }

    func updateUIView(_ uiView: PlayerView, context: Context) { }
}
This is not the final version of CustomVideoPlayer. Let's first introduce the SwiftUI view that provides the player controls, CustomControlsView.
CustomControlsView
It's the SwiftUI view that provides the controls for our video player. To keep things simple, it just consists of a play/pause button and a time slider.

The view observes changes on the view model so that it knows whether to show the pause or the play button and how to update the slider as the video keeps playing.
The view updates the view model's player when the user interacts with the controls: it plays/pauses the player and updates the current playback time.
struct CustomControlsView: View {
    @ObservedObject var playerVM: PlayerViewModel

    var body: some View {
        HStack {
            if playerVM.isPlaying == false {
                Button(action: {
                    playerVM.player.play()
                }, label: {
                    Image(systemName: "play.circle")
                        .imageScale(.large)
                })
            } else {
                Button(action: {
                    playerVM.player.pause()
                }, label: {
                    Image(systemName: "pause.circle")
                        .imageScale(.large)
                })
            }

            if let duration = playerVM.duration {
                Slider(value: $playerVM.currentTime, in: 0...duration, onEditingChanged: { isEditing in
                    playerVM.isEditingCurrentTime = isEditing
                })
            } else {
                Spacer()
            }
        }
        .padding()
        .background(.thinMaterial)
    }
}
Let's focus on the Slider:
if let duration = playerVM.duration {
    Slider(value: $playerVM.currentTime, in: 0...duration, onEditingChanged: { isEditing in
        playerVM.isEditingCurrentTime = isEditing
    })
} else {
    Spacer()
}
There are three interesting aspects we will explore soon:
- the slider needs the item's duration to be added to the view. How does the view model get this information?
- the slider's binding value is provided by the view model,
$playerVM.currentTime, and when this values changes playerVM will call the player's methodseek(to: CMTime)by subscribing to its own publisher$currentTime - as long as the user interacts with the slider, the view model's boolean property
isEditingCurrentTimeis set to true. Why do we need that?
ViewModel
PlayerViewModel is our view model. It provides the instance of the player and publishes useful information for views and controls.
@Published properties
@Published var currentTime: Double
It's the time of the current item, in seconds. It is updated using a periodicTimeObserver:
timeObserver = player.addPeriodicTimeObserver(forInterval: CMTime(seconds: 1, preferredTimescale: 600), queue: .main) { [weak self] time in
    guard let self = self else { return }
    if self.isEditingCurrentTime == false {
        self.currentTime = time.seconds
    }
}
You can notice that currentTime is not updated if the user is interacting with the slider (isEditingCurrentTime == false); this happens so that the slider's thumb does not behave inconsistently due to a conflict between the user's interaction and the new value set by the observer.
@Published var isPlaying: Bool
It indicates if the player's status is playing or paused. Here's how the view model updates its value:
player.publisher(for: \.timeControlStatus)
    .sink { [weak self] status in
        switch status {
        case .playing:
            self?.isPlaying = true
        case .paused:
            self?.isPlaying = false
        case .waitingToPlayAtSpecifiedRate:
            break
        @unknown default:
            break
        }
    }
    .store(in: &subscriptions)
@Published var isEditingChangeTime: Bool
We have already seen why we need this value. It's true while the user interacts with the time slider. When the interaction ends, the view model updates the item's current time accordingly:
$isEditingCurrentTime
    .dropFirst()
    .filter({ $0 == false })
    .sink(receiveValue: { [weak self] _ in
        guard let self = self else { return }
        self.player.seek(to: CMTime(seconds: self.currentTime, preferredTimescale: 1), toleranceBefore: .zero, toleranceAfter: .zero)
        if self.player.rate != 0 {
            self.player.play()
        }
    })
    .store(in: &subscriptions)
After updating the time of the playback, if the player was playing (player.rate != 0), we want it to keep playing (player.play()).
@Published var isInPipMode: Bool
It's true when Picture in Picture is active. Soon we will update CustomVideoPlayer using Coordinator and AVPictureInPictureControllerDelegate and we will understand how this boolean is updated.
Here's the view model full implementation:
import Combine

final class PlayerViewModel: ObservableObject {
    let player = AVPlayer()
    @Published var isInPipMode: Bool = false
    @Published var isPlaying = false

    @Published var isEditingCurrentTime = false
    @Published var currentTime: Double = .zero
    @Published var duration: Double?

    private var subscriptions: Set<AnyCancellable> = []
    private var timeObserver: Any?

    deinit {
        if let timeObserver = timeObserver {
            player.removeTimeObserver(timeObserver)
        }
    }

    init() {
        $isEditingCurrentTime
            .dropFirst()
            .filter({ $0 == false })
            .sink(receiveValue: { [weak self] _ in
                guard let self = self else { return }
                self.player.seek(to: CMTime(seconds: self.currentTime, preferredTimescale: 1), toleranceBefore: .zero, toleranceAfter: .zero)
                if self.player.rate != 0 {
                    self.player.play()
                }
            })
            .store(in: &subscriptions)

        player.publisher(for: \.timeControlStatus)
            .sink { [weak self] status in
                switch status {
                case .playing:
                    self?.isPlaying = true
                case .paused:
                    self?.isPlaying = false
                case .waitingToPlayAtSpecifiedRate:
                    break
                @unknown default:
                    break
                }
            }
            .store(in: &subscriptions)

        timeObserver = player.addPeriodicTimeObserver(forInterval: CMTime(seconds: 1, preferredTimescale: 600), queue: .main) { [weak self] time in
            guard let self = self else { return }
            if self.isEditingCurrentTime == false {
                self.currentTime = time.seconds
            }
        }
    }

    func setCurrentItem(_ item: AVPlayerItem) {
        currentTime = .zero
        duration = nil
        player.replaceCurrentItem(with: item)

        item.publisher(for: \.status)
            .filter({ $0 == .readyToPlay })
            .sink(receiveValue: { [weak self] _ in
                self?.duration = item.asset.duration.seconds
            })
            .store(in: &subscriptions)
    }
}
When updating the current item with setCurrentItem(_:) the view model resets the status of its property by setting currentTime to .zero and duration to nil.
It also subscribes to the new item status' publisher so that it can set the duration once the item is readyToPlay (and not before, because it might not have a value yet). When duration != nil the time slider is added to the controls.
CustomVideoPlayer
As seen before, we need to update the view that represents the UIView subclass, PlayerView, in order to support PiP and set the view model's isInPipMode to true as Picture in Picture starts.
The view needs a Coordinator that conforms to AVPictureInPictureControllerDelegate:
class Coordinator: NSObject, AVPictureInPictureControllerDelegate {
    private let parent: CustomVideoPlayer
    private var controller: AVPictureInPictureController?
    private var cancellable: AnyCancellable?

    init(_ parent: CustomVideoPlayer) {
        self.parent = parent
        super.init()

        cancellable = parent.playerVM.$isInPipMode
            .sink { [weak self] in
                guard let self = self,
                      let controller = self.controller else { return }
                if $0 {
                    if controller.isPictureInPictureActive == false {
                        controller.startPictureInPicture()
                    }
                } else if controller.isPictureInPictureActive {
                    controller.stopPictureInPicture()
                }
            }
    }

    func setController(_ playerLayer: AVPlayerLayer) {
        controller = AVPictureInPictureController(playerLayer: playerLayer)
        controller?.canStartPictureInPictureAutomaticallyFromInline = true
        controller?.delegate = self
    }

    func pictureInPictureControllerDidStartPictureInPicture(_ pictureInPictureController: AVPictureInPictureController) {
        parent.playerVM.isInPipMode = true
    }

    func pictureInPictureControllerWillStopPictureInPicture(_ pictureInPictureController: AVPictureInPictureController) {
        parent.playerVM.isInPipMode = false
    }
}
We can simply start or stop PiP from any view that observes the view model changes, by updating its isInPipMode property. The Coordinator subscribes to the view model's publisher $isInPipMode so that it can call the AVPictureInPictureController methods startPictureInPicture(), if the published value is true, and stopPictureInPicture(), if it is false.
You can see setController(_ playerLayer: AVPlayerLayer) initializes the controller and assigns its delegate to the Coordinator, but when is this method called?
The controller needs the AVPlayerLayer to be initialized: controller = AVPictureInPictureController(playerLayer: playerLayer) but the Coordinator is initialized before the view's makeUIView method is called, which means we cannot access the PlayerView's playerLayer yet. The solution is to call setController(_ playerLayer: AVPlayerLayer) in makeUIView and then assign its delegate to the coordinator:
func makeUIView(context: Context) -> PlayerView {
    let view = PlayerView()
    view.player = playerVM.player
    context.coordinator.setController(view.playerLayer)
    return view
}
Putting all together:
struct CustomVideoPlayer: UIViewRepresentable {
    @ObservedObject var playerVM: PlayerViewModel

    func makeUIView(context: Context) -> PlayerView {
        let view = PlayerView()
        view.player = playerVM.player
        context.coordinator.setController(view.playerLayer)
        return view
    }

    func updateUIView(_ uiView: PlayerView, context: Context) { }

    func makeCoordinator() -> Coordinator {
        return Coordinator(self)
    }

     class Coordinator: NSObject, AVPictureInPictureControllerDelegate {
        private let parent: CustomVideoPlayer
        private var controller: AVPictureInPictureController?
        private var cancellable: AnyCancellable?

        init(_ parent: CustomVideoPlayer) {
            self.parent = parent
            super.init()

            cancellable = parent.playerVM.$isInPipMode
                .sink { [weak self] in
                    guard let self = self,
                          let controller = self.controller else { return }
                    if $0 {
                        if controller.isPictureInPictureActive == false {
                            controller.startPictureInPicture()
                        }
                    } else if controller.isPictureInPictureActive {
                        controller.stopPictureInPicture()
                    }
                }
        }

        func setController(_ playerLayer: AVPlayerLayer) {
            controller = AVPictureInPictureController(playerLayer: playerLayer)
            controller?.canStartPictureInPictureAutomaticallyFromInline = true
            controller?.delegate = self
        }

        func pictureInPictureControllerDidStartPictureInPicture(_ pictureInPictureController: AVPictureInPictureController) {
            parent.playerVM.isInPipMode = true
        }

        func pictureInPictureControllerWillStopPictureInPicture(_ pictureInPictureController: AVPictureInPictureController) {
            parent.playerVM.isInPipMode = false
        }
    }
}
Using CustomVideoPlayer and CustomControlsView
Let's create a view, CustomPlayerWithControls, that embeds the custom video player and, when PiP is active, shows a list of media you can tap to replace the current item with.
We can use a simple model, like this:
struct Media: Identifiable {
    let id = UUID()
    let title: String
    let url: String

    var asPlayerItem: AVPlayerItem {
        AVPlayerItem(url: URL(string: url)!)
    }
}
title is displaying in the list row and asPlayerItem is a convenient computed property we can use to simplify the code (as long as we are 100% sure the URL string is actually a valid URL to a media resource).
So here's our CustomPlayerWithControls:
struct CustomPlayerWithControls: View {
    @StateObject private var playerVM = PlayerViewModel()
    @State private var playlist: [Media] = [
        .init(title: "First video", url: "URL_TO_FIRST.m3u8"),
        .init(title: "Second video", url: "URL_TO_SECOND.mp4"),
        .init(title: "Third video", url: "URL_TO_THIRD.mp4"),
        ...
    ]

    init() {
    	// we need this to use Picture in Picture
        let audioSession = AVAudioSession.sharedInstance()
        do {
            try audioSession.setCategory(.playback)
        } catch {
            print("Setting category to AVAudioSessionCategoryPlayback failed.")
        }
    }

    var body: some View {
        VStack {
            VStack {
                CustomVideoPlayer(playerVM: playerVM)
                    .overlay(CustomControlsView(playerVM: playerVM)
                             , alignment: .bottom)
                    .clipShape(RoundedRectangle(cornerRadius: 20, style: .continuous))
            }
            .padding()
            .overlay(playerVM.isInPipMode ? List(playlist) { media in
                Button(media.title) {
                    playerVM.setCurrentItem(media.asPlayerItem)
                }
            } : nil)

            Button(action: {
                withAnimation {
                    playerVM.isInPipMode.toggle()
                }
            }, label: {
                if playerVM.isInPipMode {
                    Label("Stop PiP", systemImage: "pip.exit")
                } else {
                    Label("Start PiP", systemImage: "pip.enter")
                }
            })
            .padding()
        }
        .padding()
        .onAppear {
            playerVM.setCurrentItem(playlist.first!.asPlayerItem)
            playerVM.player.play()
        }
        .onDisappear {
            playerVM.player.pause()
        }
    }
}
You can notice the last component in the VStack is a Button that toggles playerVM.isInPipMode so that PiP starts/ends.
Let's take a look at the overlay modifier. When PiP is active, a list of media is added:
.overlay(playerVM.isInPipMode ? List(playlist) { media in
    Button(media.title) {
        playerVM.setCurrentItem(media.asPlayerItem)
    }
} : nil)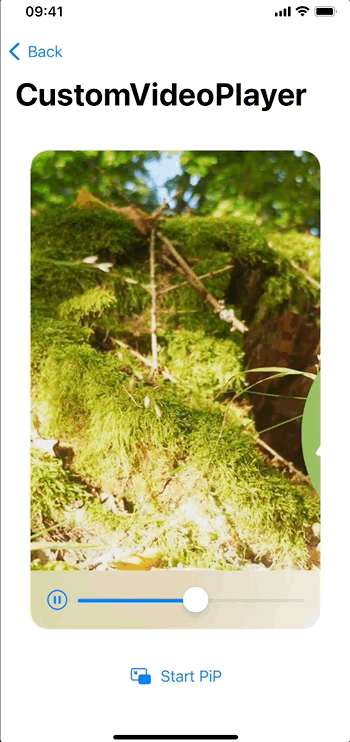
Conclusion
Let's have a recap. We have different options to implement a video player in SwiftUI.
VideoPlayer
If we want a native user interface and we do not need to support Picture in Picture, we can simply use VideoPlayer, a view provided by AVKit and SwiftUI. As of today, the view does not support PiP so if you need to support it keep reading.
AVPlayerViewController using UIViewControllerRepresentable
This is perfect when we don't need custom styling. It makes it easy to support PiP.
AVPlayerLayer and AVPictureInPictureControllerDelegate using UIViewRepresentable
It is the option described in this article. It might seem a little bit more complicated to implement, but it makes it possible to customize styling and controls.
You may find the complete project in this Github repository.
This article is part of a series of articles derived from the presentation "How to create a media streaming app with SwiftUI and AWS" presented at the NSSpain 2021 conference on November 18-19, 2021.