Designing custom AlarmKit interfaces in SwiftUI
Discover how to create and personalize user interfaces for alarms using AlarmKit with SwiftUI.

With AlarmKit, developers can easily schedule alarms within their SwiftUI applications, enabling time-based user experiences. But beyond just scheduling, AlarmKit also provides some options to customize the appearance and the content of the alarm.
In this article, we’ll explore how we can customize the appearance and behavior of alarms and what kind of contextual information they display to create a more engaging and personalized experience for your users.
Custom Alarm Buttons
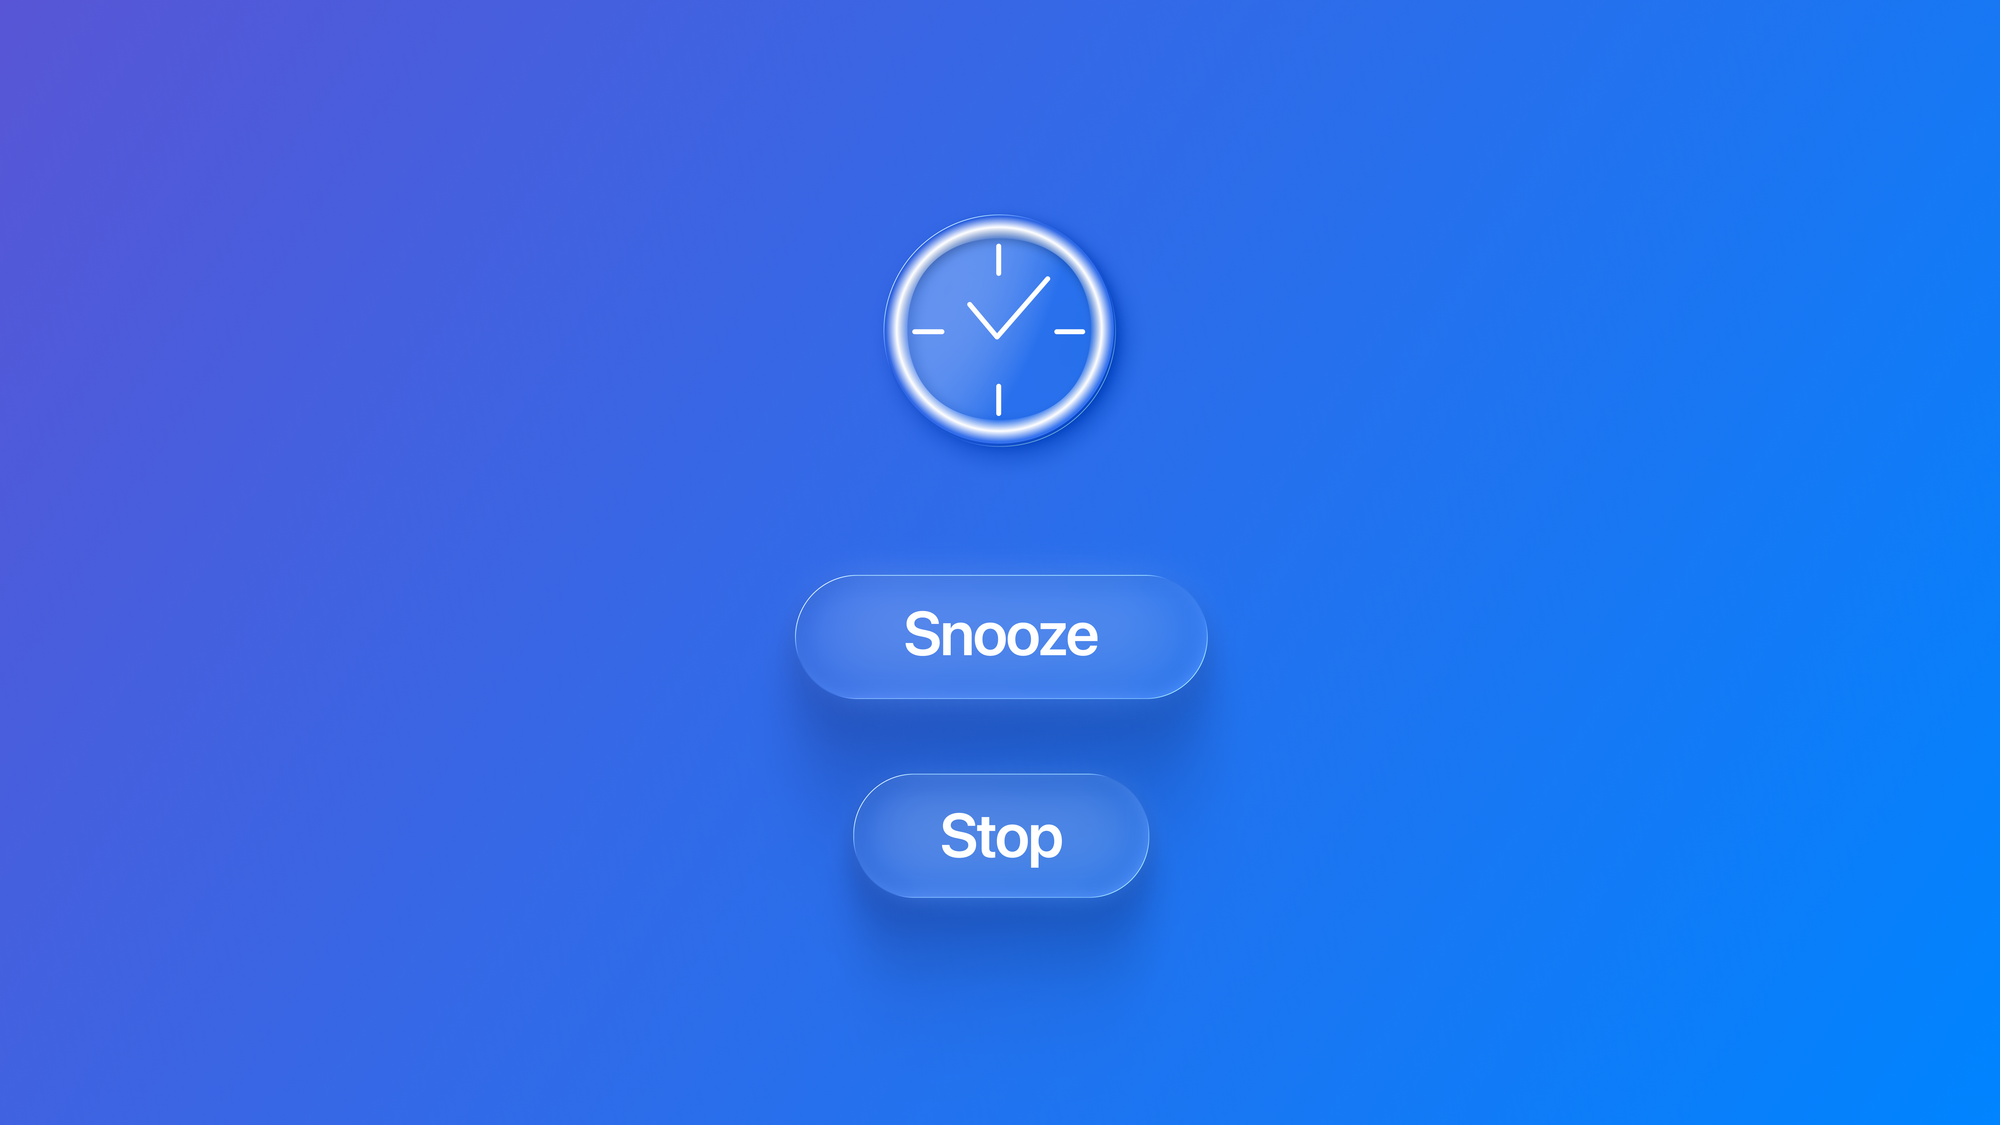
AlarmKit makes it easy to customize the actions users see when an alarm is triggered. Each alert can display up to two buttons:
- Stop Button — the main action (e.g., “Done”, “Stop”)
- Secondary Button — an optional action (e.g., “Remind Me”)
You can configure these buttons using the AlarmPresentation.Alert initializer:
let alert = AlarmPresentation.Alert(
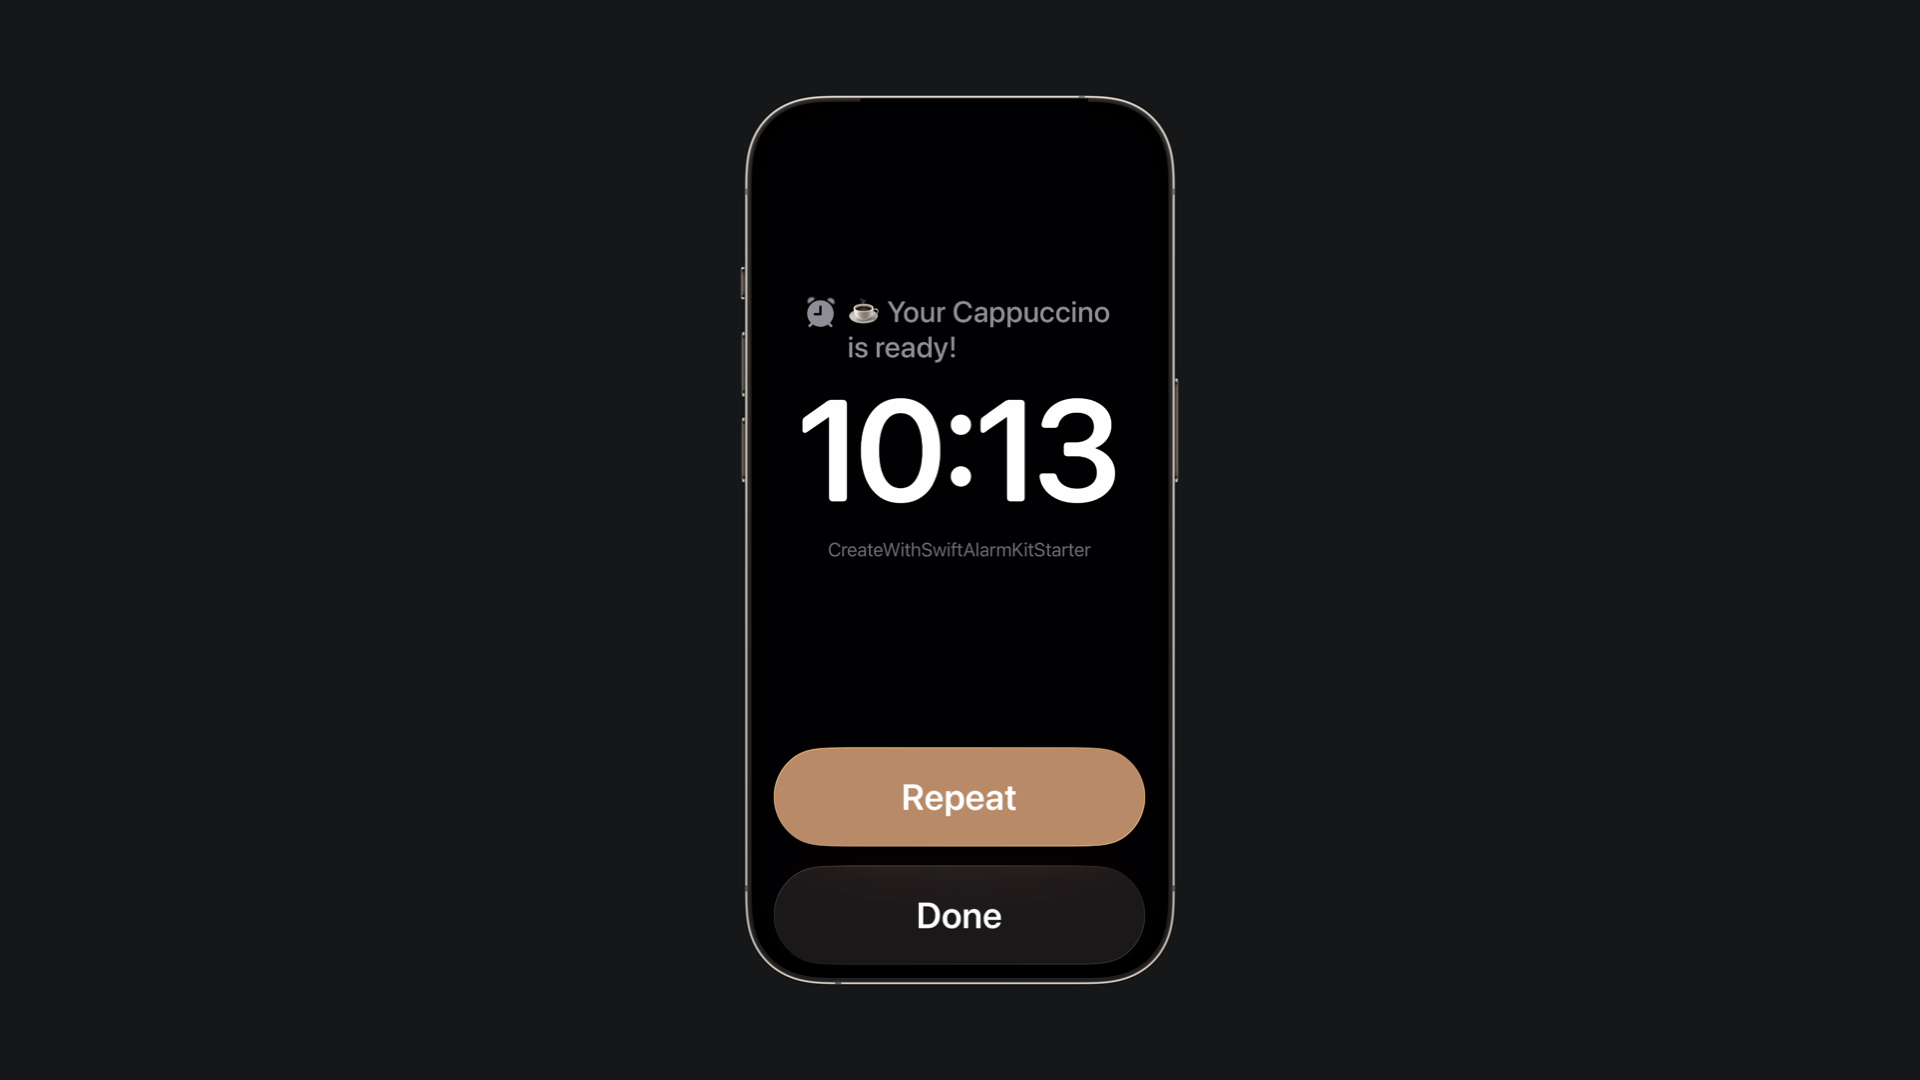
title: "☕️ Your \(selectedCoffeeType.name) is ready!",
stopButton: AlarmButton(
text: "Done",
textColor: .white,
systemImageName: "checkmark.circle.fill"
),
secondaryButton: AlarmButton(
text: "Remind Me",
textColor: .white,
systemImageName: "clock.arrow.trianglehead.2.counterclockwise.rotate.90"
)
)Both buttons support SF Symbols for icons and customizable text color, ensuring a consistent and familiar look for your users.
Secondary Button Behavior
AlarmKit extends the functionality of the secondary button with the secondaryButtonBehavior parameter. This lets you define what happens when the user taps the secondary action:
-
.countdown: makes the secondary button a repeat button for the alarm -
.custom: executes a custom action, letting you define personalized user experiences
Customizing Colors with Tint
While button text color can be set individually, AlarmKit also supports a global tint color for the alarm interface via the AlarmAttributes configuration.
The tintColor sets the accent across the alarm’s UI, making it easy to create a cohesive look and feel.
let attributes = AlarmAttributes<CoffeeMetadata>(
    presentation: AlarmPresentation(
        alert: alert,
    ),
    metadata: CoffeeMetadata(
        coffeeType: selectedCoffeeType.name,
        brewTime: minutes
    ),
    tintColor: .brown
)
Adding Custom Metadata
To provide meaningful context when an alarm triggers, AlarmKit allows you to attach metadata. Define your own struct conforming to AlarmMetadata and pass it into the alarm’s attributes.
For example, to display details about a coffee brew:
struct CoffeeMetadata: AlarmMetadata {
    var coffeeType: String
    var brewTime: Int
}
While the AlarmMetadata protocol is flexible and allows you to define custom data types for alarm-related metadata, it does have some limitations due to its inheritance from Codable, Hashable, and Sendable. For example, types like Color(from SwiftUI) do not conform to all of these protocols—specifically, Color is not Codable or Sendable, and therefore cannot be used directly in a type that conforms to AlarmMetadata.
Integration with SwiftUI
We can take advantage of all these possibilities to create time-based user experiences in our apps. The following example shows a simple application for preparing coffee using alarms:
import SwiftUI
import AlarmKit

struct ContentView: View {
    private let alarmManager = AlarmManager.shared

    @State private var selectedCoffeeType: CoffeeType = .espresso
    @State private var customMinutes: Int = 1
    @State private var useCustomTime = false

    var body: some View {
        VStack(spacing: 30) {

            VStack(spacing: 15) {
                Text("☕️ Choose Your Coffee")
                    .font(.title2)
                    .fontWeight(.semibold)

                Picker("Coffee Type", selection: $selectedCoffeeType) {
                    ForEach(CoffeeType.allCases, id: \.self) { coffee in
                        Text("\(coffee.icon) \(coffee.name)")
                            .tag(coffee)
                    }
                }
                .pickerStyle(.menu)
                .padding()
                .background(Color.brown.opacity(0.1))
                .cornerRadius(10)
            }

            VStack(spacing: 15) {
                Toggle("Custom Time", isOn: $useCustomTime)
                    .font(.headline)

                if useCustomTime {
                    HStack {
                        Text("Minutes:")
                        Stepper("\(customMinutes)", value: $customMinutes, in: 1...30)
                            .font(.title3)
                            .fontWeight(.medium)
                    }
                } else {
                    Text("Default: \(selectedCoffeeType.defaultMinutes) minutes")
                        .font(.subheadline)
                        .foregroundColor(.secondary)
                }
            }
            .padding()
            .background(Color.gray.opacity(0.1))
            .cornerRadius(10)


            Button(action: {
                Task {
                    await scheduleCoffeeTimer()
                }
            }) {
                HStack {
                    Image(systemName: "timer")
                    Text("Start Coffee Timer")
                        .fontWeight(.semibold)
                }
                .frame(maxWidth: .infinity)
                .padding()
                .background(Color.brown)
                .foregroundColor(.white)
                .cornerRadius(12)
                .font(.title3)
            }
        }
        .padding()
        .task {
            guard await requestPermission() else { return }
        }
    }

    private func requestPermission() async -> Bool {
        switch alarmManager.authorizationState {
        case .notDetermined:
            do {
                return try await alarmManager.requestAuthorization() == .authorized
            } catch {
                return false
            }
        case .authorized:
            return true
        case .denied:
            return false

        @unknown default:
            return false
        }
    }

    private func scheduleCoffeeTimer() async {
        let minutes = useCustomTime ? customMinutes : selectedCoffeeType.defaultMinutes
        let duration = TimeInterval(minutes * 60)

        let alert = AlarmPresentation.Alert(
            title: "\(selectedCoffeeType.icon) Your \(selectedCoffeeType.name) is ready!",
            stopButton: AlarmButton(
                text: "Done",
                textColor: .white,
                systemImageName: "checkmark.circle.fill"
            ),
            secondaryButton: AlarmButton(text: "Repeat", textColor: .white, systemImageName: "swift"),
            secondaryButtonBehavior: .countdown

        )

        let attributes = AlarmAttributes<CoffeeMetadata>(
            presentation: AlarmPresentation(
                alert: alert,
            ),
            metadata: CoffeeMetadata(
                coffeeType: selectedCoffeeType.name,
                brewTime: minutes
            ),
            tintColor: .brown
        )

        do {
            let timerAlarm = try await alarmManager.schedule(
                id: UUID(),
                configuration: .timer(
                    duration: duration,
                    attributes: attributes
                )
            )
            print("Coffee timer scheduled for \(minutes) minutes")
        } catch {
            print("Scheduling error: \(error)")
        }
    }
}

enum CoffeeType: String, CaseIterable {
    case espresso = "espresso"
    case americano = "americano"
    case latte = "latte"
    case cappuccino = "cappuccino"
    case pourOver = "pour_over"

    var name: String {
        switch self {
        case .espresso: return "Espresso"
        case .americano: return "Americano"
        case .latte: return "Latte"
        case .cappuccino: return "Cappuccino"
        case .pourOver: return "Pour Over"
        }
    }

    var icon: String {
        switch self {
        case .espresso: return "☕️"
        case .americano: return "☕️"
        case .latte: return "🥛"
        case .cappuccino: return "☕️"
        case .pourOver: return "☕️"
        }
    }

    var defaultMinutes: Int {
        switch self {
        case .espresso: return 1
        case .americano: return 4
        case .latte: return 3
        case .cappuccino: return 2
        case .pourOver: return 3
        }
    }
}

nonisolated
struct CoffeeMetadata: AlarmMetadata {
    var coffeeType: String
    var brewTime: Int
}
By customizing buttons, applying tint colors, and attaching metadata, you can create alarm experiences that are more connected and coherent with your app.