Implementing Live Activities in a SwiftUI app
Learn how to implement Live Activities in a SwiftUI app to show real-time data from your app

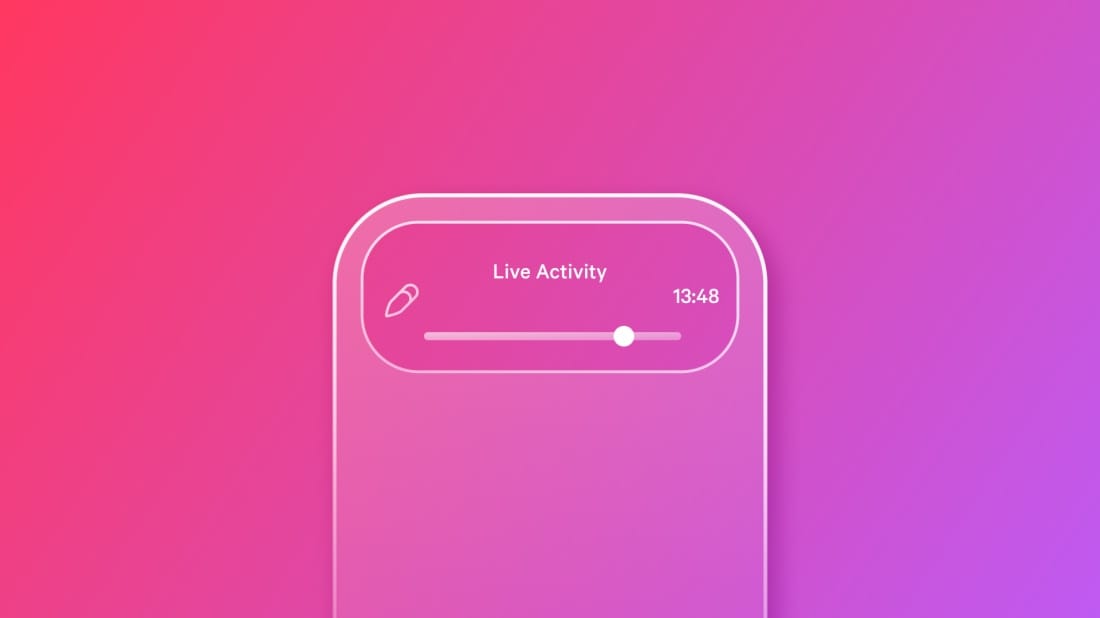
With the introduction of Live Activities, developers can now provide real-time updates directly on the Lock Screen and in the Dynamic Island. This feature is perfect for scenarios such as tracking a sports match or monitoring a delivery. To implement Live Activities, developers need to adopt the ActivityKit framework.
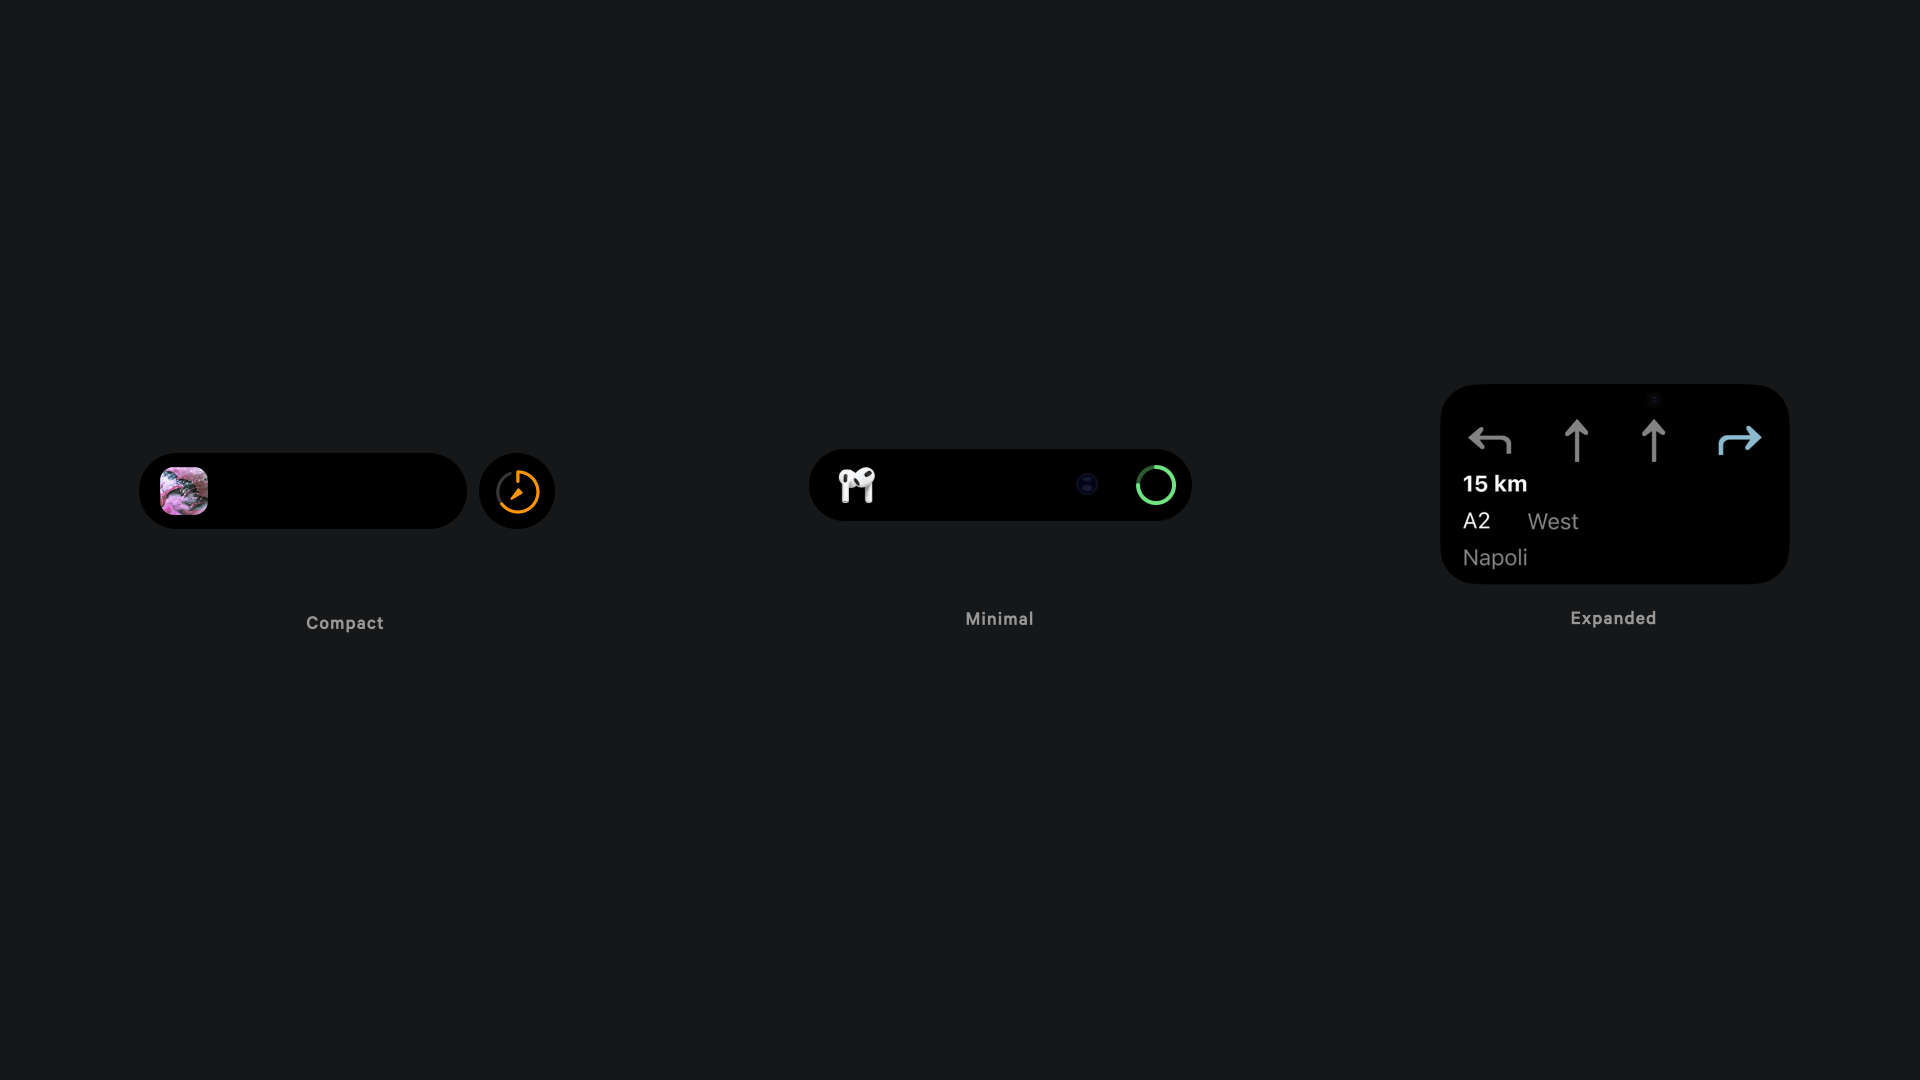
Live Activities can appear in various configurations within the Dynamic Island, each with its own set of design rules that developers must adhere to that you can find in the HIG. Here are all the possible configuration:
In this tutorial, we’ll build a simple SwiftUI app that simulates a 3D printing process. The app will start a Live Activity to display each stage of the print job and show how much time remains until the process is complete.
Before we start
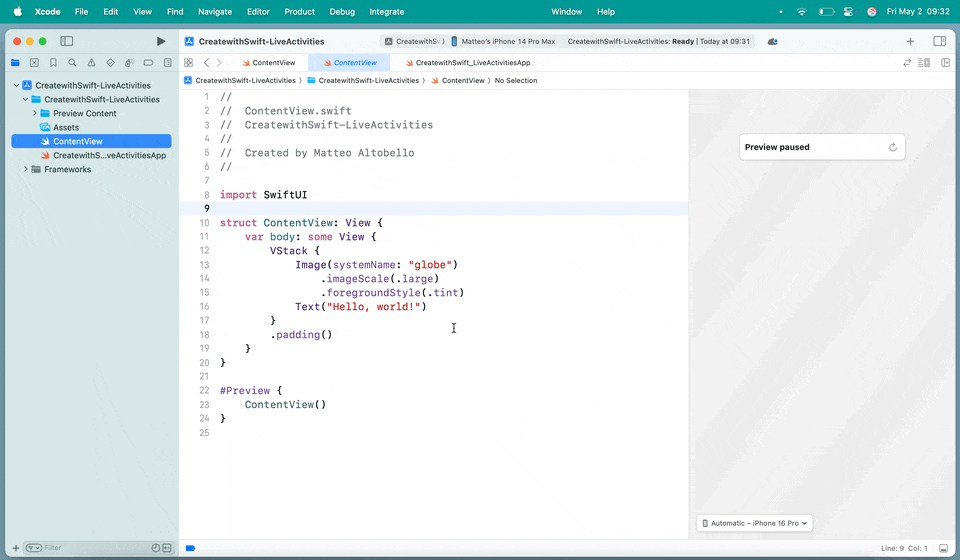
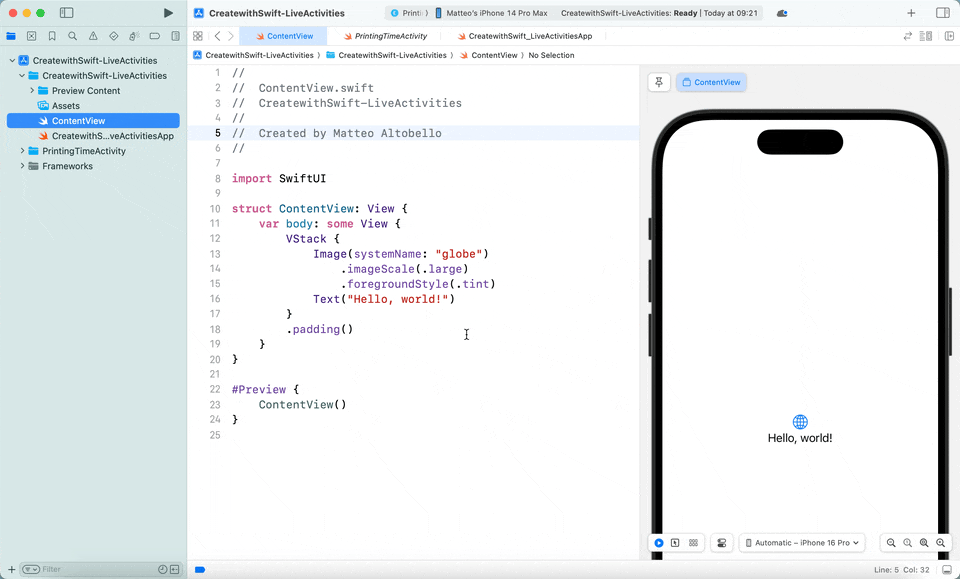
To follow this tutorial, you need a basic understanding of SwiftUI and be comfortable writing code using the Swift programming language. We will start from an empty project in SwiftUI for iOS with a Widget target. To do that from your new project go on File → New → Target and search for Widget Extension:
To be able to use Live Activities you need also to add a new field in the Info tab of the app settings named “Supports Live Activities” and select YES.
Step 1 - Create a shared folder
For this project we will need to share a specific structure among the main App target and the Widget target. One useful way of doing that is creating a new group. Right click on your project and select on “New Group”. In this folder create a new swift file named PrintingAttributes.swift and add both the app and the widget target to the target membership.
Step 2 - Define the content of the Live Activity
As first step we need to create a structure that will represent the different status that the information that we want to display will have. This structure will conform to the ActivityAttributes protocol that is used to describe the content that will appear in the live activity.
// 1.
import ActivityKit
import Foundation

// 2.
struct PrintingAttributes: ActivityAttributes {

    // 3.
    public struct ContentState: Codable, Hashable {
        var progress: Double
        var elapsedTime: TimeInterval
        var statusMessage: String
    }

    // 4.
    var printName: String
    var estimatedDuration: TimeInterval
}- Import the Foundation and ActivityKit framework
- Create a new struct named PrintingAttributes that conforms to the ActivityAttributes protocol
- Define a new struct named ContentState that will represent the information of the live activity as real-time activity progress:
progress(percent),elapsedTime(time spent), andstatusMessage(current status). - Define the
printNameandestimatedDurationproperties
Step 3 - Define the Live Activity logic
Now that we defined the structure of Live activity we need to create a class that will manage the start, the update and the end phase of the live activity. In the App folder create a new swift file named PrintingActivityViewModel.swift
// 1.
import Foundation
import ActivityKit

// 2.
@Observable
class PrintingActivityViewModel {
    // 3.
    var printName = "Benchy Boat"
    let printDuration: TimeInterval = 60
    var progress: Double = 0
    var printActivity: Activity<PrintingAttributes>? = nil
    var elapsedTime: TimeInterval = 0


    // 4.
    func startLiveActivity() {
        let attributes = PrintingAttributes(
            printName: printName,
            estimatedDuration: printDuration
        )

        let initialState = PrintingAttributes.ContentState(
            progress: 0.0,
            elapsedTime: 0,
            statusMessage: "Starting print..."
        )

        do {
            printActivity = try Activity.request(attributes: attributes, content: ActivityContent(state: initialState, staleDate: nil))
        } catch {
            print("Error starting live activity: \(error)")
        }
    }

    // 5.
    func updateLiveActivity() {
        let statusMessage: String

        if progress < 0.3 {
            statusMessage = "Heating bed and extruder..."
        } else if progress < 0.6 {
            statusMessage = "Printing base layers..."
        } else if progress < 0.9 {
            statusMessage = "Printing details..."
        } else {
            statusMessage = "Finishing print..."
        }

        let updatedState = PrintingAttributes.ContentState(
            progress: progress,
            elapsedTime: elapsedTime,
            statusMessage: statusMessage
        )

        Task {
            await printActivity?.update(using: updatedState)
        }
    }


    // 6.
    func endLiveActivity(success: Bool = false) {
        let finalMessage = success ? "Print completed successfully!" : "Print canceled"

        let finalState = PrintingAttributes.ContentState(
            progress: success ? 1.0 : progress,
            elapsedTime: elapsedTime,
            statusMessage: finalMessage
        )

        Task {
            //await printActivity?.end(using: finalState, dismissalPolicy: .default)
            await printActivity?.end(ActivityContent(state: finalState, staleDate: nil), dismissalPolicy: .default)
        }
    }
}
- Import the Foundation and ActivityKit framework
- Define the
PrintingActivityViewModelclass using the the@Observablemacro, to allow the class to automatically notify the view when properties change. - Define the properties of the
PrintingActivityViewModel. The properties includeprintName(the name of the print job),printDuration(the estimated print duration), progress (the current progress as a percentage),printActivity(the activity object itself), andelapsedTime(the time spent on the print). - Create the
startLiveActivity()function to initialize the live activity by creating an instance ofPrintingAttributes. It then sets the initial state of the activity, with zero progress, elapsed time, and a status message indicating that the print has started. The live activity is requested usingActivity.request(), and the initial state is sent to the system. - Create the
updateLiveActivity()function to update the live activity's progress as it advances. It adjusts the status message based on the current progress. The updated state is then sent to the live activity using theprintActivity?.update()method. - Create the
endLiveActivity()function to conclude the live activity once the print job is either completed or canceled. The activity is ended using theprintActivity?.end()method, and the dismissal policy is set to default, ensuring the activity is properly terminated and removed from the UI.
Step 4 - Create the UI for the app
In this step we will design a simple user interface that allows users to start and monitor the status of the live activity when the app is launched. The interface will display information such as the remaining time, the name of the model being printed, and provide controls for managing the printing process.
import SwiftUI

struct ContentView: View {

    // 1.
    @State private var isPrinting = false
    @State private var timer: Timer? = nil
    @State var viewModel = PrintingActivityViewModel()

    // 2.
    var body: some View {
        VStack(spacing: 30) {
            Image(systemName: "printer.fill.and.paper.fill")
                .font(.system(size: 80))
                .foregroundColor(isPrinting ? .blue : .gray)

            Text(isPrinting ? "Printing in progress..." : "Ready to print")
                .font(.title)
                .fontWeight(.bold)

            if isPrinting {
                VStack(spacing: 15) {
                    Text("Printing: \(viewModel.printName)")
                        .font(.headline)

                    HStack {
                        Text(String(format: "%02d:%02d", Int(viewModel.elapsedTime) / 60, Int(viewModel.elapsedTime) % 60))
                        Text("/")
                        Text(String(format: "%02d:%02d", Int(viewModel.printDuration) / 60, Int(viewModel.printDuration) % 60))
                    }


                    Gauge(value: viewModel.progress) {
                        Text("Progress")
                    } currentValueLabel: {
                        Text("\(Int(viewModel.progress * 100))%")
                    }
                    .gaugeStyle(.accessoryLinear)
                    .tint(.blue)
                }
                .padding()
                .background(RoundedRectangle(cornerRadius: 12).fill(Color(.systemBackground)))
                .shadow(radius: 3)
            }

            Button(action: isPrinting ? cancelPrint : startPrint) {
                Text(isPrinting ? "Cancel Print" : "Start Print")
                    .font(.headline)
                    .foregroundColor(.white)
                    .frame(width: 200, height: 50)
                    .background(isPrinting ? Color.red : Color.blue)
                    .cornerRadius(10)
            }
        }
        .padding()
        .onDisappear {
            timer?.invalidate()
        }
    }


    // 3.
    func startPrint() {
        isPrinting = true

        timer = Timer.scheduledTimer(withTimeInterval: 1.0, repeats: true) { _ in
            viewModel.elapsedTime += 1
            viewModel.progress = min(viewModel.elapsedTime / viewModel.printDuration, 1.0)
            viewModel.updateLiveActivity()

            // End print when complete
            if viewModel.elapsedTime >= viewModel.printDuration {
                finishPrint()
            }
        }

        // Start Live Activity
        viewModel.startLiveActivity()
    }

    func cancelPrint() {
        timer?.invalidate()
        timer = nil
        isPrinting = false

        // End Live Activity
        viewModel.endLiveActivity()
    }

    func finishPrint() {
        timer?.invalidate()
        timer = nil
        isPrinting = false

        // End Live Activity with success
        viewModel.endLiveActivity(success: true)
    }
}
- In this View we create a global timer and an instance of the
PrintingActivityViewModelto manage the state of the live printing activity. - In the
bodyof the View we use aGaugeView to graphically present the status of the printing and aButtonto start or cancel the live activity. - In the View we define three methods:
startPrint(),cancelPrint()andfinishPrint(). This three method will interact with the viewModel based on the current value of the timer.
Step 5 - Create the UI for the Live Activity
As last step we need to create the user interface also for the Live Activity, deciding how we will show the information in all the possible different configurations that the Live Activity can have. Create a new swift file named PrintingTimeActivity.
import SwiftUI
import WidgetKit
import ActivityKit

struct PrintingTimeActivity: Widget {
    var body: some WidgetConfiguration {

        // 1.
        ActivityConfiguration(for: PrintingAttributes.self) { context in

        //2.

            LiveActivityView(context: context)
        } dynamicIsland: { context in
            DynamicIsland {
                // Expanded UI
                DynamicIslandExpandedRegion(.leading) {
                    Image(systemName: "printer.fill")
                        .padding()
                }

                DynamicIslandExpandedRegion(.trailing) {
                    Text(timeString(from: context.state.elapsedTime))
                        .fixedSize(horizontal: true, vertical: true)
                        .padding()


                }

                DynamicIslandExpandedRegion(.center) {
                    VStack(){
                        Spacer()
                        Text(context.state.statusMessage)
                            .fixedSize(horizontal: true, vertical: true)
                            .bold()
                            .padding(.vertical)
                        Gauge(value: context.state.progress) {
                            Text("Progress")
                        } currentValueLabel: {
                            Text("\(Int(context.state.progress * 100))%")
                        }
                        .gaugeStyle(.accessoryLinear)
                        .padding(.vertical, 24)
                    }
                }
            } compactLeading: {
                Image(systemName: "printer.fill")

            } compactTrailing: {
                Text("\(Int(context.state.progress * 100))%")

            } minimal: {
                Image(systemName: "printer.fill")

            }
        }
    }

    private func timeString(from seconds: TimeInterval) -> String {
        let minutes = Int(seconds) / 60
        let seconds = Int(seconds) % 60
        return String(format: "%02d:%02d", minutes, seconds)
    }
}

struct LiveActivityView: View {
    let context: ActivityViewContext<PrintingAttributes>

    var body: some View {
        VStack {
            HStack {
                Image(systemName: "printer.fill")
                    .font(.title2)

                VStack(alignment: .leading) {
                    Text("3D Printing")
                        .font(.headline)
                    Text(context.attributes.printName)
                        .font(.subheadline)
                }

                Spacer()

                VStack(alignment: .trailing) {
                    Text(timeString(from: context.state.elapsedTime))
                    Text("/ \(timeString(from: context.attributes.estimatedDuration))")
                        .font(.footnote)
                        .foregroundColor(.secondary)
                }
            }

            Gauge(value: context.state.progress) {
                EmptyView()
            } currentValueLabel: {
                Text("\(Int(context.state.progress * 100))%")
            }
            .gaugeStyle(.accessoryLinear)
            .tint(.blue)

            Text(context.state.statusMessage)
                .font(.callout)
                .multilineTextAlignment(.center)
        }
        .padding()
    }

    private func timeString(from seconds: TimeInterval) -> String {
        let minutes = Int(seconds) / 60
        let seconds = Int(seconds) % 60
        return String(format: "%02d:%02d", minutes, seconds)
    }
}
- In the widget implementation we use the
ActivityConfigurationobject that describes the content of a Live Activity. - In the example above based on the different configuration we define a specific UI that will be used by the system when the Live Activity starts.
You can preview how the Live Activity will appear using the #Preview macro in this way:
#Preview(as: .dynamicIsland(.expanded), using: PrintingAttributes.init(printName: "Benchy", estimatedDuration: 20)) {
    PrintingTimeActivity()
} contentStates: {
    PrintingAttributes.ContentState(progress: 0.5, elapsedTime: 10, statusMessage: "Printing...")
}
Final Result
In this tutorial, we explored how developers can integrate Live Activities into their apps in a simple and modular way. This feature enables your app to present always up-to-date information, regardless of what the user is doing on their device, providing a flexible way to keep users informed about ongoing events, activities, or tasks over a period of time.
This is the final result of this tutorial with also the complete project available for download: