User Interaction with Notifications with async/await
By the end of this tutorial, you will be able to respond to user interactions on notifications using the UserNotifications framework.

In the previous articles, we have requested authorization to send notifications and created and scheduled local notifications with a calendar-based trigger. All of it using the new API of the UserNotifications framework using async/await. To conclude the series about local notifications let's learn how to respond when the user interacts with our notifications.
In this tutorial, we will declare notifications types, associate custom actions to them, and handle those actions in our application once our user interacts with them.
Creating Actions
An action represents a task your application performs in response to a notification delivered by the system. They are objects of the type UNNotificationAction and you must define the actions your app supports during the launch time of your application.
As a starting point, create a class called AppDelegate that inherits from NSObject and conforms to the UIApplicationDelegate protocol.
// 1. Create a new class called AppDelegate
class AppDelegate: NSObject, UIApplicationDelegate {

	// 2. Add the method defined by the UIApplicationDelegate protocol
	func application(_ application: UIApplication, didFinishLaunchingWithOptions launchOptions: [UIApplication.LaunchOptionsKey : Any]? = nil) -> Bool {

        // Your code will come here later

        return true
    }

}
Creating our AppDelegate class.
This class will house most of the methods we need to implement to allow our application to respond to the actions of a notification.
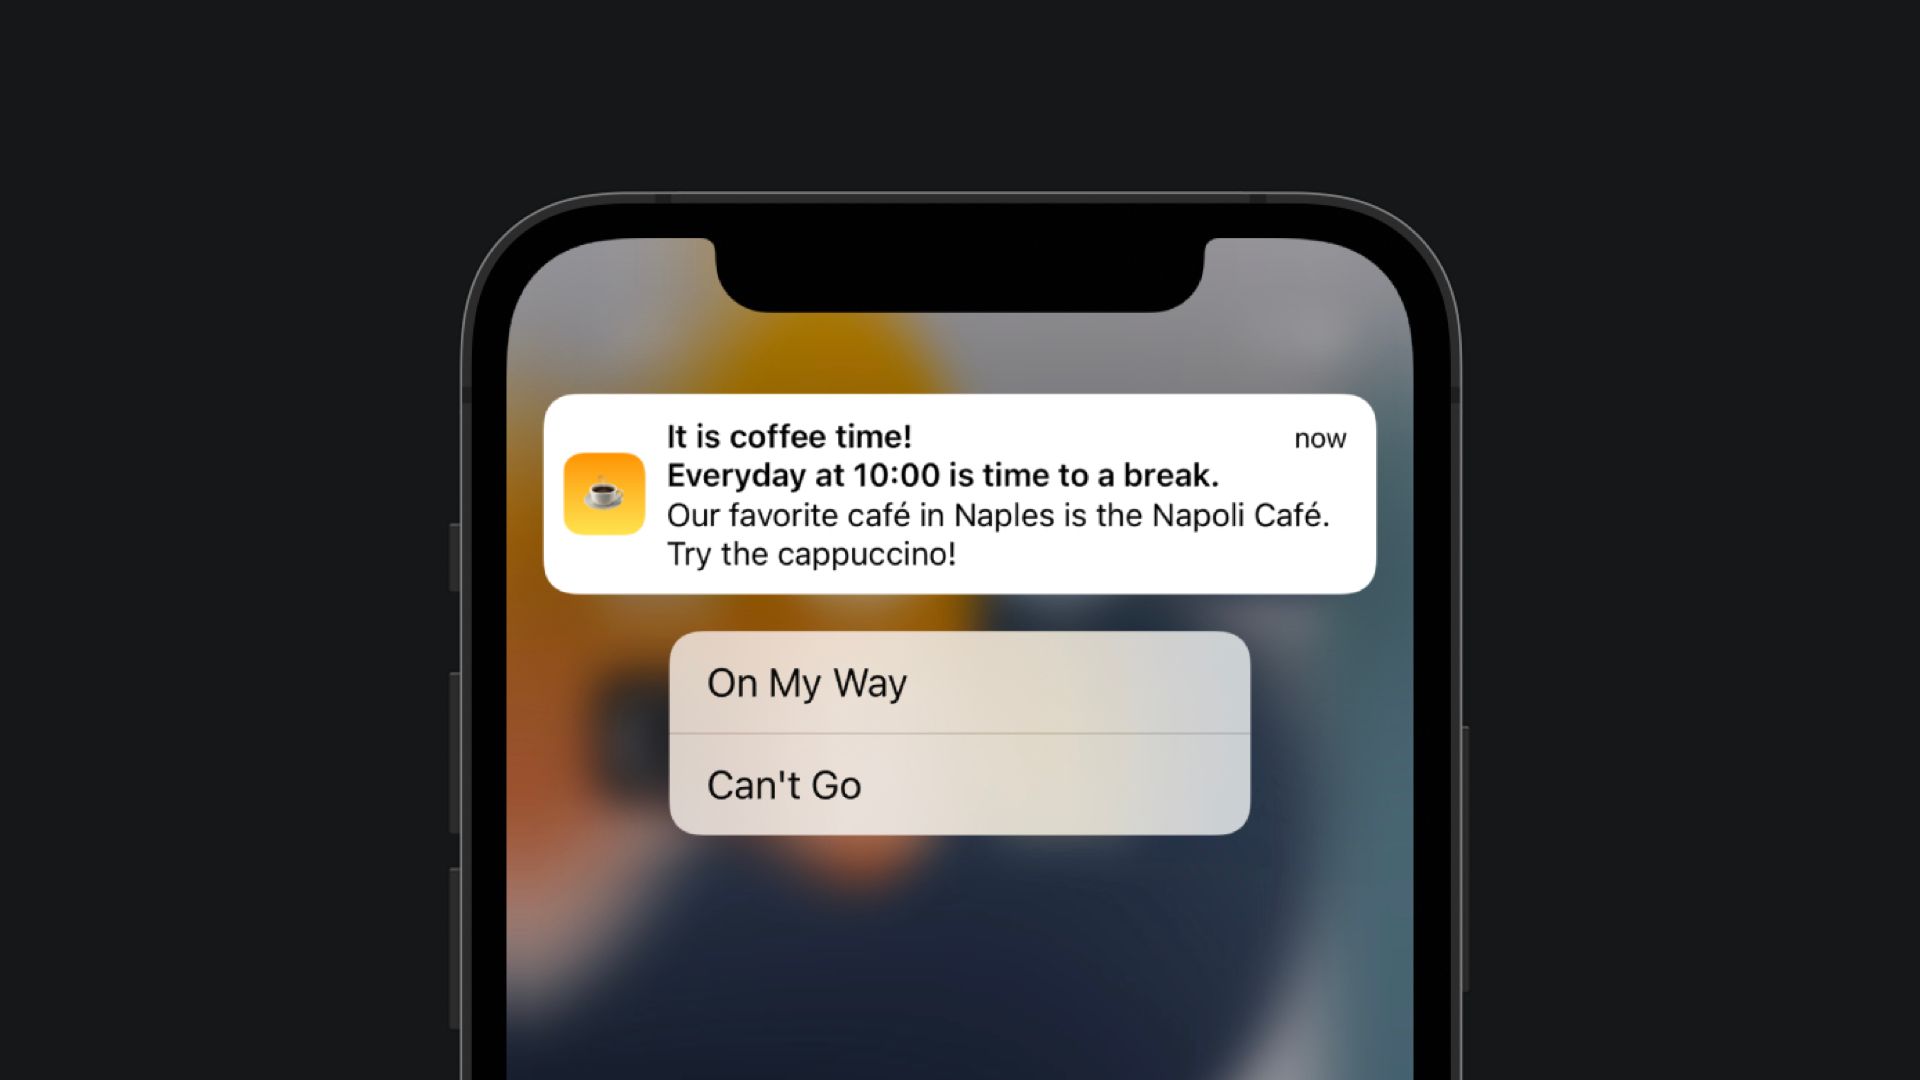
We will use the following notification content as an example. It is a simple notification that every day at 10:00 a.m. tells you it is coffee time and suggests you a coffee bar to go take a coffee.
// Content for a notification that tells you it's coffee time.
let notificationContent = UNMutableNotificationContent()
notificationContent.title = "It is coffee time!"
notificationContent.subtitle = "Everyday at 10:00 is time to a break."
notificationContent.body = "Our favorite café in Naples is the Napoli Café. Try the cappuccino!"
Content of the notification being used as an example.
We are going to create a function in which we are going to declare two custom actions for this notification. The first one will allow the user to say “I’m on my way to grab a coffee” and the second one will be “I’m not able to grab a coffee right now”.
In the AppDelegate class, create a function called setUpCoffeeNotificationCategory().
class AppDelegate: NSObject, UIApplicationDelegate {

	...

	// 3. Function to set up your notification category and actions
	func setUpCoffeeNotificationCategory() {
		// Your code will come here later
	}
}
Function to set up our notification categories.
Now inside this function let’s:
- Declare the actions that will be associated with our notification;
- Define the notification type by creating a category with an identifier;
- Register the category on the notification center.
func setUpCoffeeNotificationCategory() {
	// 4. Define the custom actions
	let onMyWayAction = UNNotificationAction(identifier: "ACCEPT_ACTION", title: "On My Way", options: UNNotificationActionOptions(rawValue: 0))
	let cantGoNowAction = UNNotificationAction(identifier: "DECLINE_ACTION", title: "Can't Go", options: UNNotificationActionOptions(rawValue: 0))

	// 5. Define the notification category
	let coffeeTimeCategory = UNNotificationCategory(
		identifier: "COFFEE_TIME",
		actions: [onMyWayAction, cantGoNowAction],
		intentIdentifiers: [],
		hiddenPreviewsBodyPlaceholder: "Unlock for coffee.",
		options: .customDismissAction
	)

	// 6. Register the notification category
	let notificationCenter = UNUserNotificationCenter.current()
	notificationCenter.setNotificationCategories([coffeeTimeCategory])
}
Defining our custom actions and associating them with a notification category.
Each action has a unique identifier and a title, which will appear to the users when they interact with the notification. To know more about the properties of a UNNotificationAction check the official Apple documentation.
Now we need to call our function in the method application(_: didFinishLaunchingWithOptions:) of the UIApplicationDelegate protocol.
class AppDelegate: NSObject, UIApplicationDelegate {

	func application(_ application: UIApplication, didFinishLaunchingWithOptions launchOptions: [UIApplication.LaunchOptionsKey : Any]? = nil) -> Bool {
       // 7. Calling our function
		self.setUpCoffeeNotificationCategory()

		return true
    }

	func setUpCoffeeNotificationCategory() { ... }
}
Setting up our notification categories when our app opens.
To define our class AppDelegate as the app delegate of our SwiftUI application, we need to set it up at the entry point of our application. Create a property called appDelegate with the property wrapper @UIApplicationDelegateAdaptor(AppDelegate.self).
@main
struct CoffeeTimeApp: App {

	// 8. Set up our class as the application delegate
    @UIApplicationDelegateAdaptor(AppDelegate.self) var appDelegate

    var body: some Scene {
        WindowGroup {
            ContentView()
        }
    }
}
Setting up our application delegate as our custom AppDelegate class.
Now when your application opens one of the first things it will do is register your notification category and actions at the notification center.
The last step of the setup is to associate the category of the notification to the notifications your application will schedule from now on. You just need to assign the same category identifier to the notification content once you create it.
let notificationContent = UNMutableNotificationContent()
notificationContent.title = "It is coffee time!"
notificationContent.subtitle = "Everyday at 10:00 is time to a break."
notificationContent.body = "Our favorite café in Naples is the Napoli Café. Try the cappuccino!"

// 9. Assign the category identifier to the notification content
notificationContent.categoryIdentifier = "COFFEE_TIME"
Now when the notification is triggered, when the user long press it the actions will appear below the notification.
Handling User-Selected Actions on Notifications
When the user selects one of the actions on the notification your application will be launched by the system in the background and call the notification center delegate method userNotificationCenter(_:didReceive:withCompletionHandler:).
Let’s create an extension of our AppDelegate class that conforms to the UNUserNotificationCenterDelegate protocol. Inside our extension implement the method userNotificationCenter(_:didReceive:) async.
// 10. Create an extension of AppDelegate that conforms to the UNUserNotificationCenterDelegate protocol
extension AppDelegate: UNUserNotificationCenterDelegate {

	// 11. Implement the method that handles notification responses
	func userNotificationCenter(_ center: UNUserNotificationCenter, didReceive response: UNNotificationResponse) async {

        let categoryIdentifier = response.notification.request.content.categoryIdentifier
        let actionIdentifier = response.actionIdentifier

        print("🟣 Notification Category: \(categoryIdentifier)")
        print("🟣 Action Identifier: \(actionIdentifier)")
    }

}
This method will be called by your application every time your user interacts with your notification actions. You can identify the type of notification and selected action through the response object and based on it, handle it properly in your application.
For our example, we are just going to print the category identifier and the action identifier of the notification in the response object.
Now we are missing only one more step before being done. We need to assign our app delegate object as the delegate of our notification center. It must be done as soon as our application opens, so in the application(_:didFinishLaunchingWithOptions:) method add the following lines of code.
class AppDelegate: NSObject, UIApplicationDelegate {

    func application(_ application: UIApplication, didFinishLaunchingWithOptions launchOptions: [UIApplication.LaunchOptionsKey : Any]? = nil) -> Bool {
        // 12. Set up the delegate object of the notification center
        let notificationCenter = UNUserNotificationCenter.current()
        notificationCenter.delegate = self

        self.setUpCoffeeNotificationCategory()

        return true
    }

    func setUpCoffeeNotificationCategory() { ... }
}
Wrapping Up
Now your application should be:
- Authorized to send notifications;
- Creating and scheduling local notifications and;
- Responding to user interactions on custom actions.
All of it using the new asynchronous versions of the methods in the User Notifications framework.
This tutorial is the third on a series of three complementary tutorials. You can find the first and second at:
- Requesting User Authorization for Notifications with async/await
- Creating and Scheduling Local Notifications with async/await
You can complement this reading with the articles available in the official Apple Documentation of the User Notifications frameworks:
- Asking Permission to Use Notifications
- Scheduling a Notification Locally from Your App
- Declaring Your Actionable Notification Types
- Handling Notifications and Notification-Related Actions
Keep in mind that the methods being referenced in these articles are not the new asynchronous versions yet and they still don’t cover App Delegate in a SwiftUI application.
And last, but not least, you can find the code of the project in this tutorial on the following Github Gist.
 262588213843476