
Using App Intents in a SwiftUI app
Learn how to add App Intents to your SwiftUI app enabling users to reach its main functionalities from anywhere on the phone.


Released with iOS 16, the AppIntents framework enables developers to extend the core functionality of an app to system services like Siri, Spotlight, Shortcut, and the new Action Button. In this way, users can use your app features almost everywhere in the system.
In this tutorial, we will guide you on how to integrate the AppIntents framework within a SwiftUI app by building a simple movie tracker. In this app, users will be able to add a new movie and mark a movie as seen, complete with a rating, by only using actions in the Shortcut app.
By the end of this tutorial, you will understand how to expose your app's logic and entities to the operative system and create useful actions that are available in the system.
Before we start
To follow this tutorial you need a basic understanding of SwiftUI and be comfortable writing code using the Swift programming language.
To start the tutorial create a new SwiftUI project for iOS with Xcode.
Step 1 - Define the Model
Let's define the model representing our movie data within the app. Create a new Swift file named Model.swift and add the following code:
import Foundation

// 1.
struct MovieItem: Identifiable {
    // 2.
    var id: UUID = UUID()
    var movieTitle: String
    var isWatched: Bool = false
    var rating: MovieRating
}

// 3.
enum MovieRating: String {
    case toWatch
    case bad
    case good
    case incredible
}
Model.swift
- Create a new struct named
MovieItemthat conforms to theIdentifiableprotocol; - Add the properties
movieTitle,isWatchedandratingas variables of the typeString,Bool, andMovieRatingrespectively; - Define an enum object
MovieRatingwith four cases:toWatch,bad,good, andincredible, representing different ratings for movies.
Step 2 - Define the logic
Now that we defined the model for our data let's define the logic to perform two key actions:
- Adding a new movie to the list
- Marking a movie as 'seen' while adding a rating
Create a new Swift file named ViewModel.swift.
import Foundation

// 1.
@Observable
class MovieViewModel {
    // 2.
    static let shared = MovieViewModel()
    // 3.
    var movies: [MovieItem] = []

    // 4.
    func addMovie(movieTitle: String) {
        let newMovie = MovieItem(movieTitle: movieTitle, rating: .toWatch)
        MovieViewModel.shared.movies.append(newMovie)
    }

    // 5.
    func addRating(movie: MovieItem, rating : MovieRating) {
        if let index = movies.firstIndex(where: { $0.id == movie.id }) {
            MovieViewModel.shared.movies[index].isWatched.toggle()
            MovieViewModel.shared.movies[index].rating = rating
        }
    }
}
ViewModel.swift
- Create a new class named
MovieViewModelwith the@Observablemacro; - Create a shared instance of the class to access its methods and properties throughout the project;
- Define an array of
MovieItemtype to store a collection of movies; - Define a method called
addMovie(movieTitle: String)that adds a new movie to the collection, taking the movie title as input; - Define a method called
addRating(movie: MovieItem, rating: MovieRating)that toggles the completion status of a movie (marking it as watched) and sets its rating.
Step 3 - Design the View
In this step, we'll design a simple SwiftUI view to display the list of all the added movies. Open the ContentView.swift file and modify it as follows:
import SwiftUI

struct ContentView: View {
    var body: some View {
        NavigationStack{
            // 1.
            List(MovieViewModel.shared.movies) { movie in
                // 2.
                HStack {
                    Image(systemName: movie.isWatched ? "checkmark.circle.fill" : "circle")

                    Text(movie.movieTitle)
                        .strikethrough(movie.isWatched)

                    if movie.isWatched {
                        Text("\\(movie.rating.rawValue)")
                    }
                    Spacer()
                }
            }
            .padding()
            .listStyle(PlainListStyle())
            .navigationTitle("Movie List")
        }
    }
}
ContentView.swift
- Use a
Listview to display the movies, passing the movie's property of the shared instance of theMovieViewModel; - Each movie item is represented by an SF symbol and a text showing its title. If the movie is watched, we strike through its title and display its rating.
With this simple design, users can visualize the list of movies and their respective ratings. Next, we'll explore how to expose the model and methods to the AppIntents framework, allowing us to perform some actions within the Shortcut app.
Step 4 - Create an App Intent to add a movie
The first action that we want to perform using the AppIntents framework is adding a movie to the list.
To do that we will prompt the user to insert a movie title that will be added to the list. After receiving the input we will perform the method in the view model responsible for adding it.
Create a new file named AddMovieIntent.swift:
// 1.
import AppIntents

// 2.
struct AddMovieIntent: AppIntent {

    // 3.
    static var title = LocalizedStringResource("Add a new movie")

    // 4.
    @Parameter(title: "Movie Title")
    var movieTitle: String

    // 5.
    func perform() async throws -> some IntentResult {
        MovieViewModel.shared.addMovie(movieTitle: movieTitle)
        return .result()
    }
}
AddMovieIntent.swift
- Import the
AppIntentsframework; - Create a new struct named
AddMovieIntentthat conforms to theAppIntentprotocol; - Set the
titleproperty to provide a descriptive title for the intent used in the Shortcut app; - Use the
@Parameterproperty wrapper to gather user input for the movie title. The response will then be stored in themovieTitleproperty; - Implement the
perform()method to execute the action of adding a movie. Within this method, we call theaddMovie(movieTitle:)function fromMovieViewModel, passing the providedmovieTitle, and returning anIntentResultobject.
Step 5 - Implementing the AppEntity protocol
The first action that we want to perform using the AppIntents framework is adding a rating to a movie using the addRating(movie:, rating:) method. This method requires two parameters of MovieItem and MovieRating type respectively.
When dealing with custom data types as parameters in AppIntents, our object needs to conform to some specific protocols.
Let's begin by extending the MovieItem struct in the Model.swift file to conform to the AppEntity protocol:
import Foundation
// 1.
import AppIntents

struct MovieItem: Identifiable { ... }

enum MovieRating: String { ... }

// 1.
extension MovieItem: AppEntity {
    // 2.
    static var typeDisplayRepresentation: TypeDisplayRepresentation = "Movie"

    // 3.
    var displayRepresentation: DisplayRepresentation {
        .init(title: LocalizedStringResource(stringLiteral: movieTitle))
    }

    // 4.
    static var defaultQuery = MovieQuery()
}

// 5.
struct MovieQuery: EntityQuery {
    // 6.
    func entities(for identifiers: [UUID]) async throws -> [MovieItem] {
        MovieViewModel.shared.movies.filter { identifiers.contains($0.id) }
    }

    // 7.
    func suggestedEntities() async throws -> [MovieItem] {
        MovieViewModel.shared.movies.filter { !$0.isWatched }
    }
}
Model.swift
- Import the
AppIntentsframework and create and extension of the MovieItem type conforming with the AppEntity protocol; - Define a
typeDisplayRepresentationproperty that will be used to describe the entity in different places; - Define a
displayRepresentationproperty to define how you want to display the entity when the shortcut is performed; - Create a
defaultQueryproperty initialized with aMovieQueryobject to handle entity queries. Within this object, we'll specify the default query to be utilized when the system requests the list of entities; - Define a struct
MovieQueryconforming to theEntityQueryprotocol to handle entity retrieval and suggestions from the collection of movies; - Implement the
entitiesmethod to filter theMovieViewModel's movies based on provided identifiers; - Implement the
suggestedEntitiesmethod returning movies that have not been marked as watched.
Step 6 - Implementing the AppEnum protocol
To use the MovieRating enum as a parameter in an AppIntent it needs to conform to the AppEnum protocol. Let's extend the MovieRating type to implement the protocol as in the following code:
import Foundation
import AppIntents

struct MovieItem: Identifiable { ... }

enum MovieRating: String { ... }

extension MovieItem: AppEntity { ... }

struct MovieQuery: EntityQuery { ... }

// 1.
extension MovieRating: AppEnum {
    // 2.
    static var typeDisplayRepresentation: TypeDisplayRepresentation = "Film Rating"

    // 3.
    static var caseDisplayRepresentations: [MovieRating: DisplayRepresentation] = [
        .toWatch: "To watch",
        .bad: "Bad",
        .good: "Good",
        .incredible: "Incredible 💫",
    ]
}
Model.swift
- Create an extension of the
MovieRatingtype conforming with theAppEnumprotocol; - Define a
typeDisplayRepresentationas we did before to describe the entity; - Define a
caseDisplayRepresentationsproperty to describe each app enum case.
By completing these steps we are now able to use our MovieItem and MovieRating objects as Parameter in an App Intent.
Step 7 - Create an Intent with a custom data type as a parameter
We are going to create an Intent to mark a movie and add a rating to it. Create a new file named MovieRatingIntent.swift and add the following code.
import AppIntents
import SwiftUI

// 1.
struct MovieRatingIntent: AppIntent {
    // 2.
    @Parameter(title: "Select a Movie")
    var movie: MovieItem
    // 3.
    @Parameter(title: "Film Rating")
    var movieRating: MovieRating

    static var title = LocalizedStringResource("Add a rating")

    // 4.
     func perform() async throws -> some IntentResult  {
         MovieViewModel.shared.addRating(movie: movie, rating: movieRating)
         return .result()
    }
}
MovieRatingIntent.swift
- Create a new struct named
MovieRatingIntent, conforming to theAppIntentprotocol; - Implement the
movieparameter enabling users to select a movie from the movie list as input; - Implement the
movieRatingparameter allowing users to select a rating for the chosen movie; - Inside the
perform()method, we execute the action of rating the movie by toggling its completion status and assigning the selected rating.
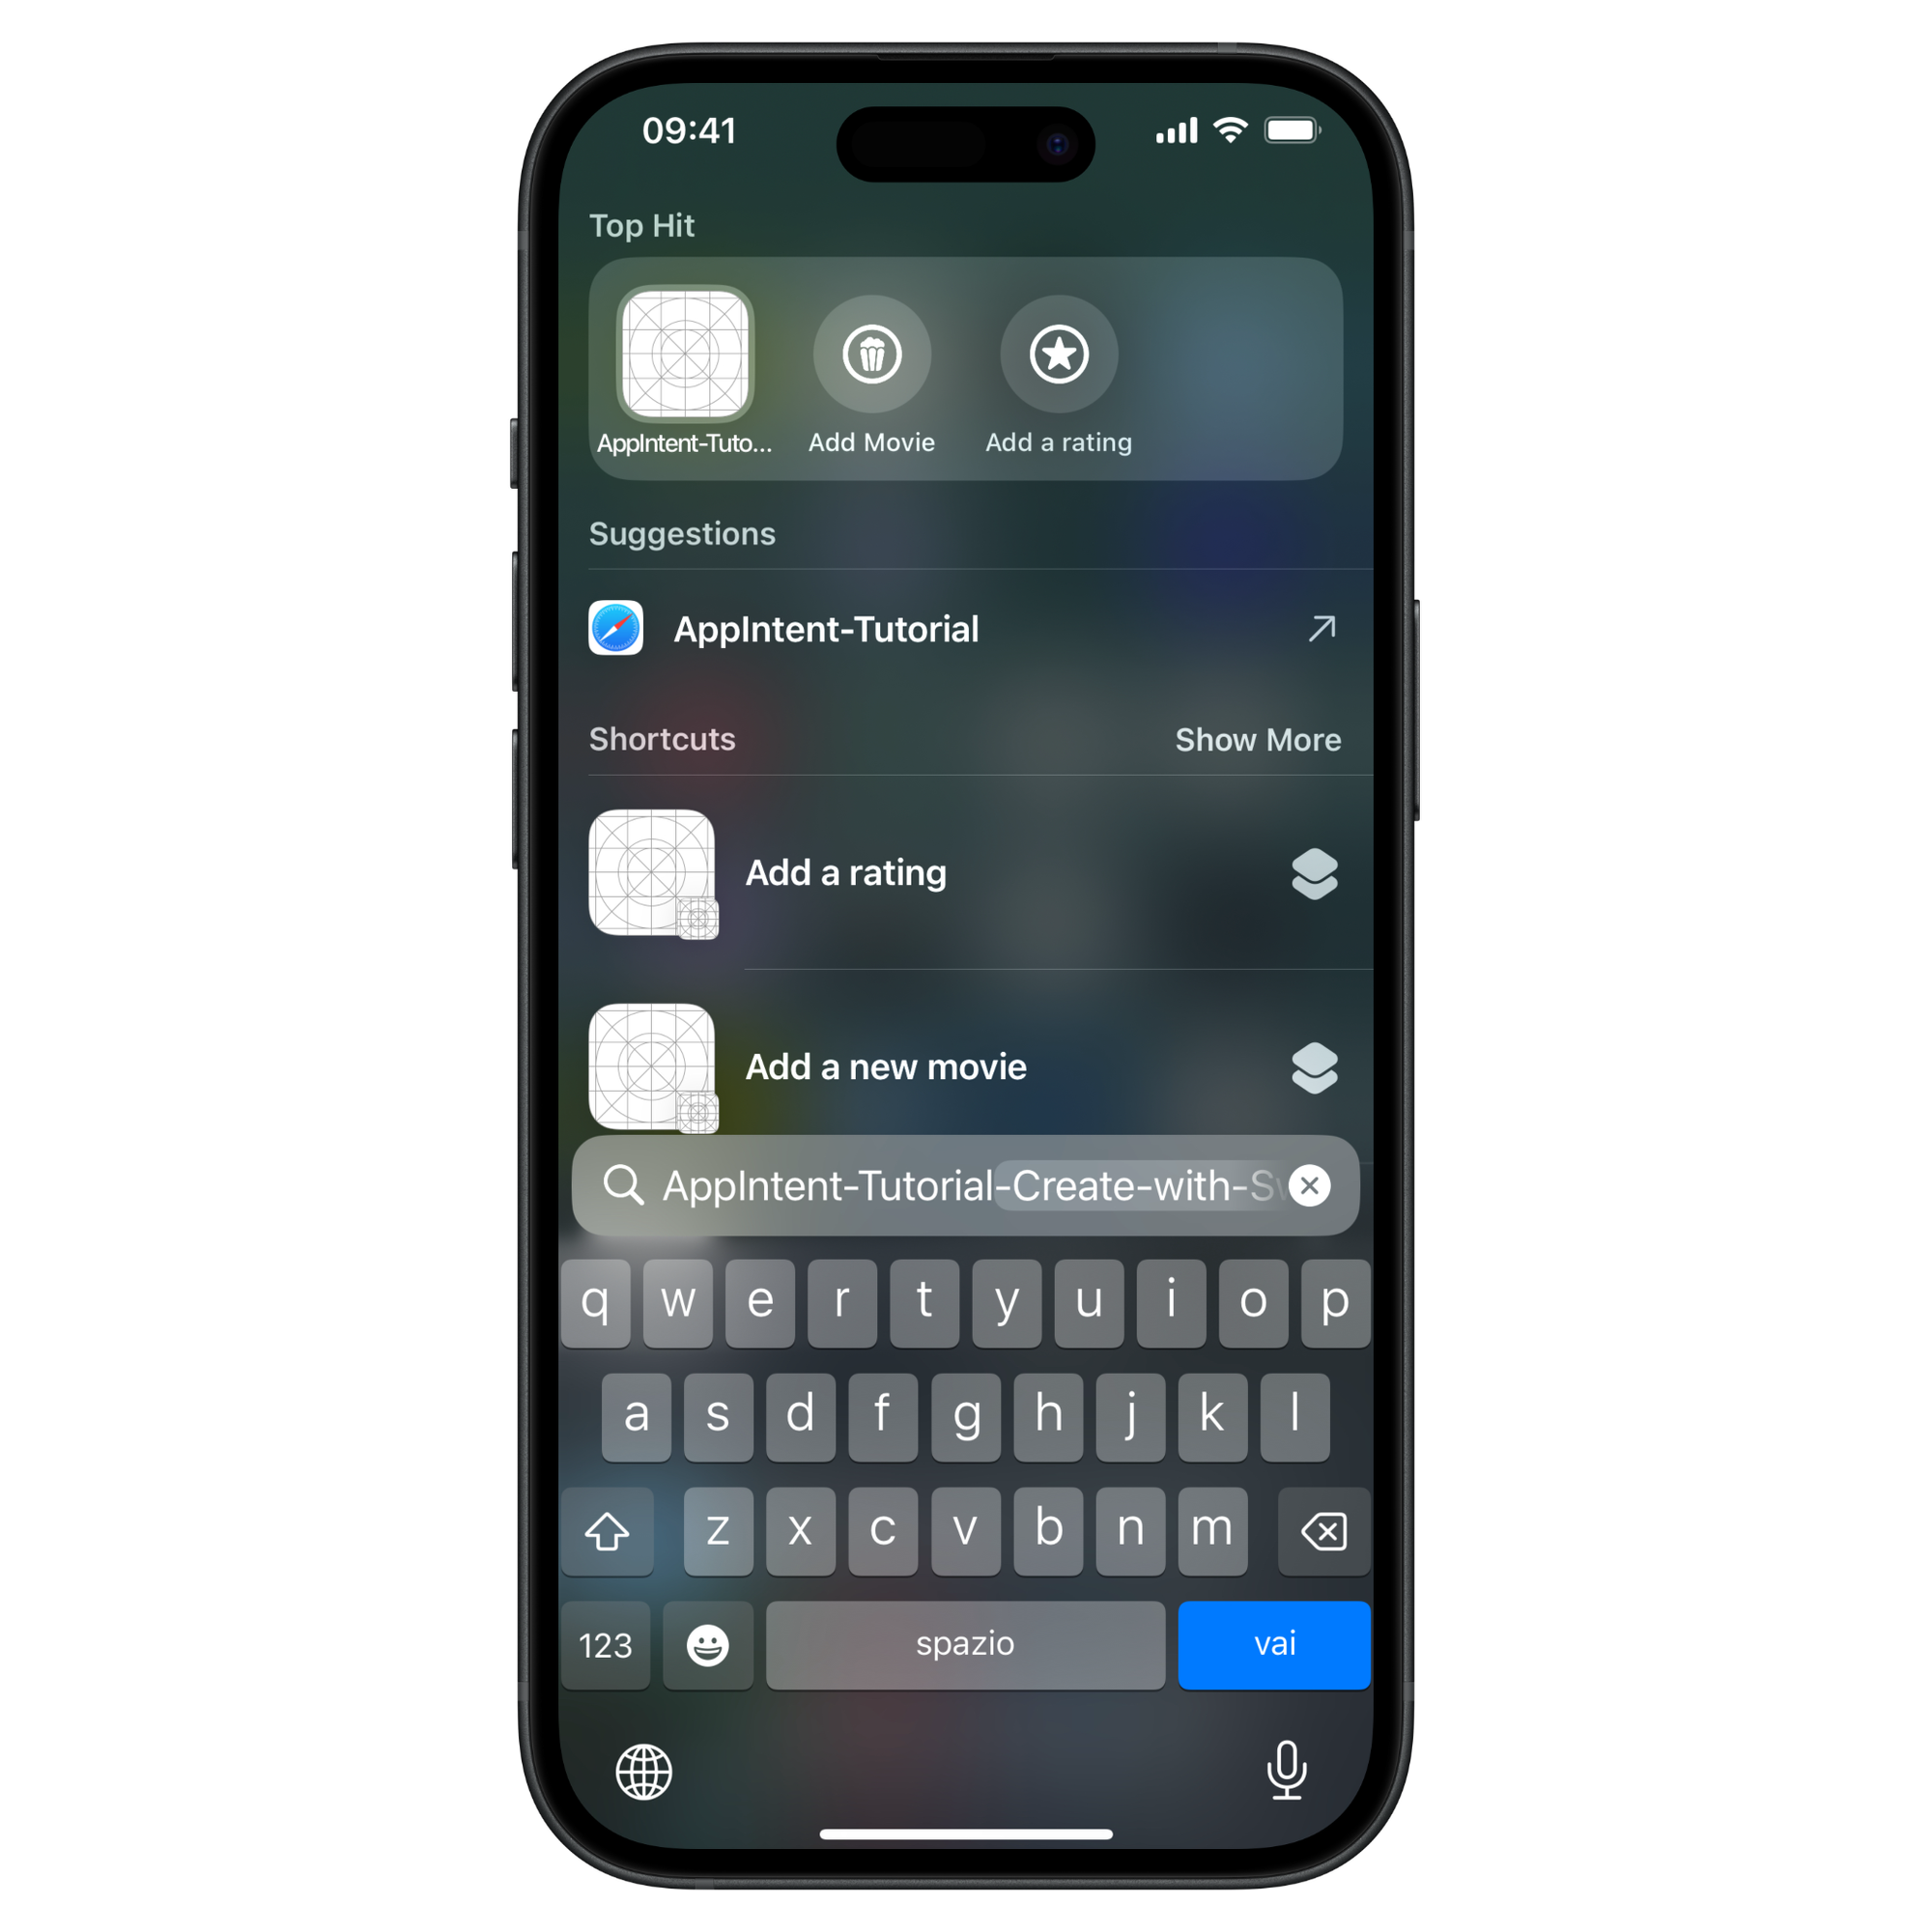
You can now find this new shortcut available in the Shortcuts app.
Step 8 - Expose the intents to Spotlight
One useful option for Intents is making them available for users in multiple places inside the system. Let's make our action available also through Spotlight.
Create a new file named MovieAppShortcutProvider.swift and use the following code:
import AppIntents

// 1.
struct MovieAppShortcutProvider: AppShortcutsProvider {
    // 2.
    @AppShortcutsBuilder
    static var appShortcuts: [AppShortcut] {
        // 3.
        AppShortcut(
            intent: AddMovieIntent(),
            phrases: [
                "Add a movie to the list"
            ],
            shortTitle: "Add Movie",
            systemImageName: "popcorn.circle"
        )

        AppShortcut(
            intent: MovieRatingIntent(),
            phrases: [
                "Add rating to movies"
            ],
            shortTitle: "Add rating",
            systemImageName: "star.circle"
        )
    }
}
MovieAppShortcutProvider.swift
- Define a new struct named
MovieAppShortcutProviderthat conforms to theAppShortcutsProviderprotocol; - Using
@AppShortcutsBuilderwe can provide multipleAppShortcutinstances for differentAppIntentobjects. - Create an
AppShortcutobject for each intent that we defined passing the intent, some specific phrases to search the action, a short title and an SF symbol name.
Now if you try to search your app in Spotlight you will see all the actions available
Conclusion
In this tutorial we saw how easy it is to extend some of the core functionalities of our app to system services, giving the users the possibility to run certain actions using Siri or Spotlight and integrate them into personalized automation using the Shortcuts app.
Supporting the AppIntents framework can help users discover your app’s main functionality.
If you are planning to support AppIntents in your app check also the Human Interface Guidelines to understand what type of action you should include in your App intents:
