Creating a HomeKit-enabled App with SwiftUI
Understand how to create a HomeKit-enabled App with SwiftUI, how to read data from smart home accessories, and control their features.

With the official launch of Apple-supported matter in October 2022, home automatisation will become more approachable with less fragmentation among vendors. It is supported by most relevant players, such as Amazon, Google, Comcast, IKEA and of course Apple, so it is time to learn more about developing HomeKit-enabled apps.
This tutorial will cover the very basics of finding accessories added to your Home within the Home app, how to identify available features and then how to read and write data to change the settings of your smart accessories. It will not cover the implementation of Matter, which will be supported from iOS 16.1 onwards. If you want to dive into the Matter Framework, explore the Apple Developer Documentation or wait for the next article in our series.
If you are new to HomeKit, this is how to get started.
Creating a new App with HomeKit Capabilities
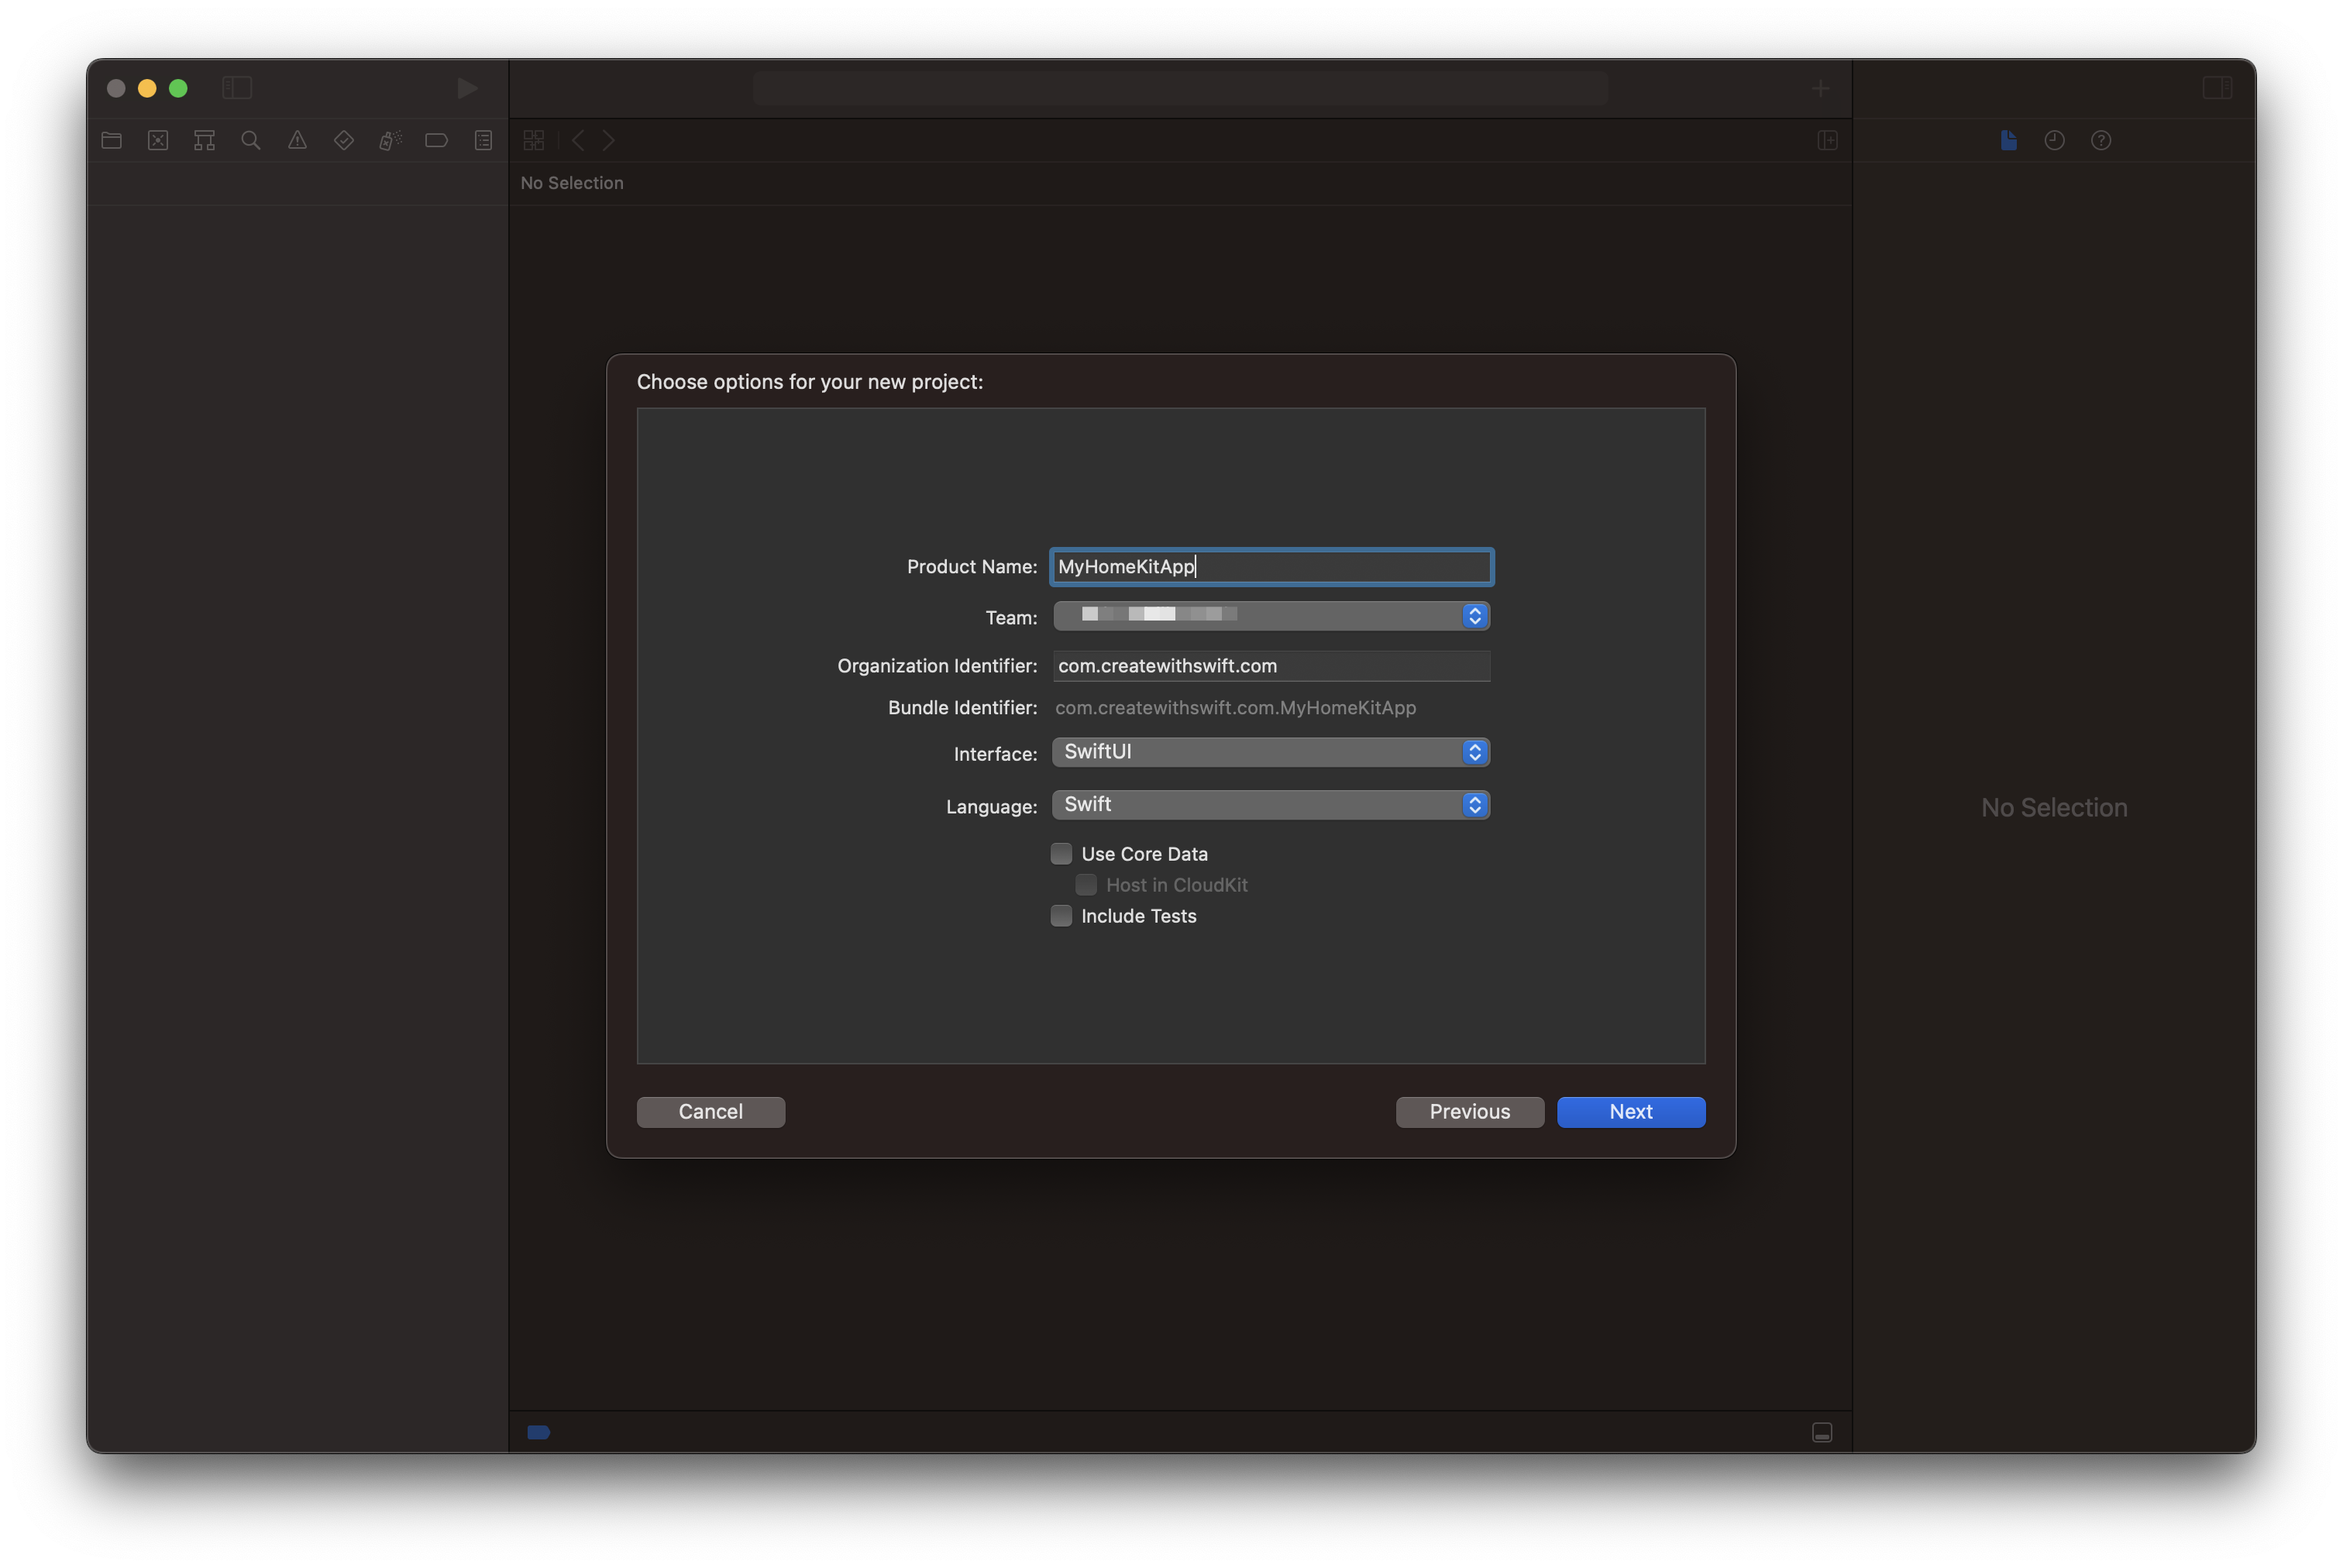
In Xcode, let's create a new app project using SwiftUI. I named my app MyHomeKitApp. The app will be quite simple and just use List Views to show what is available in HomeKit. Once features are implemented, you might want to explore how to adopt more advanced architecture patterns, such as MVVM, or evolve the simplified UI to create a better user experience.
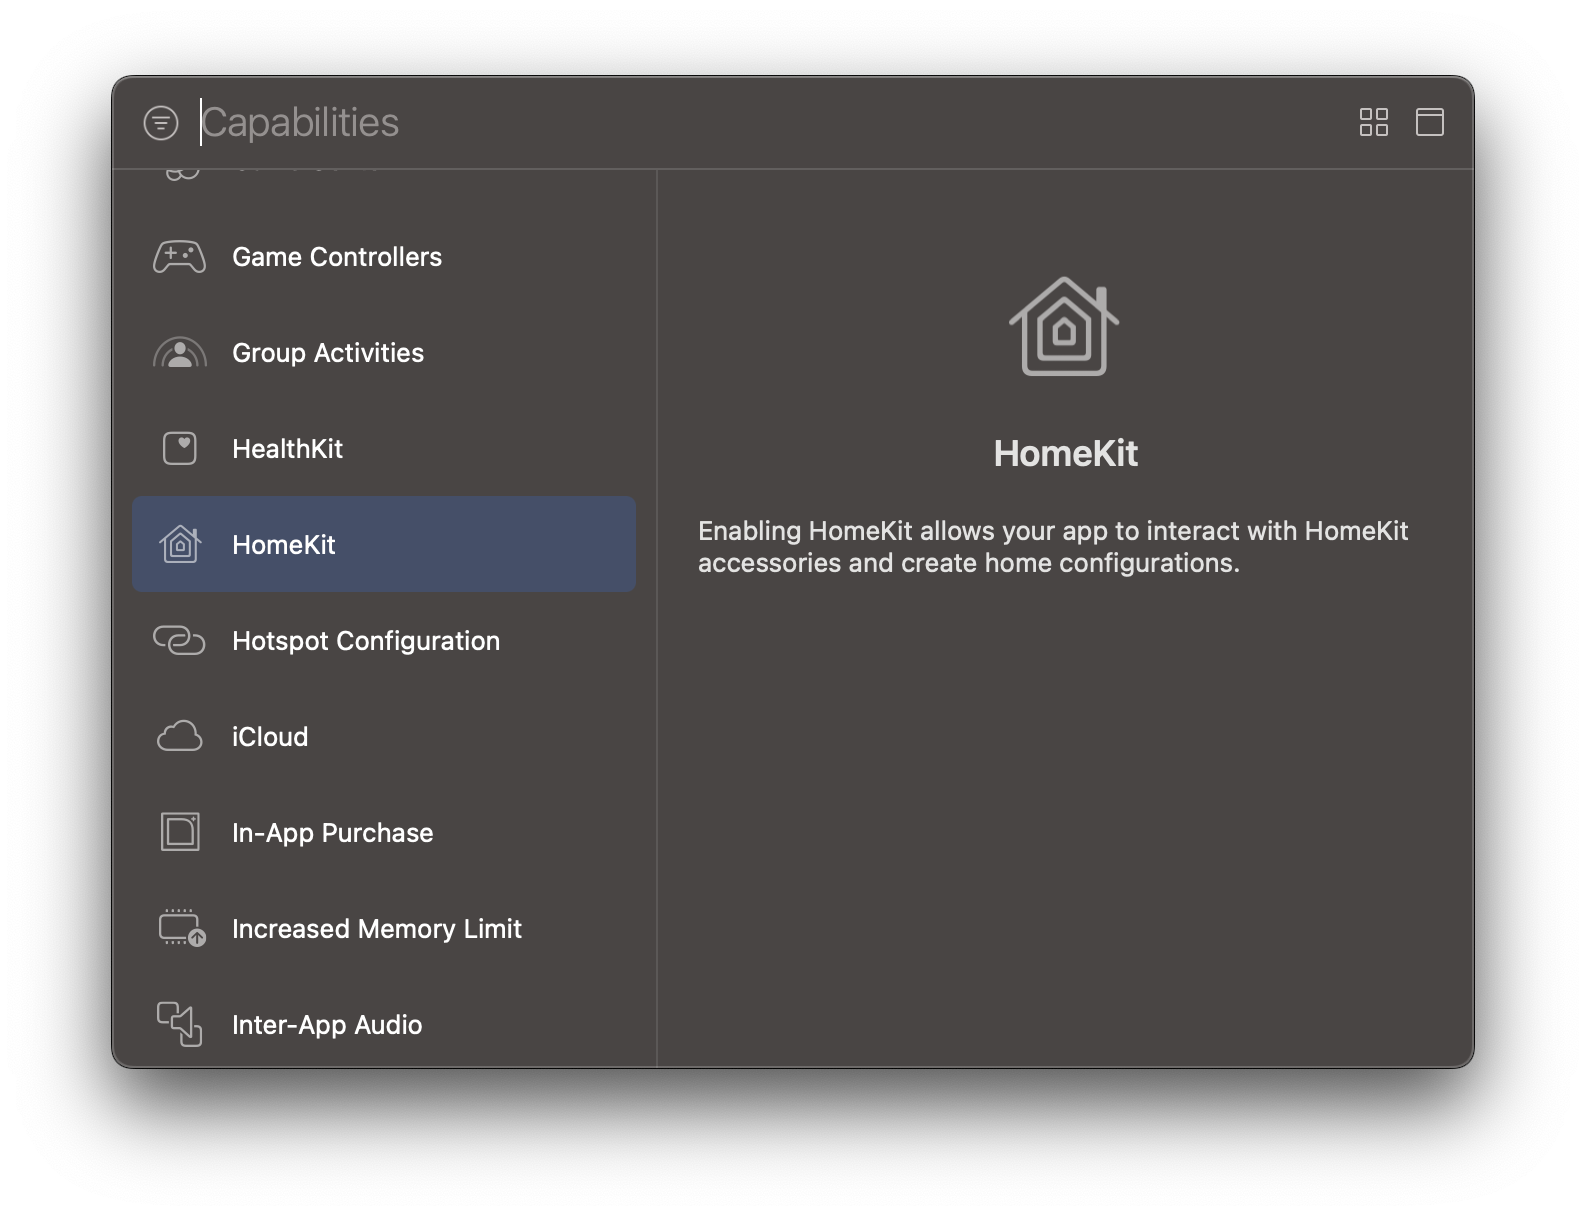
Fire, you have to add the HomeKit capability to the project. This can be done in the Project Settings and the Signing & Capabilities pane of your target. When clicking on the "+" button in the preference pane, you can search the available capabilities for HomeKit to allow you to interact with HomeKit accessories.
Once added, Xcode will prompt you to download Apple's HomeKit Accessory Simulator (HAS). The HAS comes as a part of the Additional Tools for Xcode package and can be downloaded from the Apple Developer Website. It comes in handy in case you don't have many smart home accessories and want to simulate setups without having to buy any hardware.

A more detailed explanation of how the HomeKit Accessory Simulator can be found in our article "Developing Apps with the HomeKit Accessory Simulator" or in the Apple Developer Documentation.
As your app will access HomeKit and as part of that potentially sensitive information about your smart home setup, e.g. security cameras, automatisation schemes etc., you need an entitlement to your projects info.plist to ask the user for permission to access HomeKit.
In your project settings Info pane you can add a new entry for the Custom iOS Target Properties. Provide a meaningful description of why you need access to HomeKit for the NSHomeKitUsageDescription key.
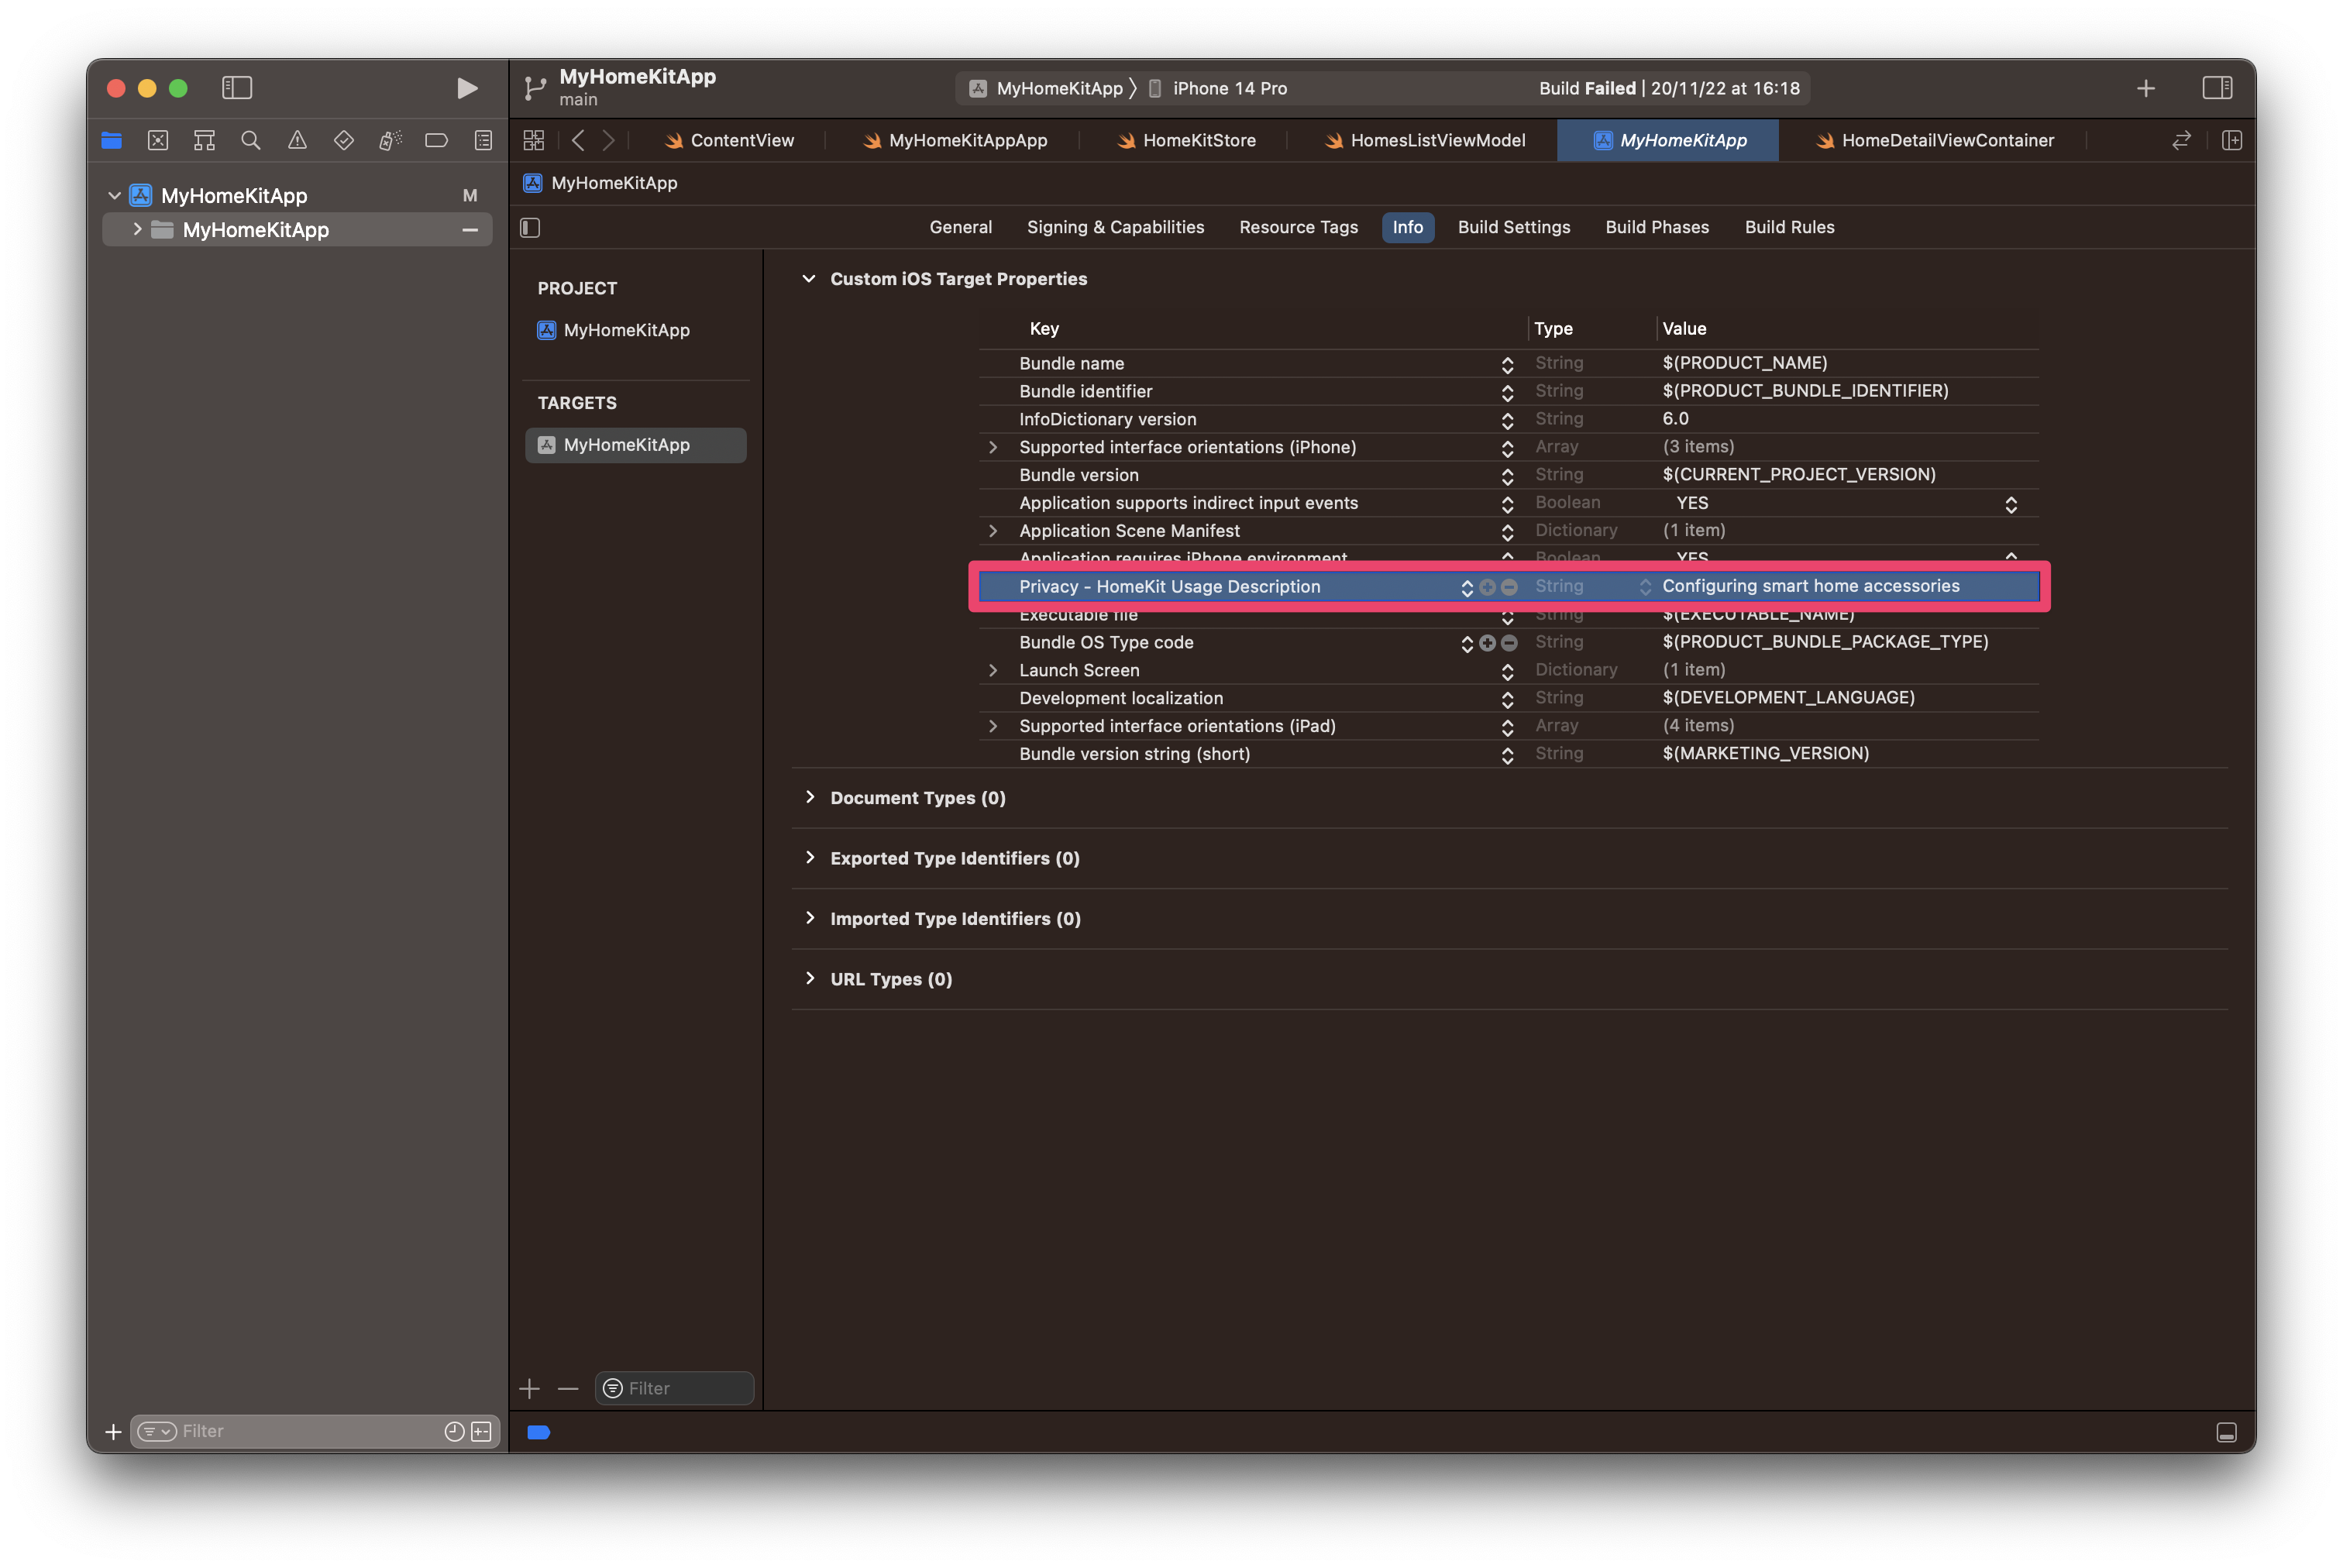
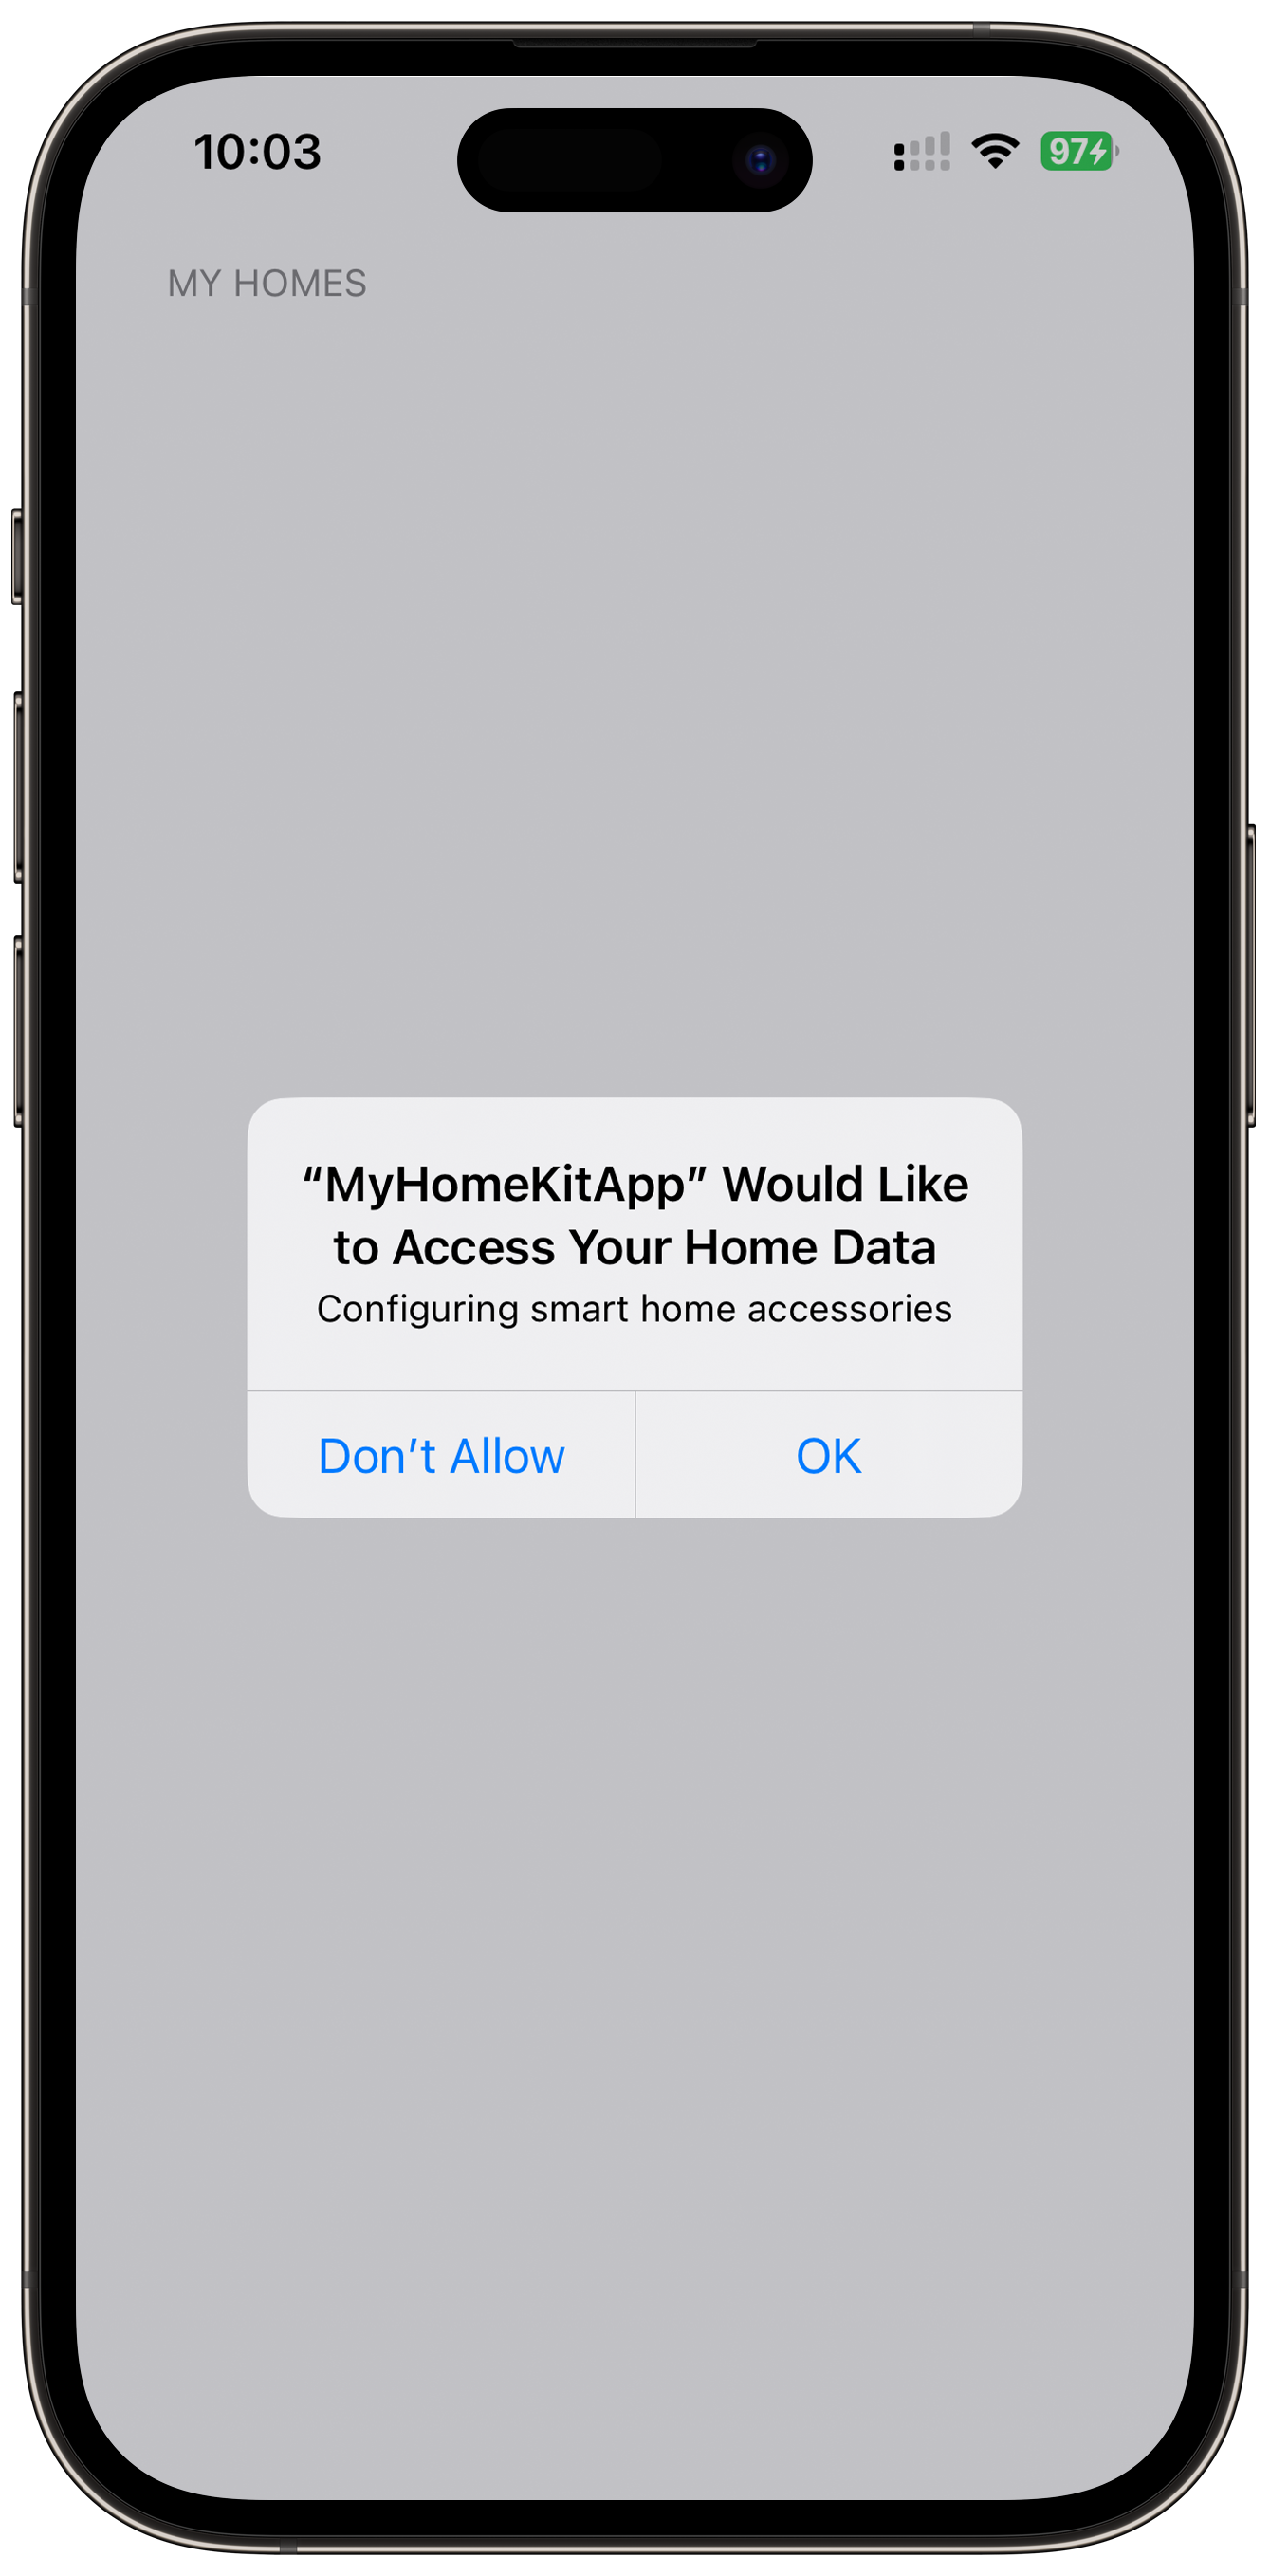
As a consequence, iOS will automatically generate an Alert for the user when the app tries to access HomeKit for the first time. The alert will include your app name and the usage description provided in the plist entry. Also notice, that users can change these permissions at any time through the Settings app. Therefore it might be smart to incorporate frequent checks for permissions in your app.
HomeKit Essentials
Before we get going, here is some more information about the information architecture inside HomeKit. This is critical to understand and while confusing labeling may exist, it is quite straightforward.
HomeKit organizes the control of smart home accessories in Homes, of which you can create as many as you like. Within Homes there are Rooms that can be grouped in Zones, which are basically collections of Rooms.
Inside each Room, there can then be any number of Accessories which in turn will provide a number of Services that provide Characteristics. For example, a smart lightbulb may come with Services such as a light sensor and an actual control for the light bulb itself. The light sensor then may have Characteristics for detecting the ambient light and indicating whether the sensor is operative, while the lightbulb may come with Characteristics such as power state and brightness level etc.
These Characteristics can then be used to control the smart accessories, for example turning lights on or off, and changing brightness or color. Also, they can be used for automatization based on specific values, for example turning on the light when the ambient light goes below a certain threshold.

Based on this, let's build an app that will display any number of Homes available in HomeKit, any Accessories, their Services, and their Characteristics. Then, let's also understand how we can read values from and write new values to the Characteristics to control the accessory.
Exploring HomeKit
Searching Homes, Accessories, their Services and Characteristics
Let's start by adding a new file to our Xcode project, named HomeStore.Swift. We will use it to manage access to HomeKit and reference it from the SwiftUI views we will create.
For a real product, you may want to adopt more advanced design patterns for your app. To focus on HomeKit features, this was kept as straightforward as possible.
Finding Available Homes
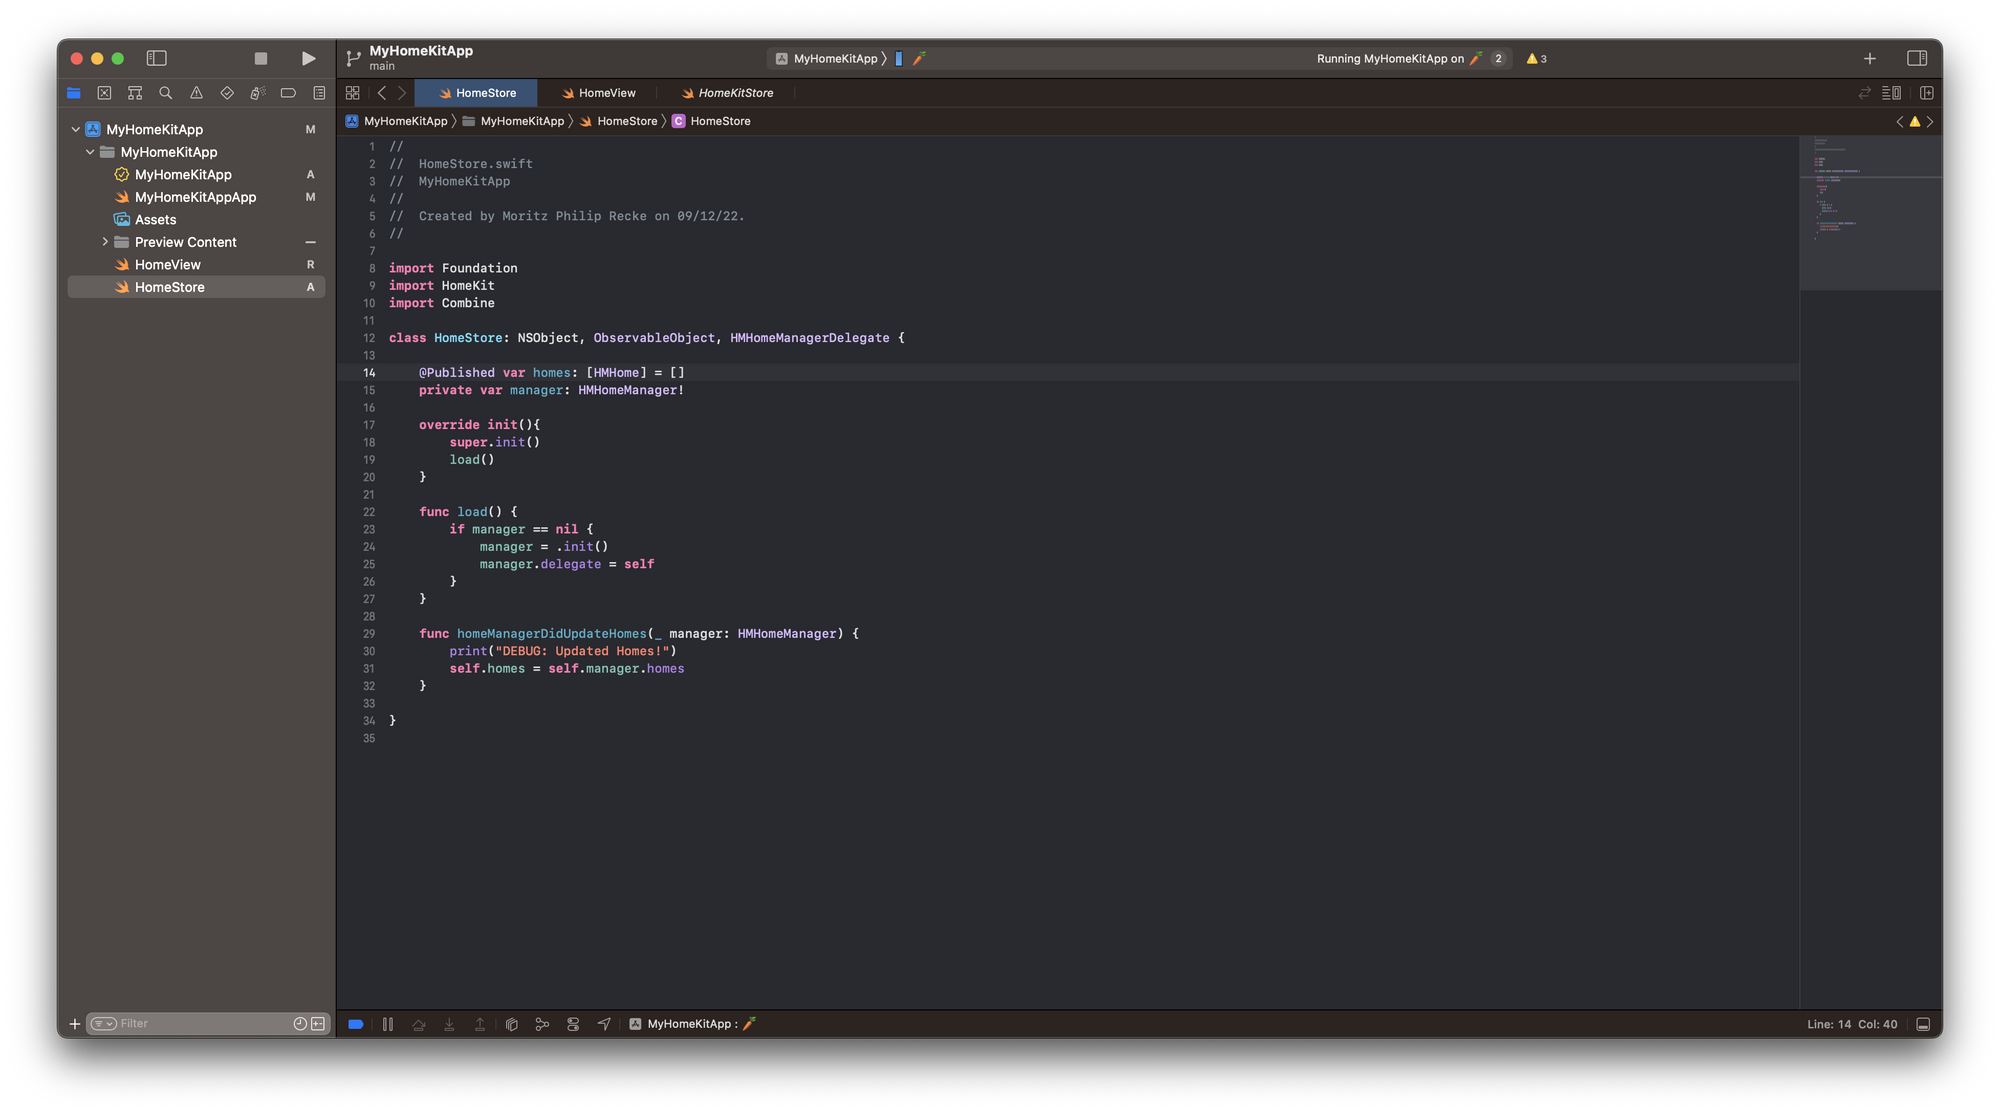
The HomeStore is a class object and can therefore be used across the app as a reference type. It comes with a @Published array of HMHome, which is the primary unit of living space inside HomeKit, that can be composed of rooms organized in zones.
The HomeStore used a private instance of HMHomeManager, which serves as the primary manager for a collection of any number of homes for a user. HomeKit provides access to any accessories configured inside across any HomeKit-enabled app as well as the Home app coming with iOS.
To stay informed of any changes made on any of the Homes, we are adopting the HMHomeManagerDelegate Protocol to communicate any changes in the state of the home network. the manager will update the @Published array of homes, while overall access to the home network will only be done through the HomeStore.
import Foundation
import HomeKit
import Combine

class HomeStore: NSObject, ObservableObject, HMHomeManagerDelegate {


    @Published var homes: [HMHome] = []
    private var manager: HMHomeManager!

    override init(){
        super.init()
        load()
    }

    func load() {
        if manager == nil {
            manager = .init()
            manager.delegate = self
        }
    }


    func homeManagerDidUpdateHomes(_ manager: HMHomeManager) {
        print("DEBUG: Updated Homes!")
        self.homes = self.manager.homes
    }
}
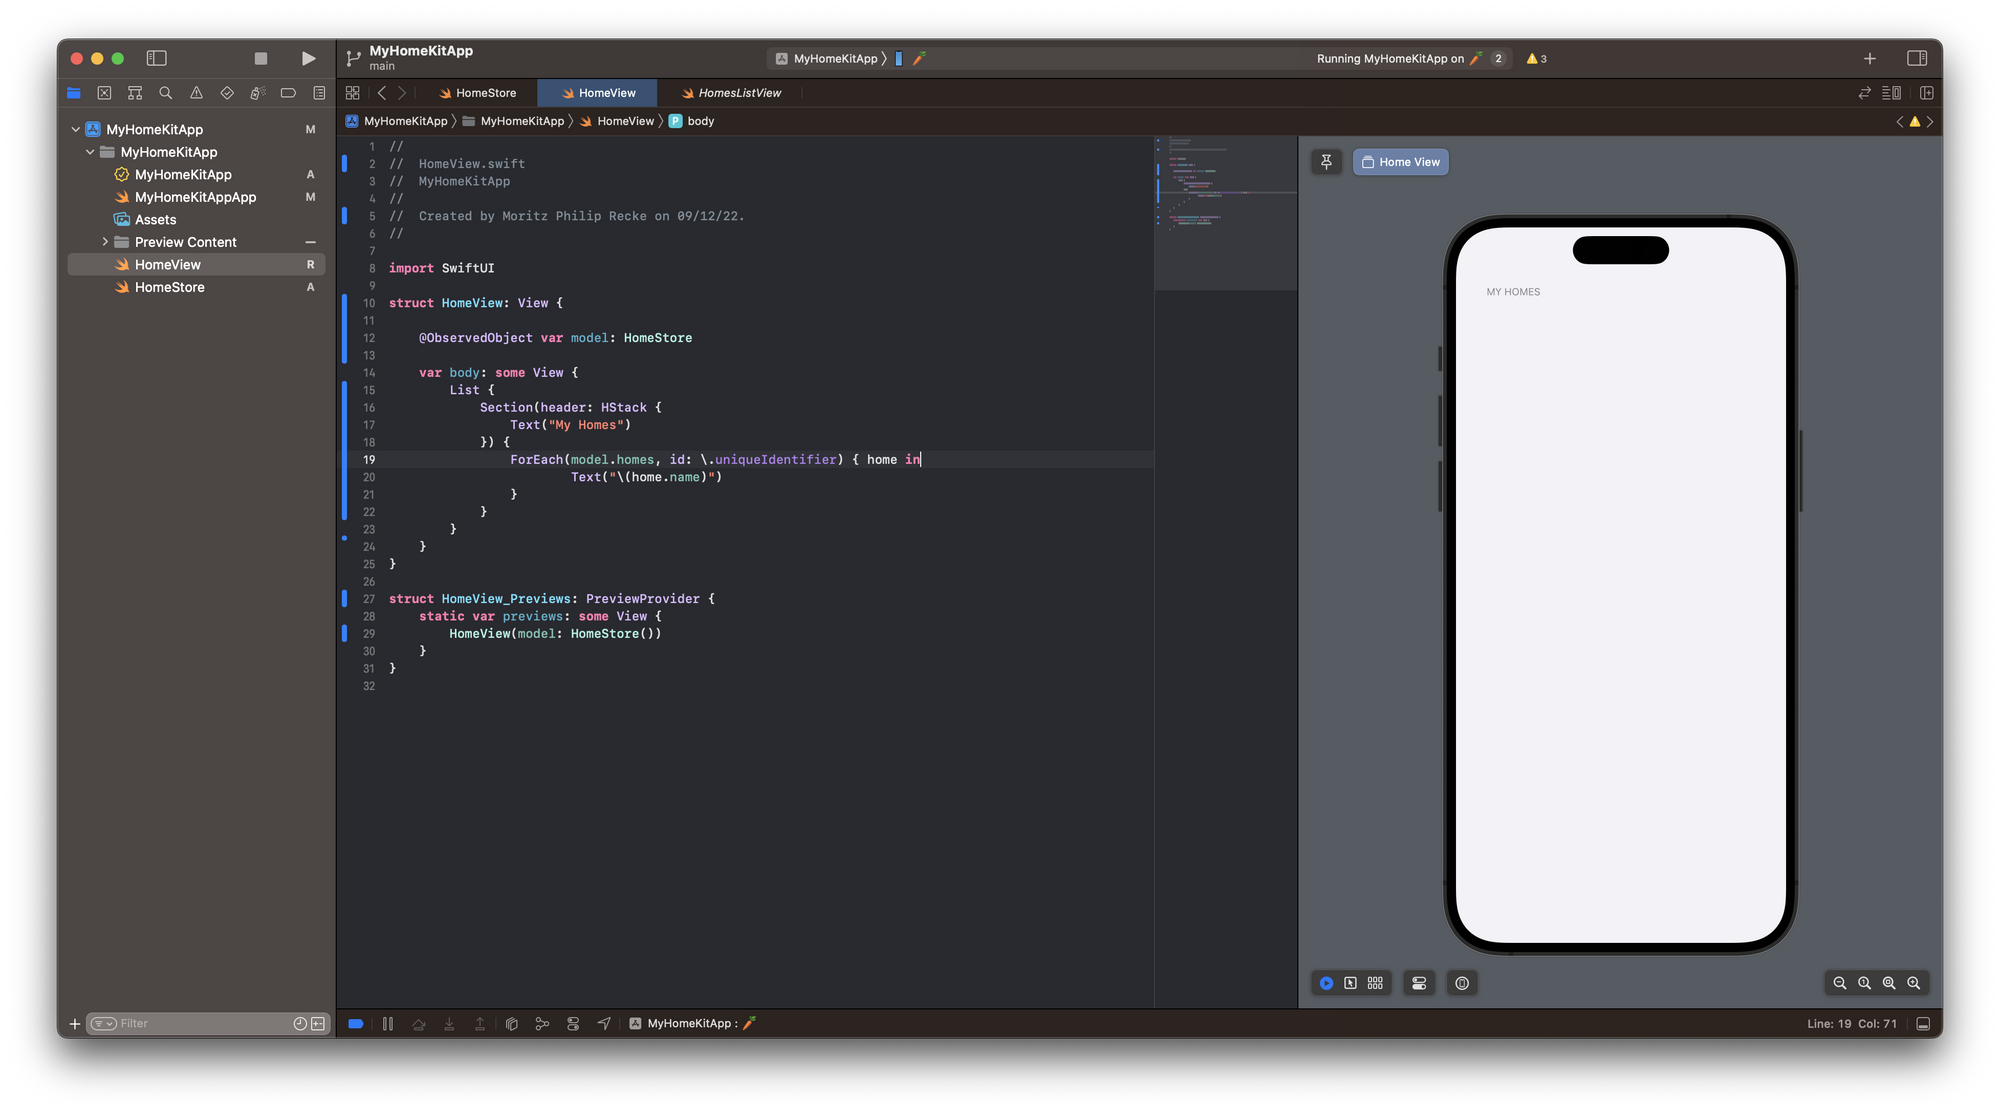
To start with a simple View, let's rename our ContentView.Swift file to HomeView.Swift and the ContentView struct to HomeView. As an @ObservedObject we can add the HomeStore as our model.
The body contains a simple List with a Section header of "My Homes" and then a simple Text view for every home in the model. Before we go any further, let's ensure this basic setup works.
import SwiftUI
import HomeKit

struct HomeView: View {

    @ObservedObject var model: HomeStore

    var body: some View {
        List {
            Section(header: HStack {
                Text("My Homes")
            }) {
                ForEach(model.homes, id: \.uniqueIdentifier) { home in
                        Text("\(home.name)")
                }
            }
        }
    }
}
Inside the MyHomeKitAppApp.Swift file makes sure, to replace the ContenView() with the new HomeView(model: HomeStore()) we just created. Note that as the model property, we are passing the HomeStore object.
import SwiftUI
@main
struct MyHomeKitAppApp: App {
var body: some Scene {
WindowGroup {
HomeView(model: HomeStore())
}
}
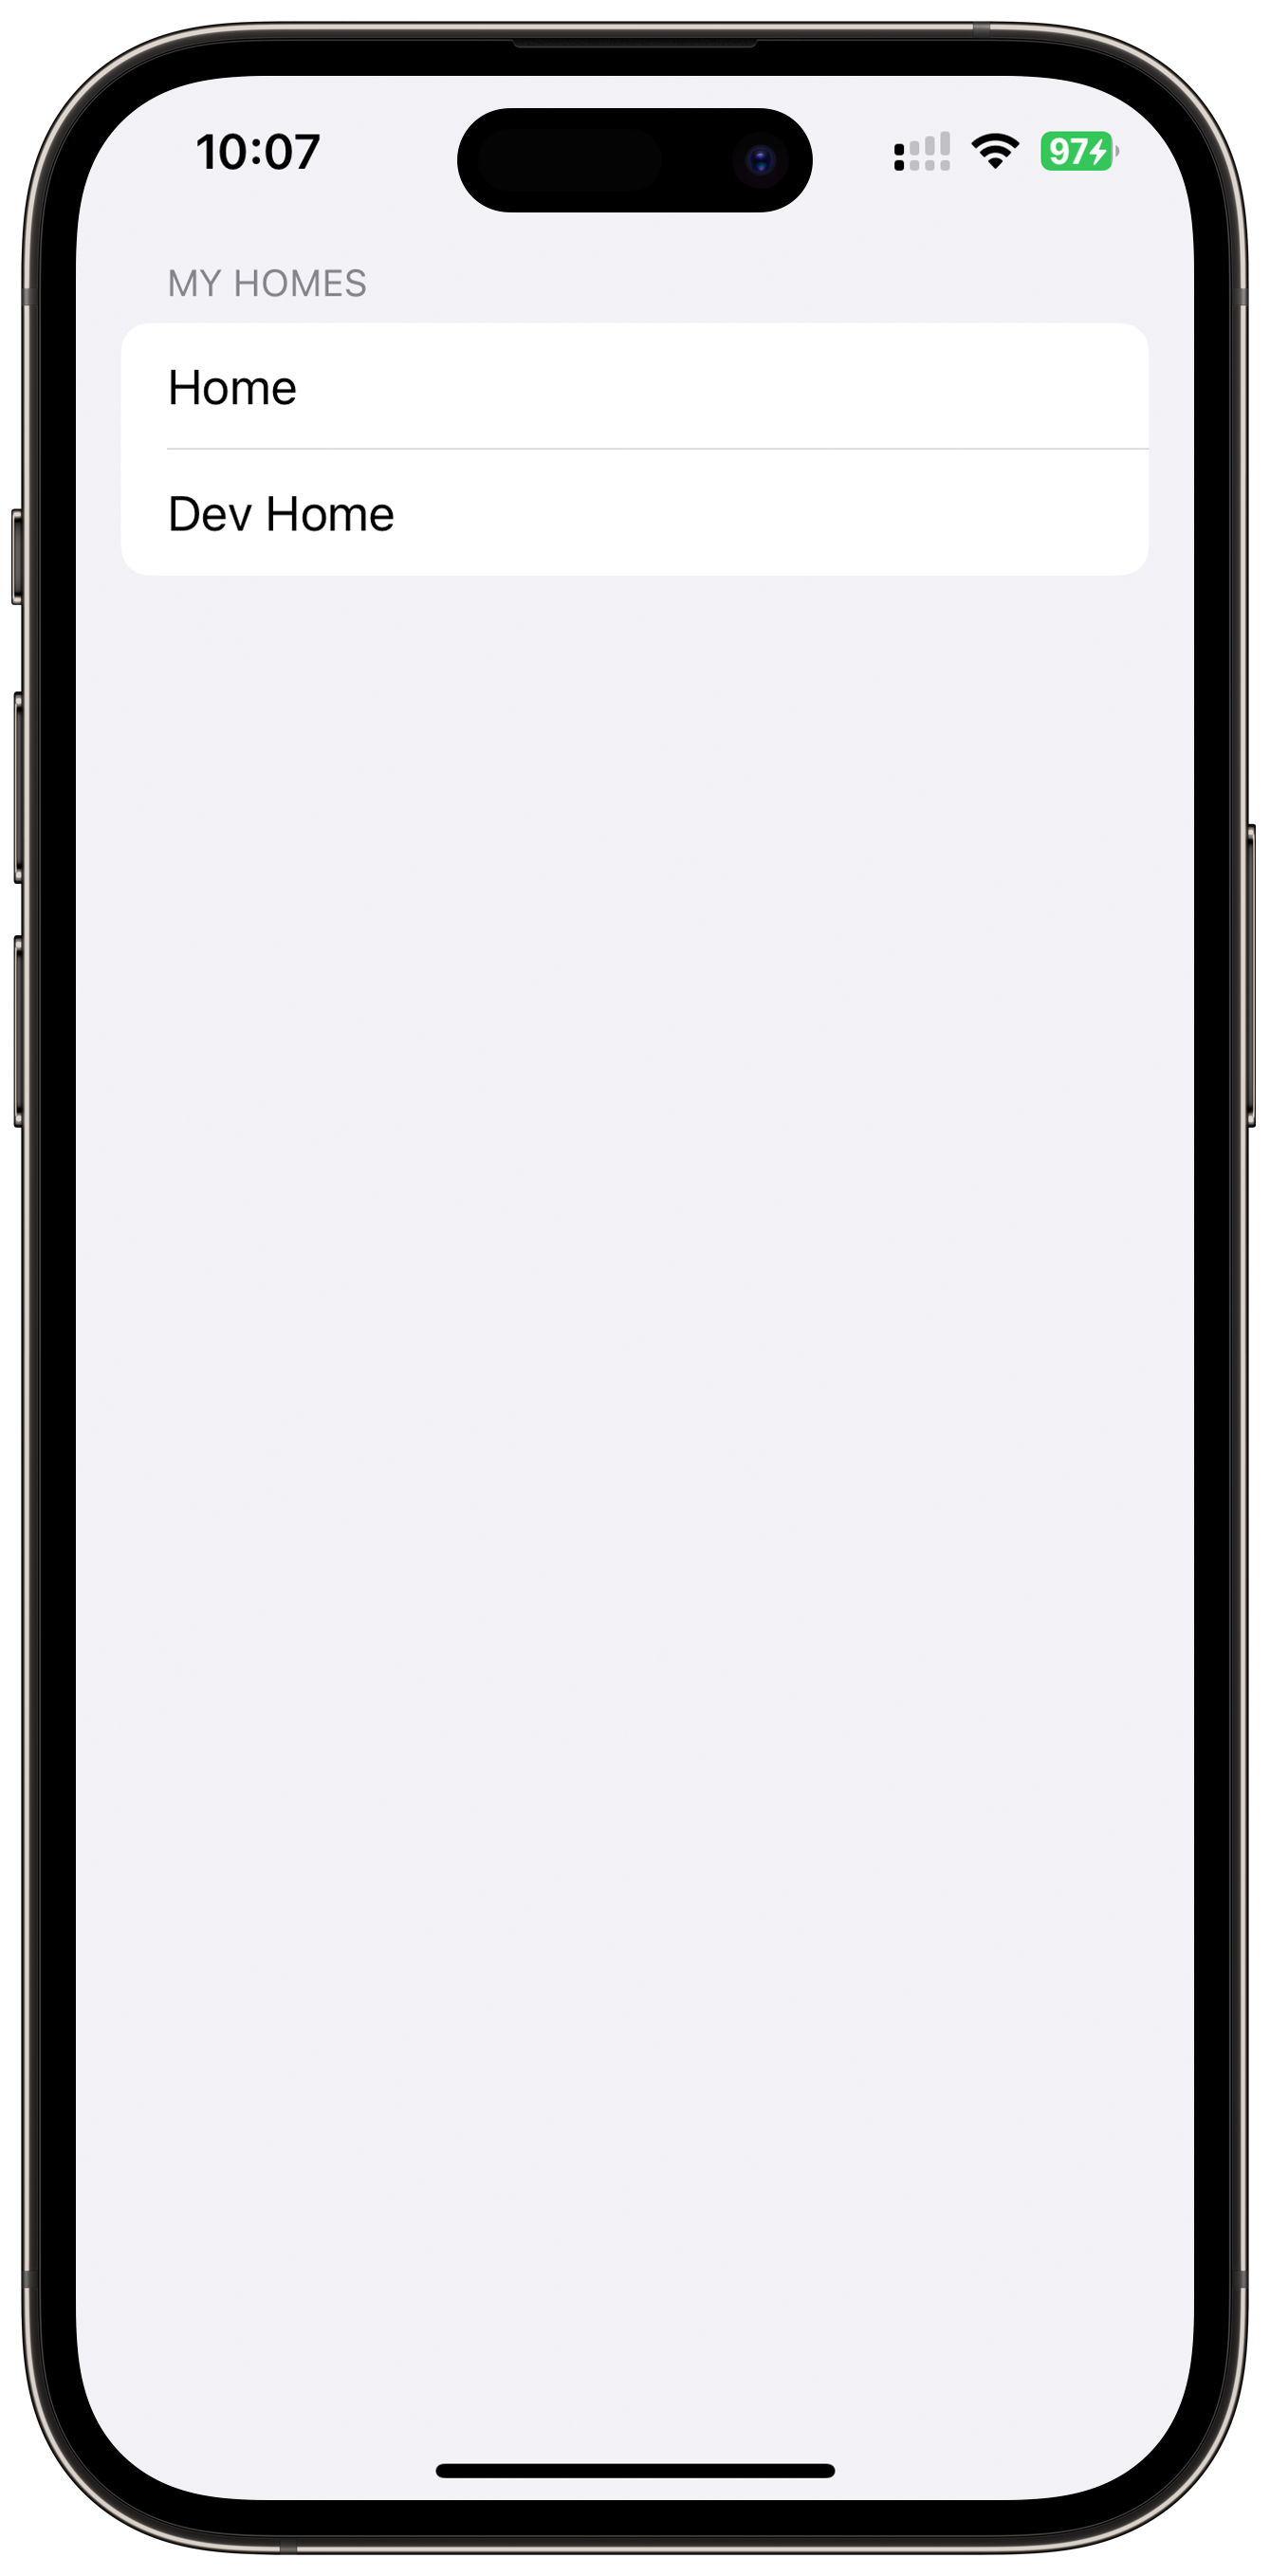
}In my home, I have two Homes configured in HomeKit. One is called Home and actually contains all the smart home accessories I have. Dev Home is a second home I set up in the Home app on my iPhone for developing apps and testing HomeKit-enable apps with the HomeKit Accessory Simulator (HAS).
Since we want to dive deeper into our Home setup to see what accessories, services, and characteristics are available, let's add a NavigtationStack or our HomeView. It will allow us to navigate to detail views of each Home to then explore what is inside.
import SwiftUI
import HomeKit

struct HomeView: View {

    @State private var path = NavigationPath()
    @ObservedObject var model: HomeStore

    var body: some View {
        NavigationStack(path: $path) {
            List {
                Section(header: HStack {
                    Text("My Homes")
                }) {
                    ForEach(model.homes, id: \.uniqueIdentifier) { home in
                        NavigationLink(value: home){
                            Text("\(home.name)")
                        }.navigationDestination(for: HMHome.self){
                            AccessoriesView(homeId: $0.uniqueIdentifier, model: model)
                        }
                    }
                }
            }
        }
    }
}
Notice that by adding the NavigationLink and .navigationDestination modifier, we are navigating to an AccessoriesView, passing the UUID if the selected Home and the model are properties.
Finding available Accessories
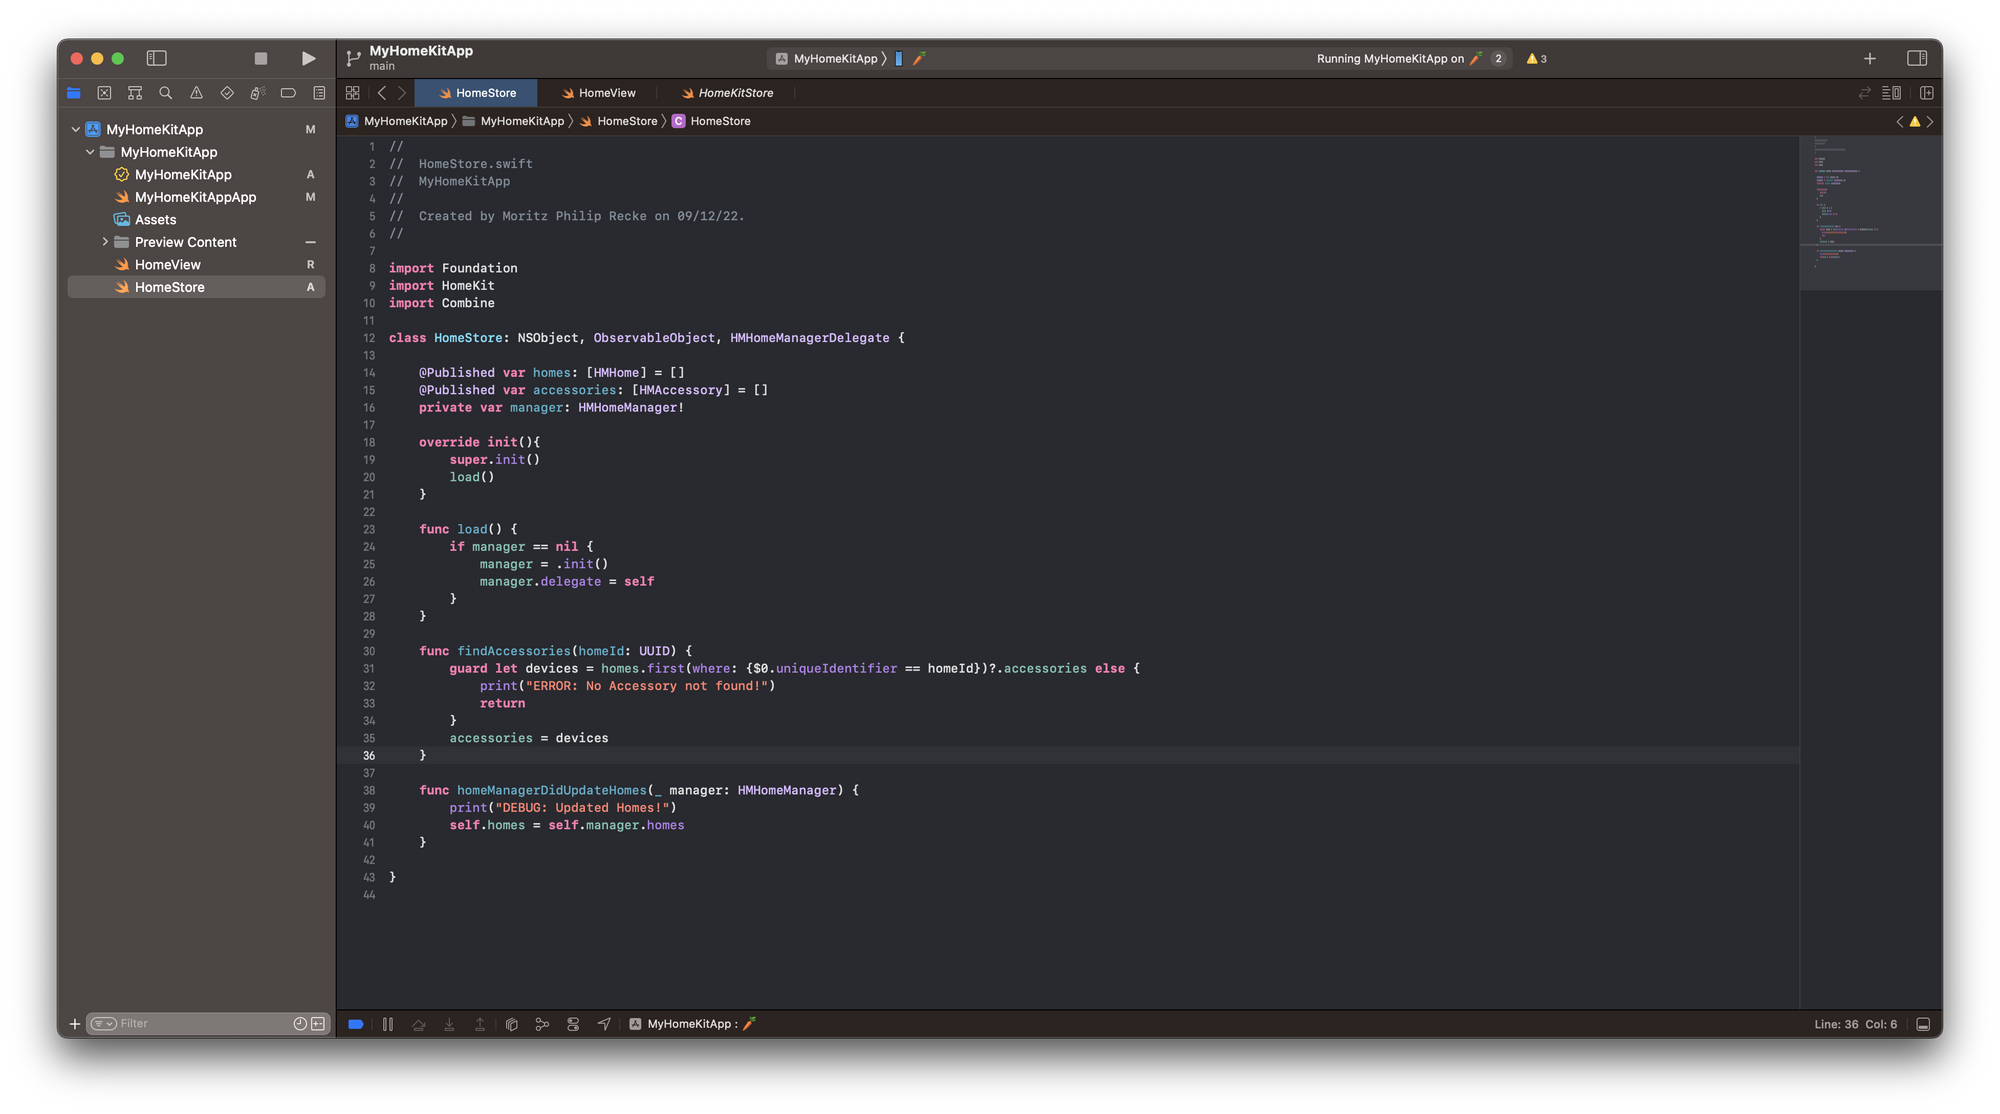
Now, let's add some functionality to the HomeStore. We are adding a function called findAccessories(homeId: UUID) that will assign all accessories within that Home to a new @Published array of HMAccessory, which represent physical HomeKit-enabled devices installed in a Home.
class HomeStore: NSObject, ObservableObject, HMHomeManagerDelegate {


    @Published var homes: [HMHome] = []
    @Published var accessories: [HMAccessory] = []
    private var manager: HMHomeManager!

    [...]

    func findAccessories(homeId: UUID) {
        guard let devices = homes.first(where: {$0.uniqueIdentifier == homeId})?.accessories else {
            print("ERROR: No Accessory not found!")
            return
        }
        accessories = devices
    }
}
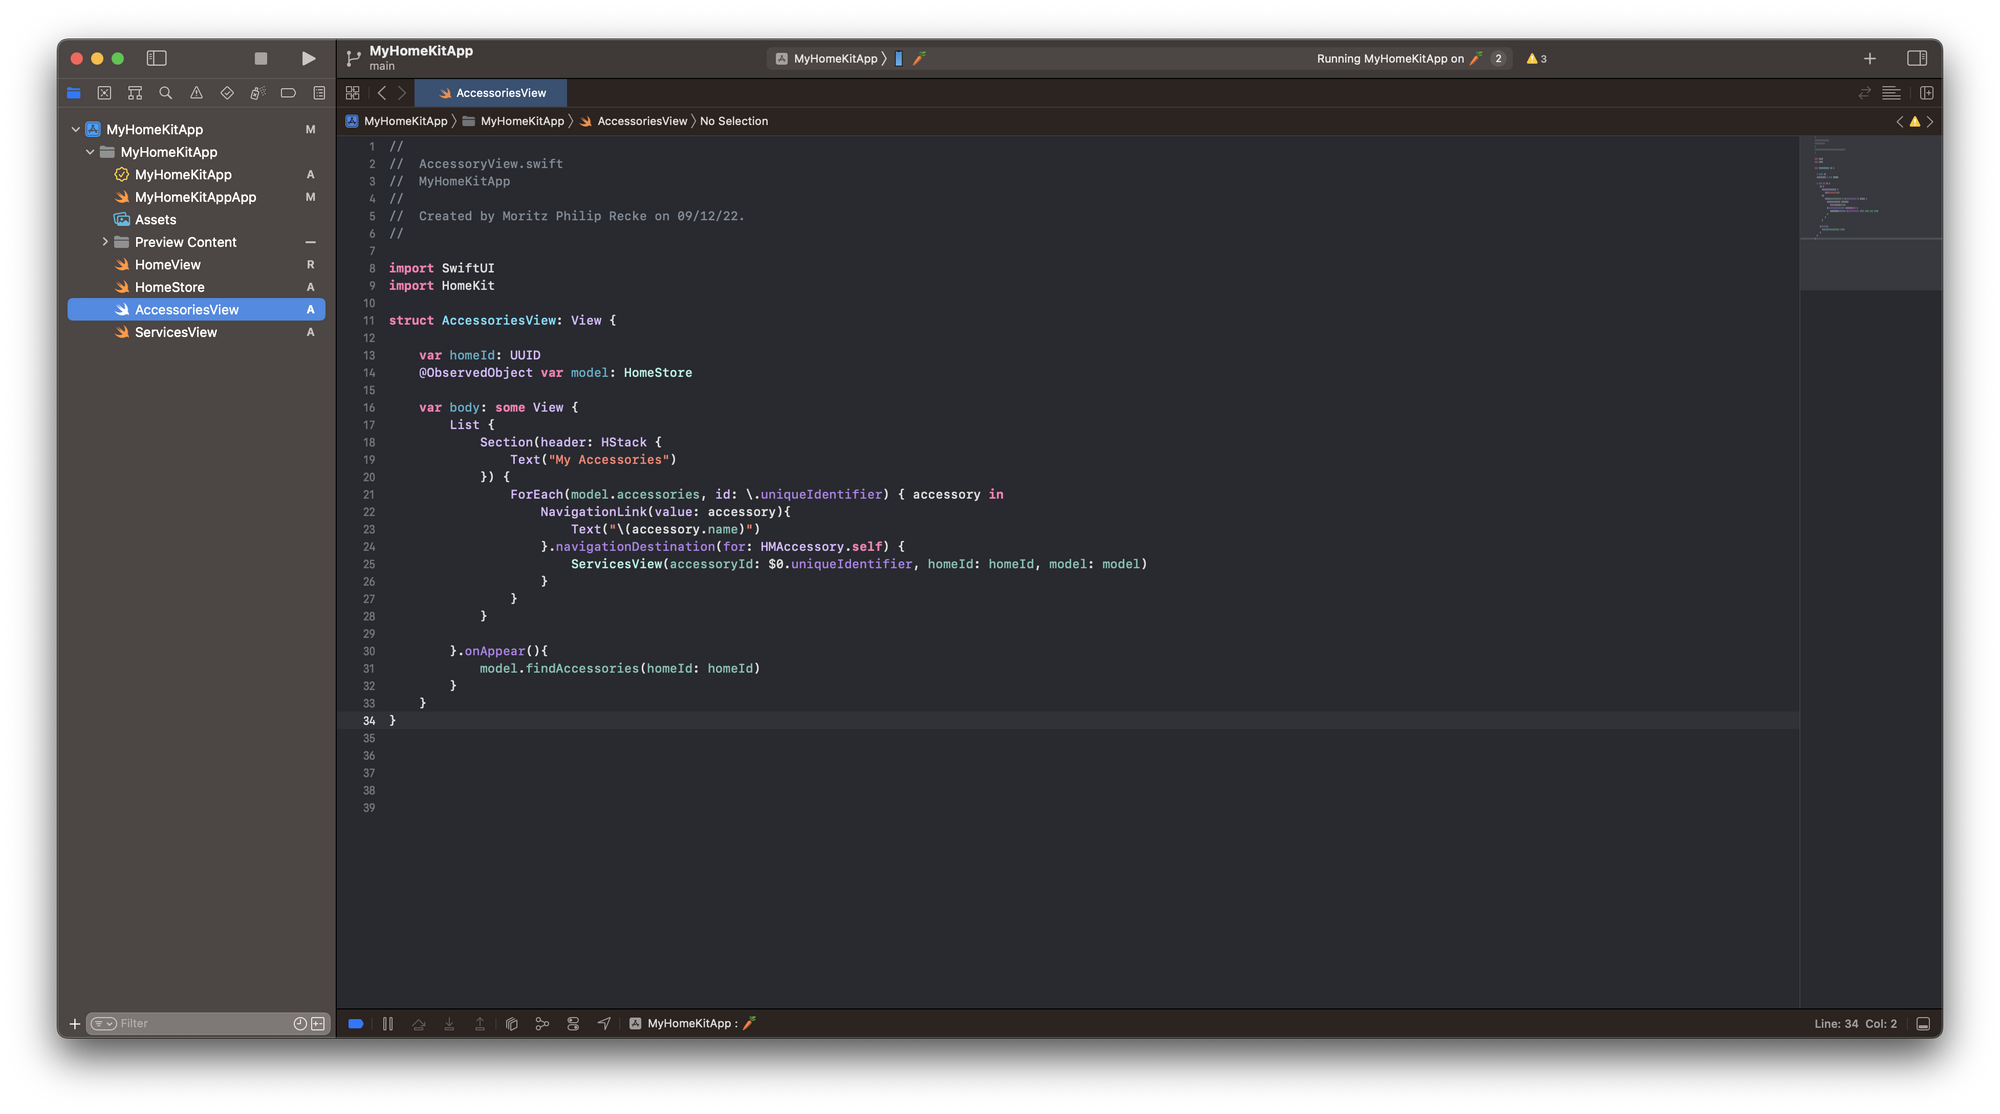
Now let's add a new AccessoriesView.Swift file to the project to create a new List view showing all accessories available in our HomeStore model with a similar setup to the HomeView. This means we will navigate to a ServicesView for every Accessory in the list to dig deeper.
To keep things simple, I added a .onAppear modifier that will use the findAccessories function from the model to load the accessories. Since it is a @Published property in the HomeStore, the view will render the List with all accessories found.
import SwiftUI
import HomeKit

struct AccessoriesView: View {

    var homeId: UUID
    @ObservedObject var model: HomeStore

    var body: some View {
        List {
            Section(header: HStack {
                Text("My Accessories")
            }) {
                ForEach(model.accessories, id: \.uniqueIdentifier) { accessory in
                    NavigationLink(value: accessory){
                        Text("\(accessory.name)")
                    }.navigationDestination(for: HMAccessory.self) {
                        ServicesView(accessoryId: $0.uniqueIdentifier, homeId: homeId, model: model)
                    }
                }
            }
        }.onAppear(){
            model.findAccessories(homeId: homeId)
        }
    }
}
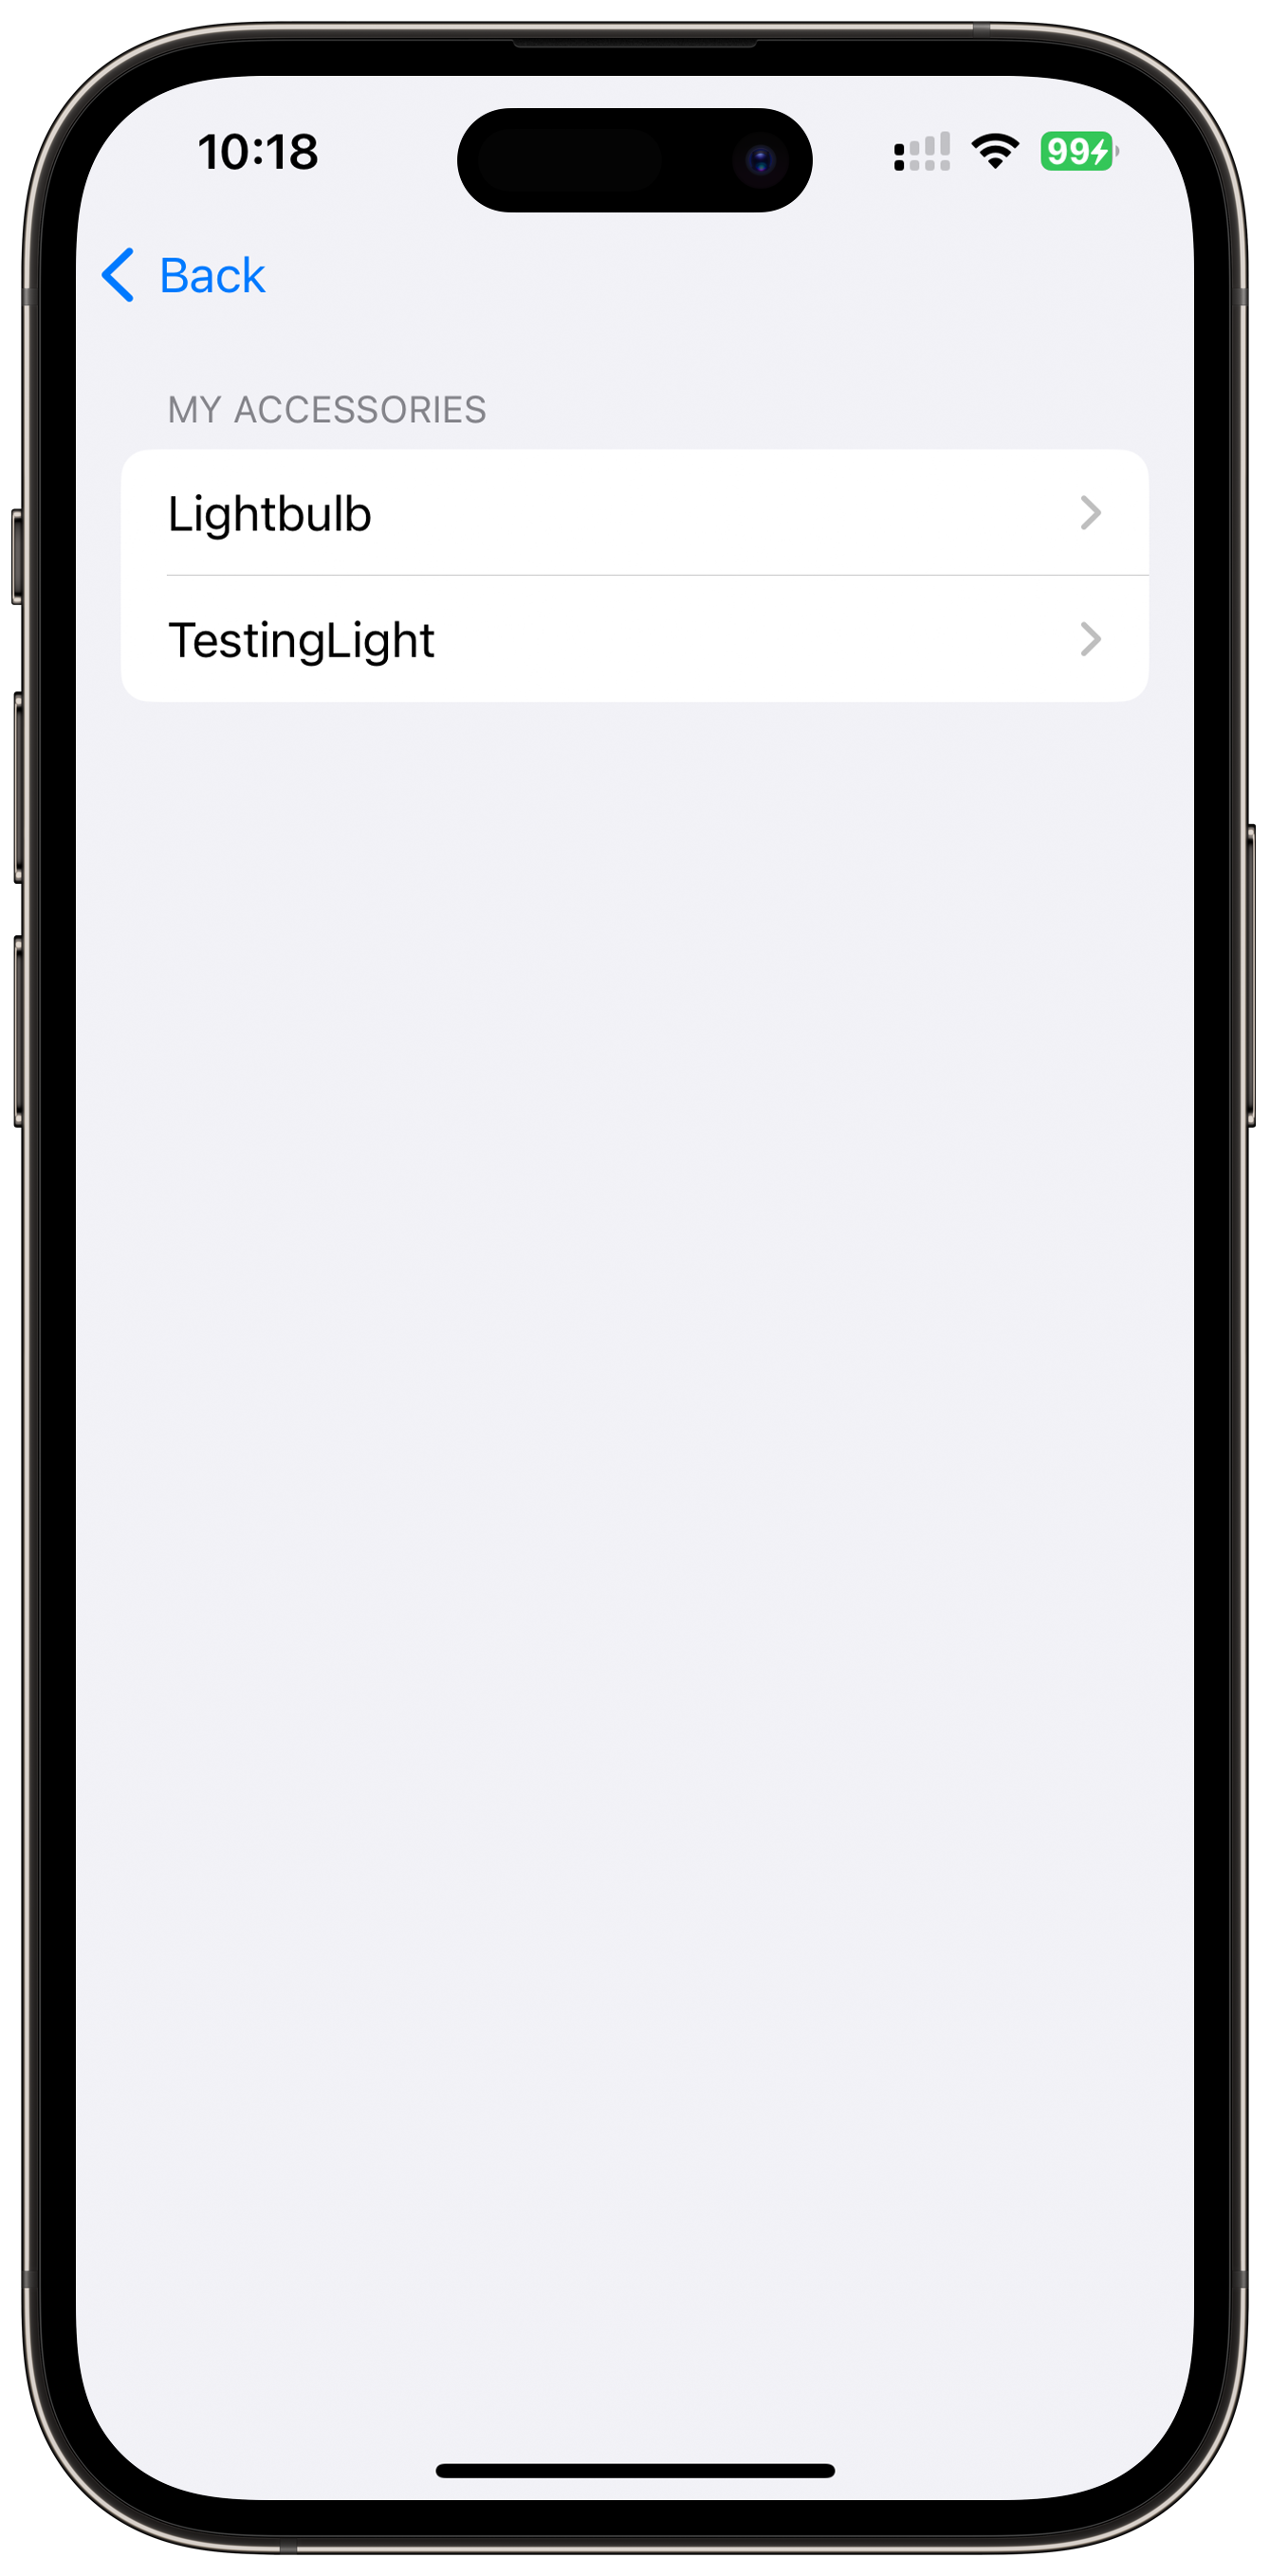
In my Dev Home, there are two accessories that I configured through the HomeKit Accessory Simulator (HAS). If I navigate into the Dev Home on the iPhone, the accessories are displayed correctly.

Finding Accessory Services
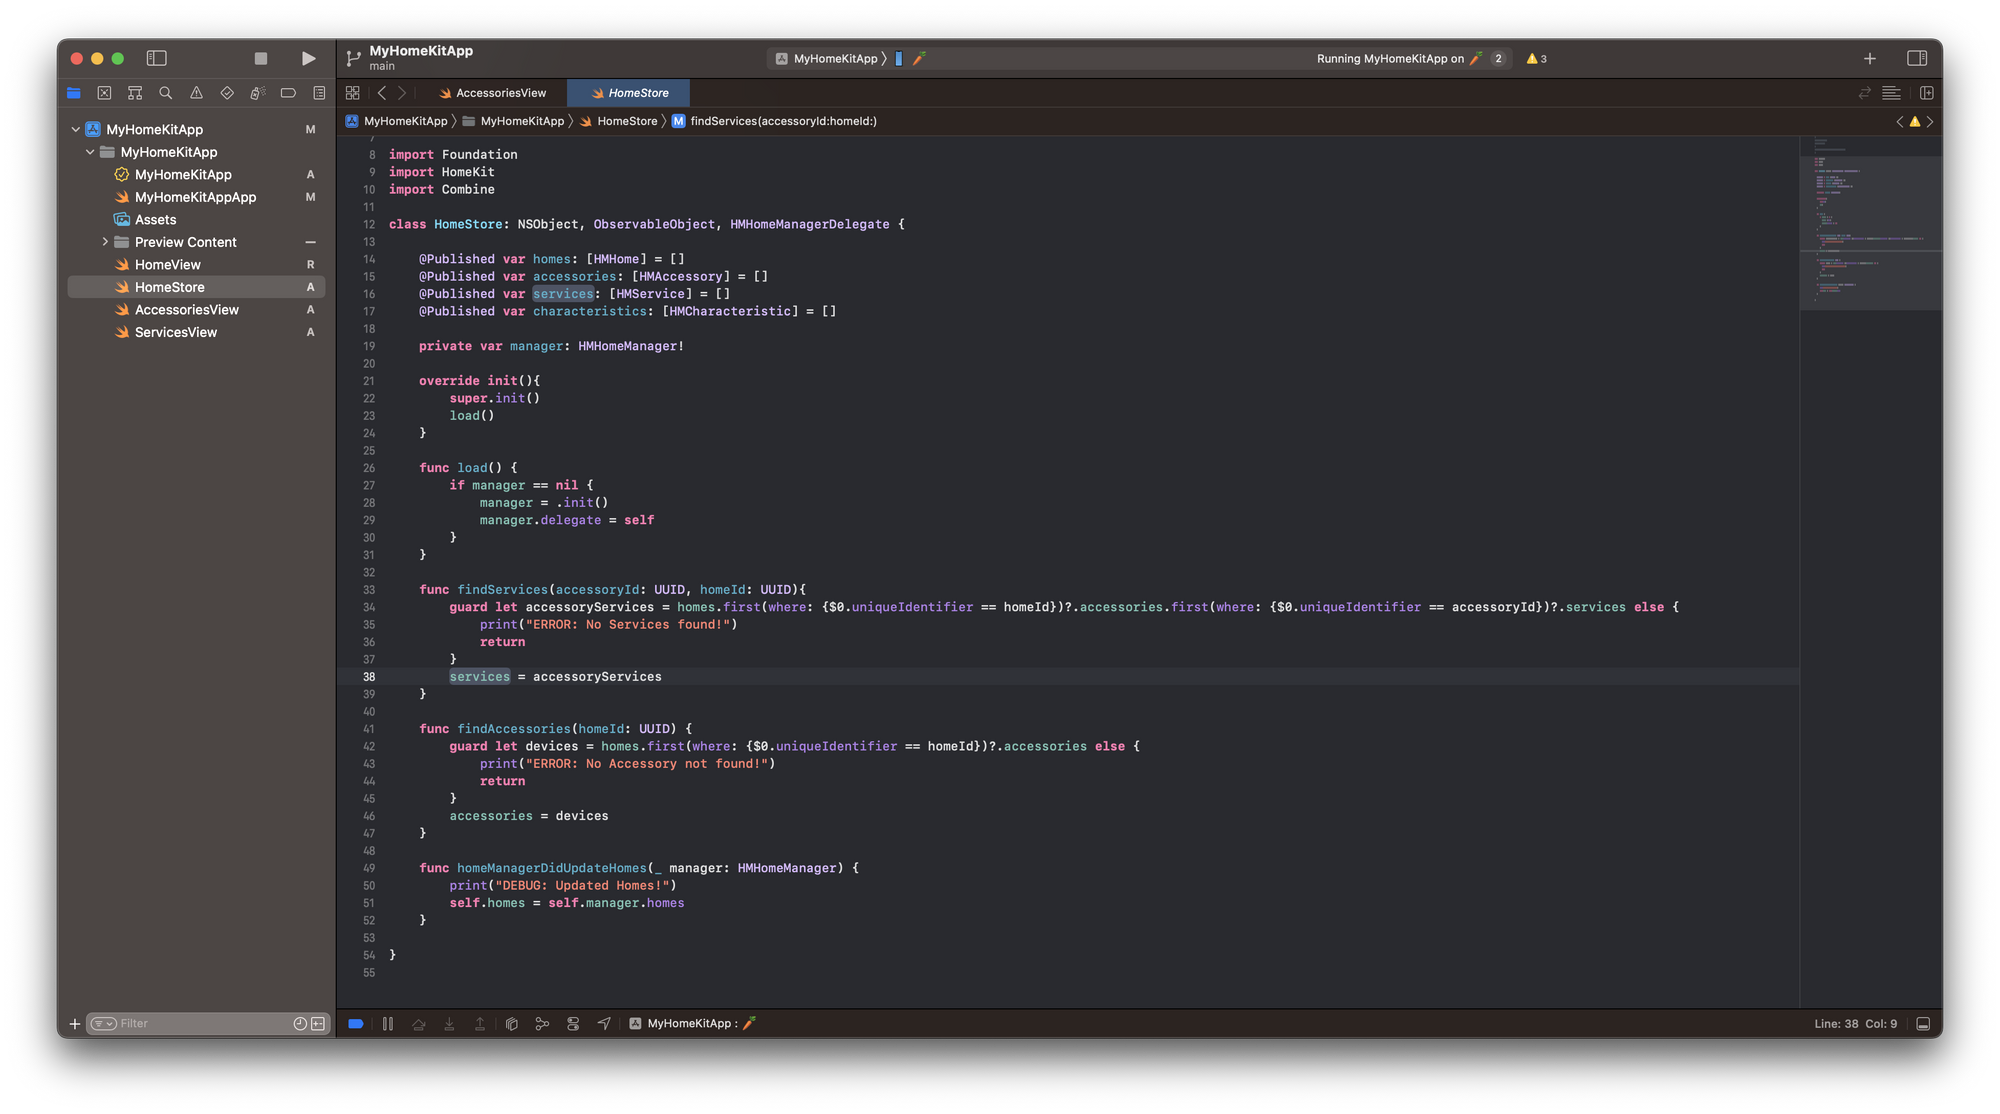
Since we now know all the available Accessories in our Home, let's search for the Services that each of these offers. To this effect, we are again extending the functionality of the HomeStore. We are adding a function called findServices(accessoryId: UUID, homeId: UUID) that will assign all services within a specific Accessory within that Home to a new @Published array of HMService, which represent controllable features of an HomeKit-enabled accessory, like an ambient light sensor attached to a smart lightbulb.
class HomeStore: NSObject, ObservableObject, HMHomeManagerDelegate {


    @Published var homes: [HMHome] = []
    @Published var accessories: [HMAccessory] = []
    @Published var services: [HMService] = []
    private var manager: HMHomeManager!

    [...]

    func findServices(accessoryId: UUID, homeId: UUID){
        guard let accessoryServices = homes.first(where: {$0.uniqueIdentifier == homeId})?.accessories.first(where: {$0.uniqueIdentifier == accessoryId})?.services else {
            print("ERROR: No Services found!")
            return
        }
        services = accessoryServices
    }
}
Similar to before, we can add a new ServicesView.Swift file to the project to create a new List view showing all services available in our HomeStore model with a similar setup to the AccessoriesView. This means we will navigate to a CharacteristicsView for every Service in the list to dig deeper.
import SwiftUI
import HomeKit

struct ServicesView: View {

    var accessoryId: UUID
    var homeId: UUID
    @ObservedObject var model: HomeStore

    var body: some View {

        List {
            Section(header: HStack {
                Text("\(model.accessories.first(where: {$0.uniqueIdentifier == accessoryId})?.name ?? "No Accessory Name Found") Services")
            }) {
                ForEach(model.services, id: \.uniqueIdentifier) { service in
                    NavigationLink(value: service){
                        Text("\(service.localizedDescription)")
                    }.navigationDestination(for: HMService.self) {
                        CharacteristicsView(serviceId: $0.uniqueIdentifier, accessoryId: accessoryId, homeId: homeId, model: model)
                    }
                }
            }
        }.onAppear(){
            model.findServices(accessoryId: accessoryId, homeId: homeId)
        }
    }
}
To keep things simple, I added a .onAppear modifier that will use the findServices function from the model to load the services. Since it is a @Published property in the HomeStore, the view will render the List will all services found.
Finding Service Characteristics
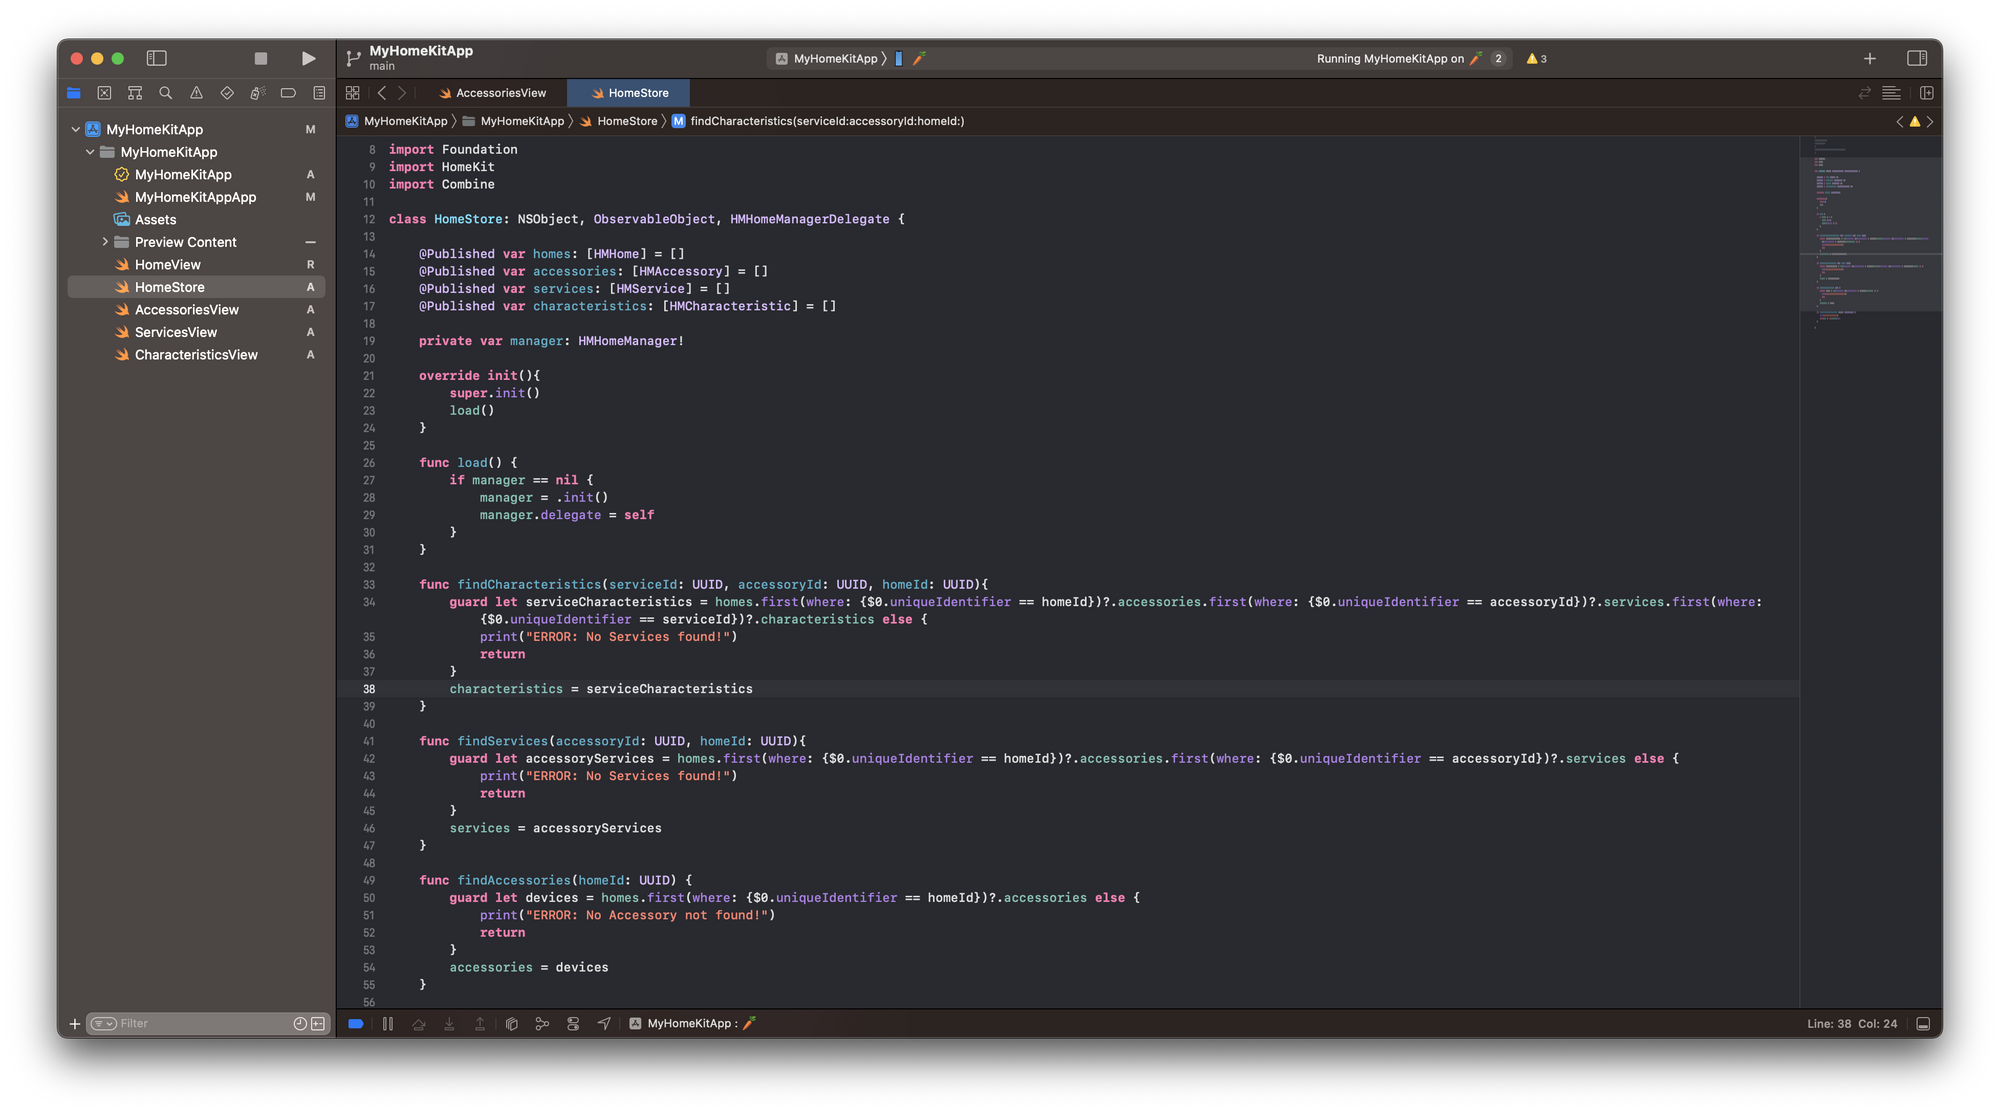
We now know all available Services for any Accessory in our Home. So, let's search for the Characteristics that each of these Services offers. We can again add this as a function to the HomeStore. Let's add a findCharacteristics(serviceId: UUID, accessoryId: UUID, homeId: UUID) function that will assign all Characteristics of a specific Service to a new @Published array of HMCharacteristic, which represent aspects of a service that provides data or controls, for example, the brightness of a lightbulb or its power state.
class HomeStore: NSObject, ObservableObject, HMHomeManagerDelegate {


    @Published var homes: [HMHome] = []
    @Published var accessories: [HMAccessory] = []
    @Published var services: [HMService] = []
    @Published var characteristics: [HMCharacteristic] = []
    private var manager: HMHomeManager!

    [...]

    func findCharacteristics(serviceId: UUID, accessoryId: UUID, homeId: UUID){
        guard let serviceCharacteristics = homes.first(where: {$0.uniqueIdentifier == homeId})?.accessories.first(where: {$0.uniqueIdentifier == accessoryId})?.services.first(where: {$0.uniqueIdentifier == serviceId})?.characteristics else {
            print("ERROR: No Services found!")
            return
        }
        characteristics = serviceCharacteristics
    }
}
Now let's add another file to the project, called CharacteristicsView.Swift. Same as with the other views, we add a List view showing all characteristics available in our HomeStore model with a similar setup to the ServicesView. As we will not dig any deeper, I kept the detail view for the navigation simple. It will just show a Text view with the localized description of the Characteristic, which will show the value and type as well as some other metadata.
Again, I added a .onAppear modifier that will use the findCharacteristics function from the model to load the data. Since it is a @Published property in the HomeStore, the view will render the List will all characteristics found.
struct CharacteristicsView: View {

    var serviceId: UUID
    var accessoryId: UUID
    var homeId: UUID
    @ObservedObject var model: HomeStore

    var body: some View {
        List {
            Section(header: HStack {
                Text("\(model.services.first(where: {$0.uniqueIdentifier == serviceId})?.name ?? "No Service Name Found") Characteristics")
            }) {
                ForEach(model.characteristics, id: \.uniqueIdentifier) { characteristic in
                    NavigationLink(value: characteristic){
                        Text("\(characteristic.localizedDescription)")
                    }.navigationDestination(for: HMCharacteristic.self) {
                        Text($0.metadata?.description ?? "No metadata found")
                    }
                }
            }
        }.onAppear(){
            model.findCharacteristics(serviceId: serviceId, accessoryId: accessoryId, homeId: homeId)
        }
    }
}
All views together should allow you to navigate any of your Homes, and see all available Accessories, their Services and their Characteristics.
It is as simple as this. Overall, it might take some getting used to the information architecture. In principle, all smart home accessories in HomeKit can be monitored and visualised with these few steps. The Accessories come with a wide variety of metadata, ranging from vendor information, firmware versions, and any number of services and characteristics that can then be used to visualise the state of the Home, control Accessories or create automatisation based on data from Services and their Characteristics.
Next, let's how we can effectively read data from the Characteristics and even more relevantly, how we can write data to Characteristics to control our smart home Accessories.
Controlling Accessoires
Reading from and Writing to Service Characteristics
Before we go on, let's have another look at the HomeKit Accessory Simulator (HAS). Since you might not have a lot of smart home accessories at home or even if, you might not know enough about them to proceed easily, take a closer look.
Inside the HomeKit Accessory Simulator (HAS) you can set up and configure any number of Accessories for HomeKit. When you do that, you can configure all kinds of general information, for example, its Category, Primary Service, and then all its Services and their Characteristics.
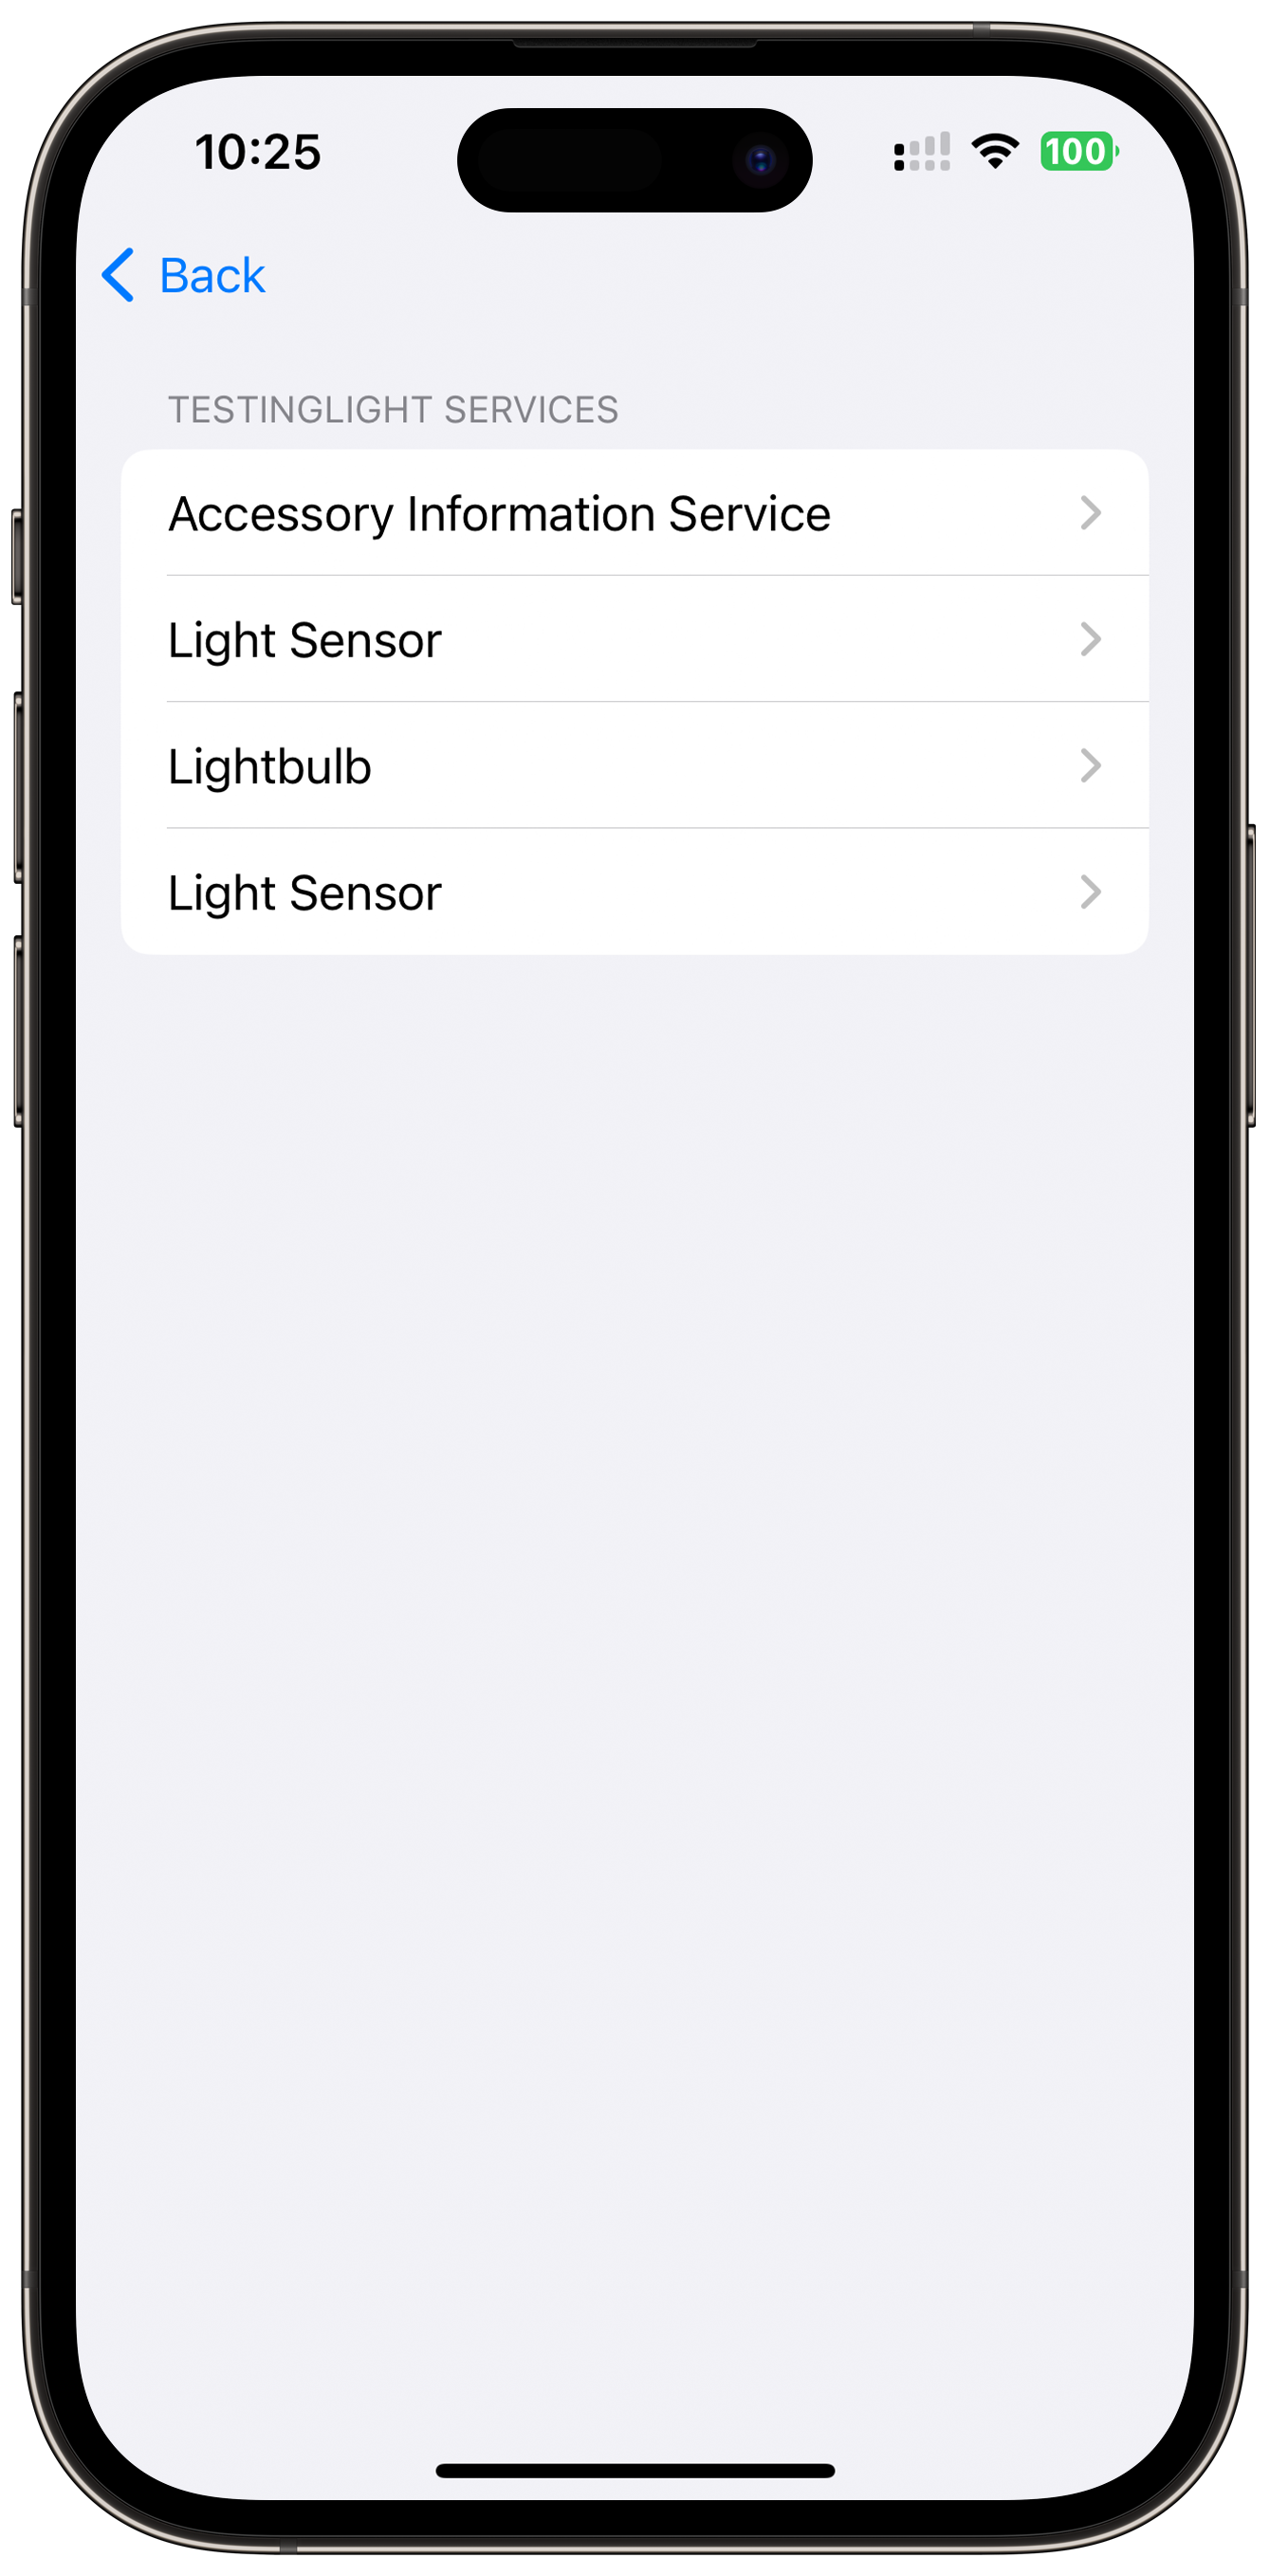
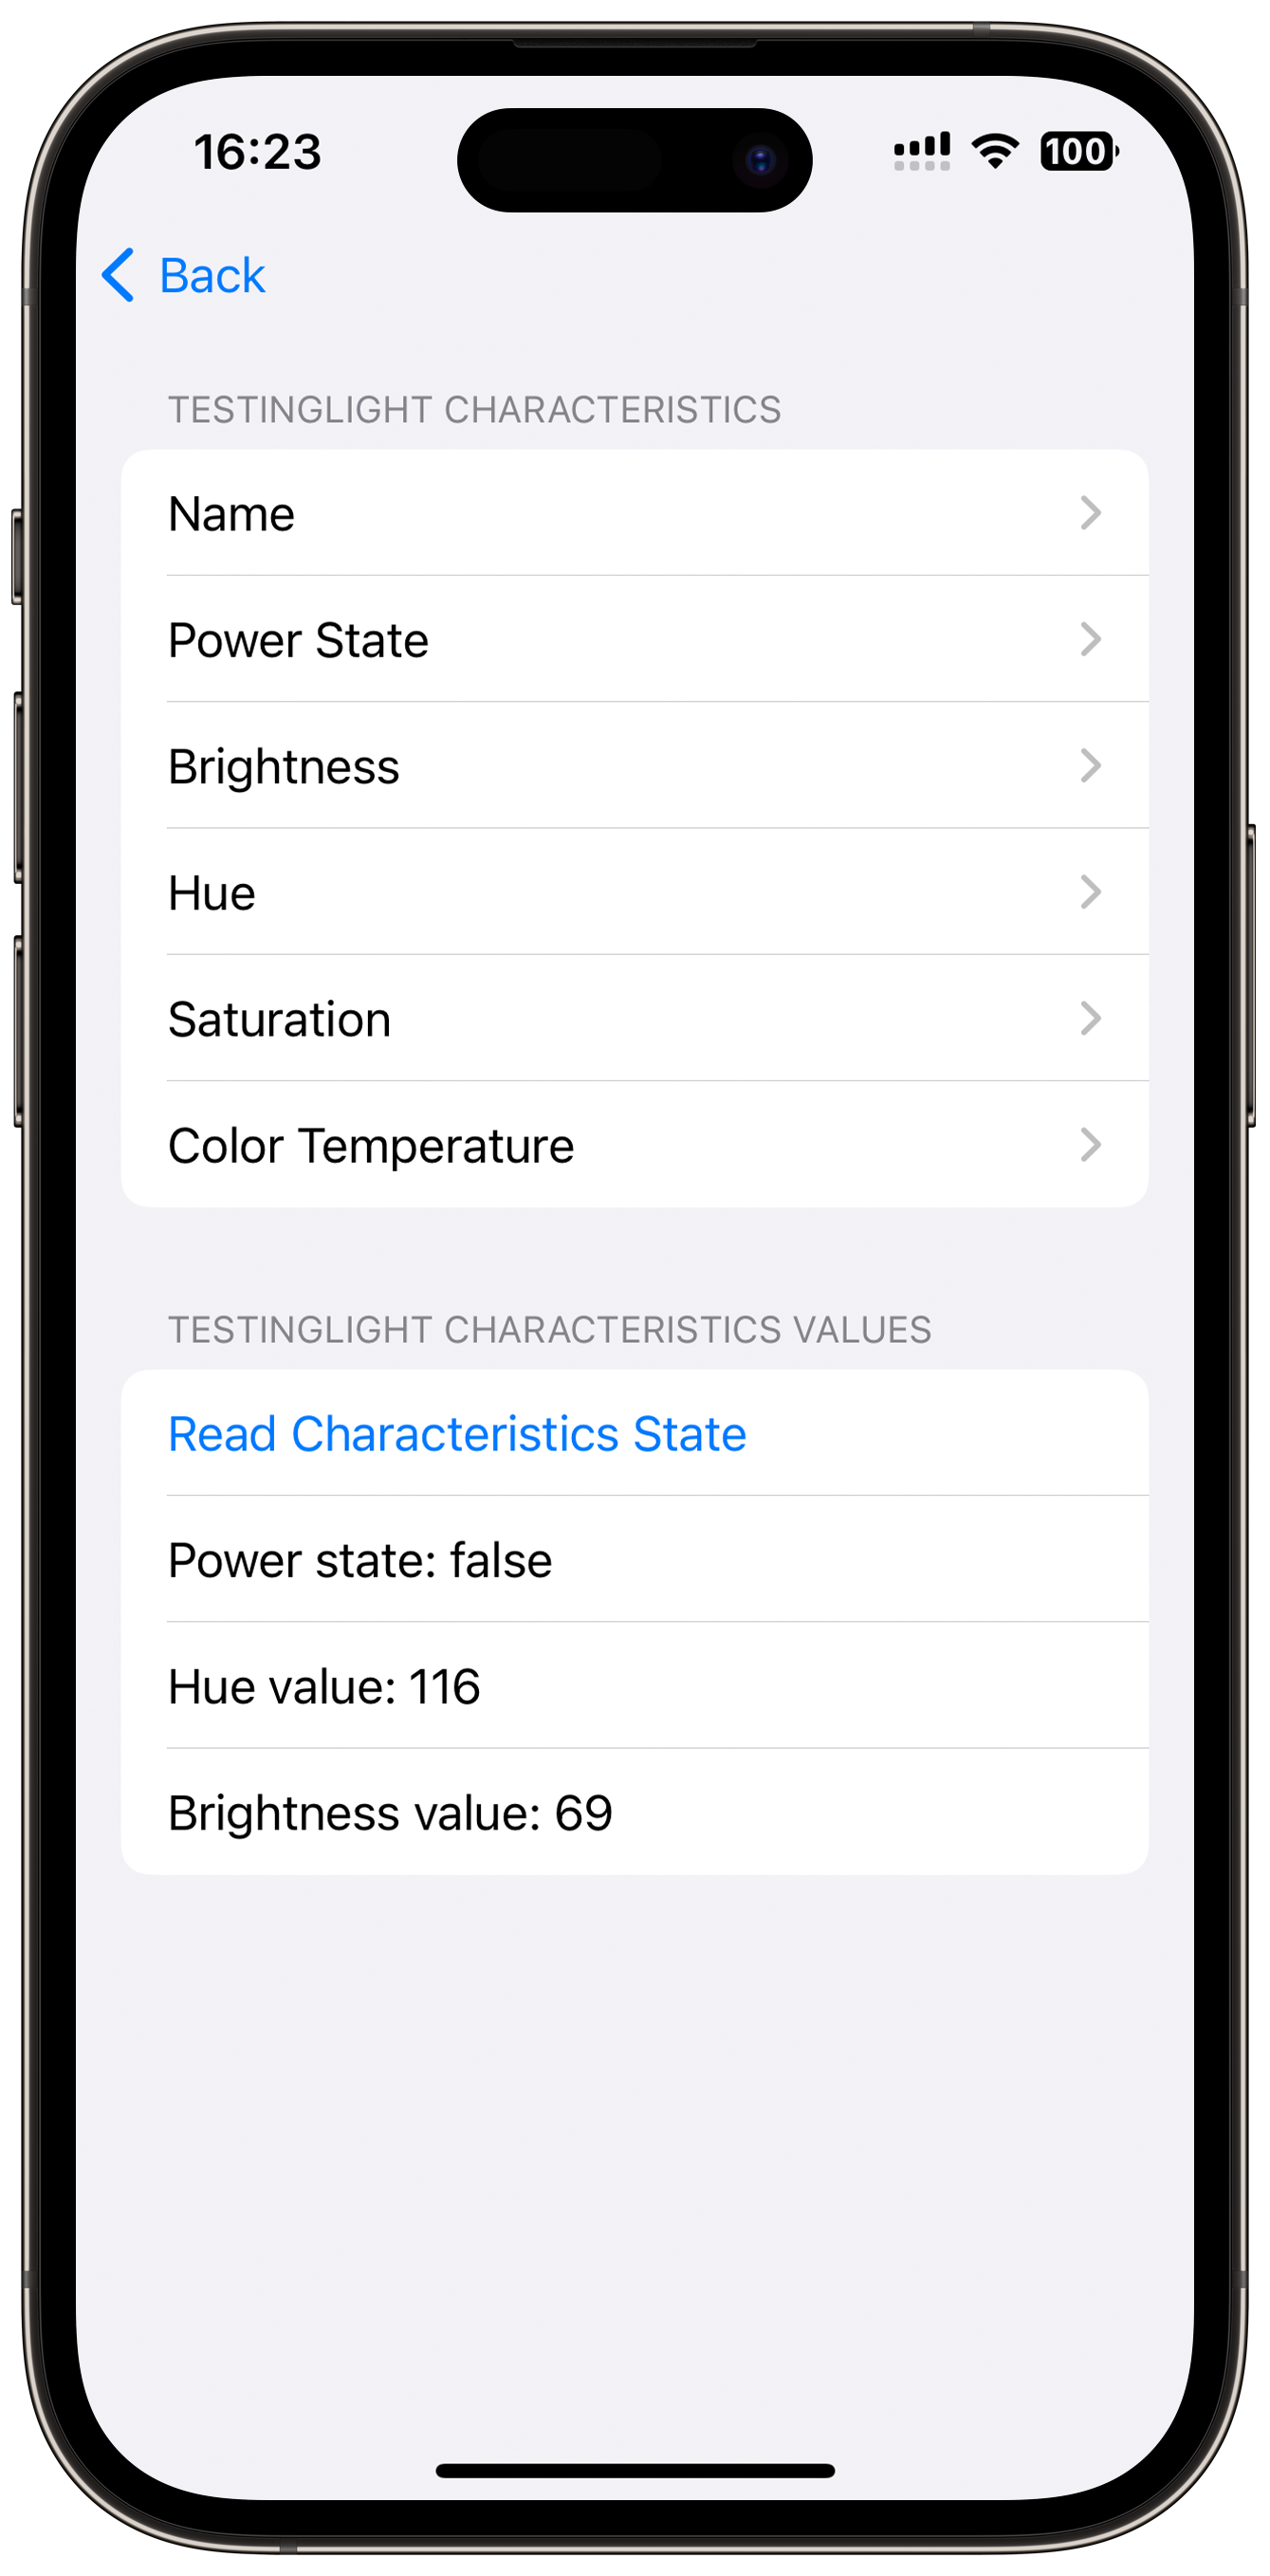
For example, I created a TestingLight Accessory that is in the Lightbulb category. I then added a Lightbulb Service to the Accessory that comes with some default Characteristics, such as On, Brightness, Hue, Saturation, and Color Temperature. All of it I can access through HomeKit when the simulator is running on my Mac within the same local network.
Of course can configure more advanced accessories and even security cameras, using your Mac's camera for testing. Apple provides an extensive Accessory Service Types API Collection for all Services as well as a Characteristic types API Collection for HomeKit-based Accessories.

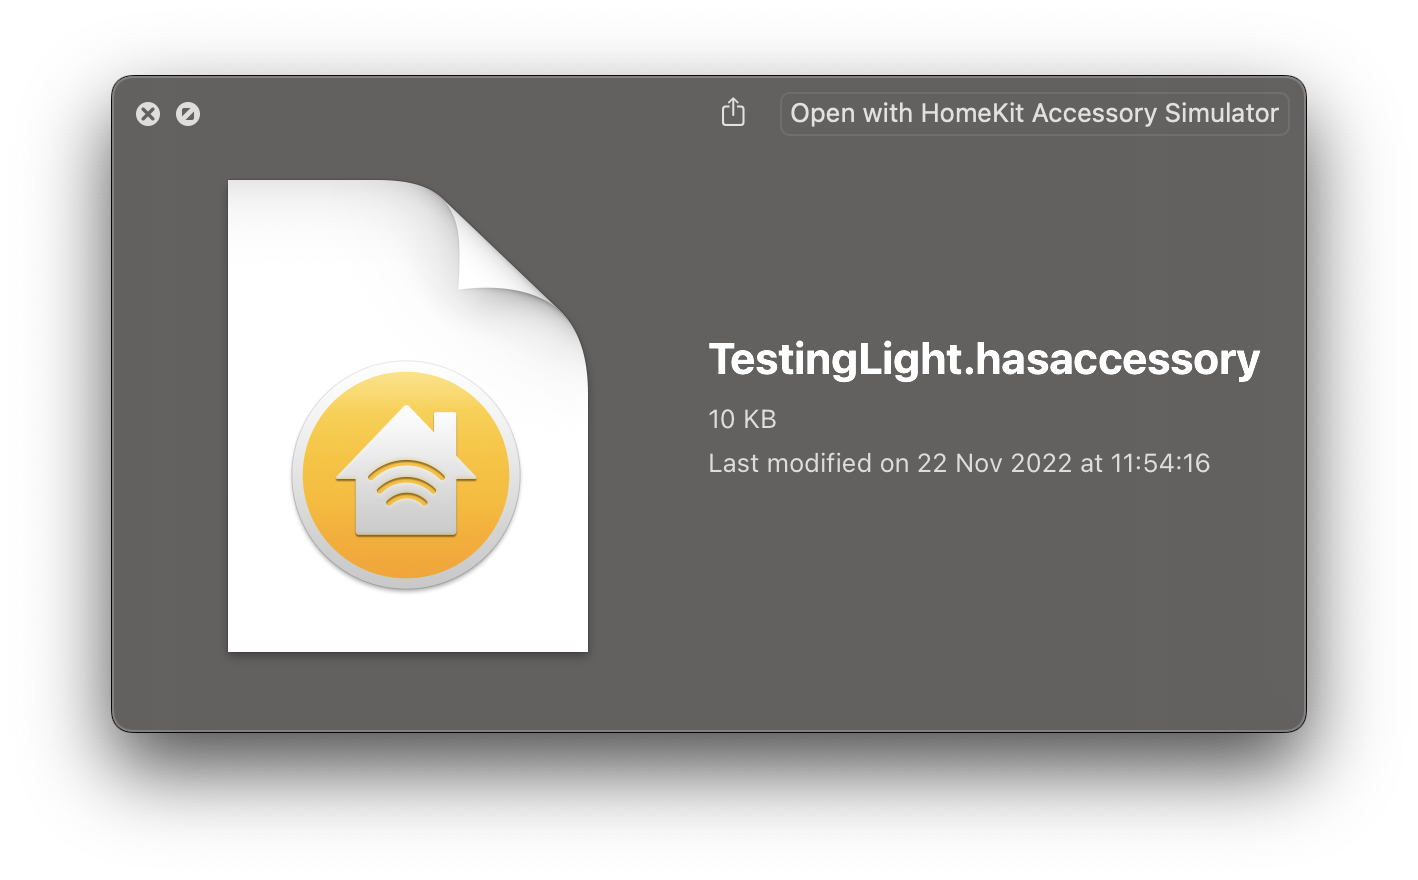
When developing your app with a team of developers, you can also conveniently export the Accessory configuration from HomeKit Accessory Simulator (HAS) and share it with other developers that can import the .hasaccessory file on their development machine.
Based on this, let's proceed to read the Characteristics of the Lightbulb Service from the TestingLight Accessory I created for my Dev Home.
Reading Characteristics
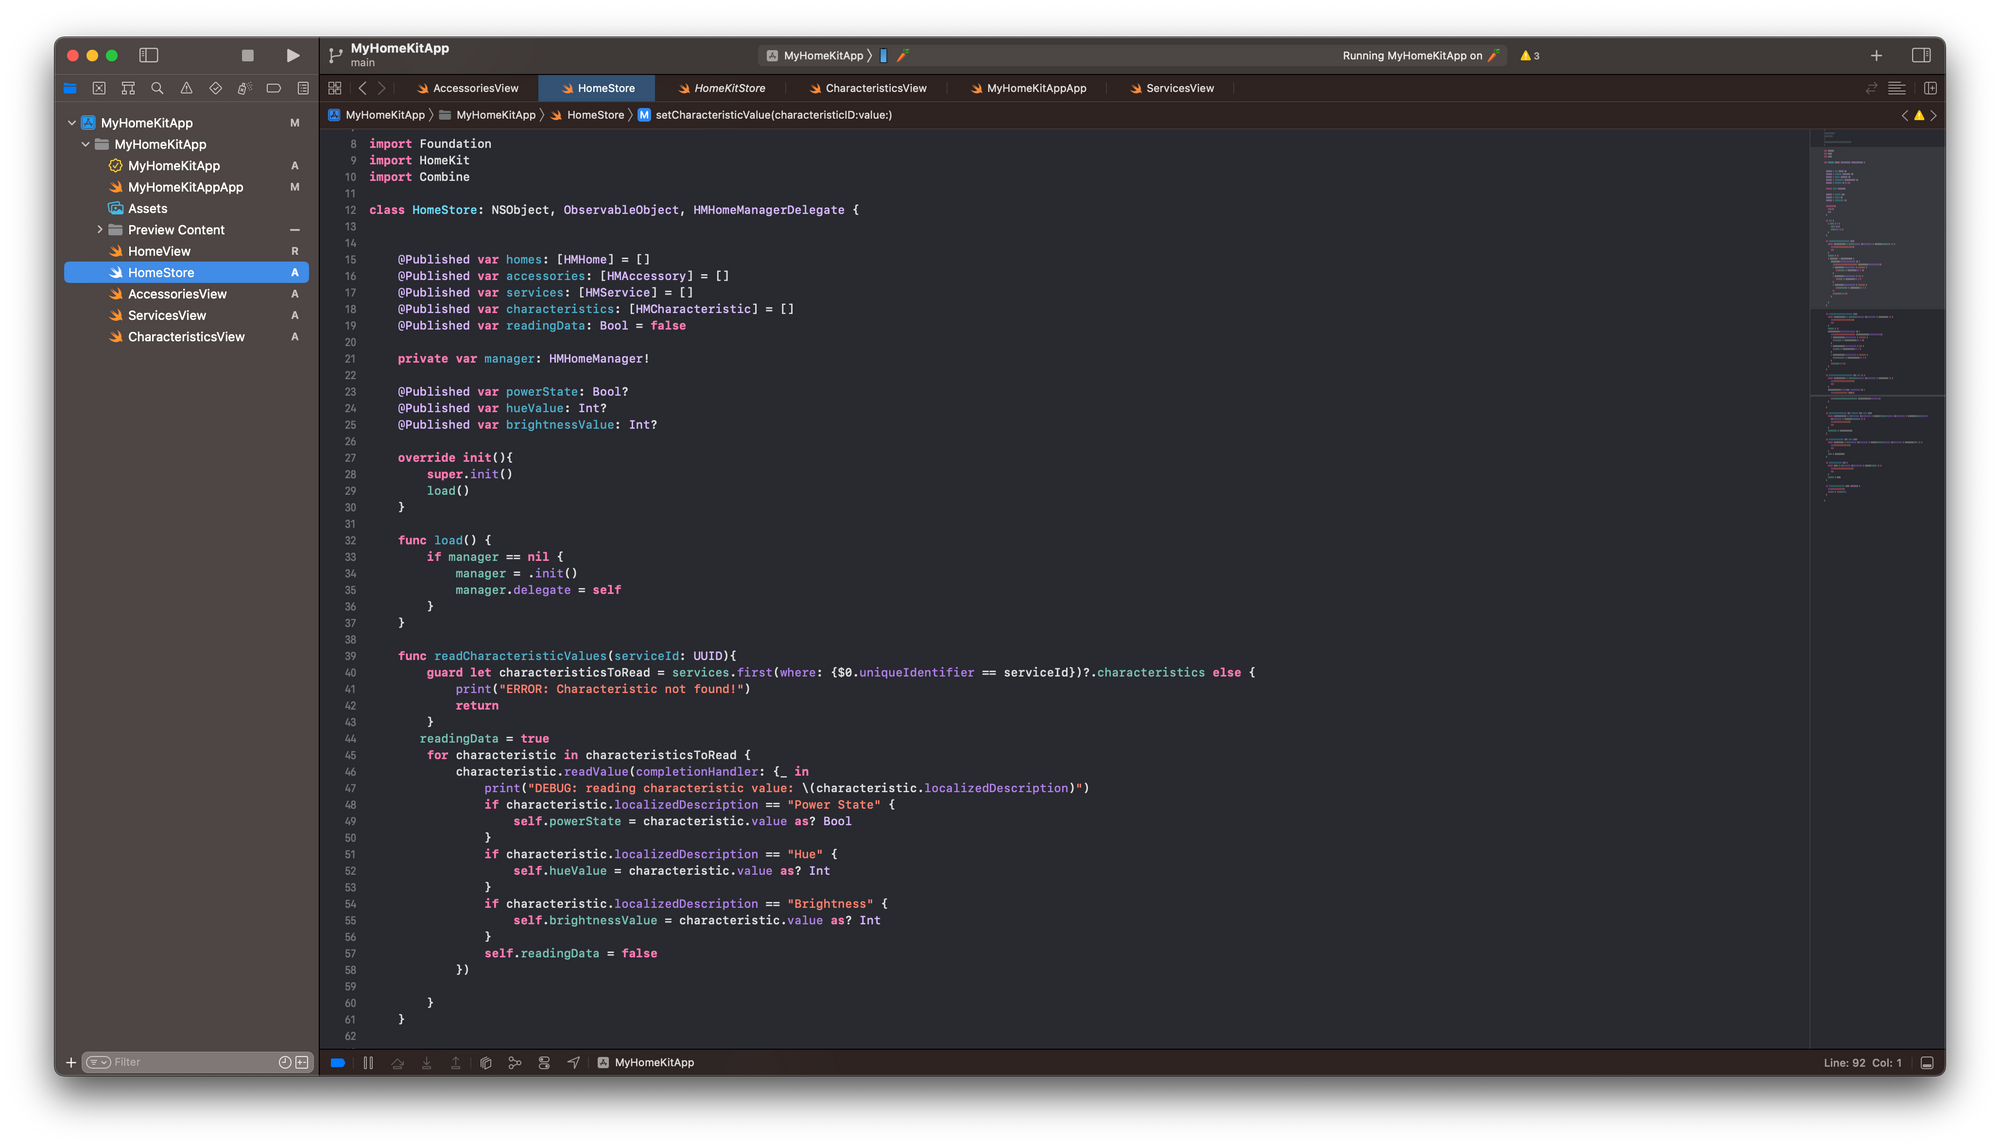
To read the Characteristics we can again evolve the functionality of our HomeStore. Let's add a readCharacteristicValues(serviceId: UUID) function that takes the unique identifier of a specific Service as a parameter to then search for its Characteristics. There may be many Characteristics, so I implementing some aspects specific to the TestingLight Accessory and its Lightbulb Service.
I want to read the Power State, Brightness, and Hue values, for which I am also creating @Published properties for the HomeStore to make the data available for the SwiftUI views using the HomeStore as a model.
Now, even though any Characteristic has a value property, it is not advisable to just read this property as the values may frequently change. The Accessories live in the Home network and can be accessed by other apps or even changed through automatization, so we should use the function readValue() async throws. This is executed asynchronously, so we have to use a completion handler to read the values.
To filter the Characteristics for the values we want, we can use the localizedDescription property to filter for "Power State", "Brightness" and "Hue" to store the results in the new properties of the HomeStore.
class HomeStore: NSObject, ObservableObject, HMHomeManagerDelegate {


    @Published var homes: [HMHome] = []
    @Published var accessories: [HMAccessory] = []
    @Published var services: [HMService] = []
    @Published var characteristics: [HMCharacteristic] = []
    private var manager: HMHomeManager!

    @Published var readingData: Bool = false

    @Published var powerState: Bool?
    @Published var hueValue: Int?
    @Published var brightnessValue: Int?

    [...]

    func readCharacteristicValues(serviceId: UUID){
        guard let characteristicsToRead = services.first(where: {$0.uniqueIdentifier == serviceId})?.characteristics else {
            print("ERROR: Characteristic not found!")
            return
        }
       readingData = true
        for characteristic in characteristicsToRead {
            characteristic.readValue(completionHandler: {_ in
                print("DEBUG: reading characteristic value: \(characteristic.localizedDescription)")
                if characteristic.localizedDescription == "Power State" {
                    self.powerState = characteristic.value as? Bool
                }
                if characteristic.localizedDescription == "Hue" {
                    self.hueValue = characteristic.value as? Int
                }
                if characteristic.localizedDescription == "Brightness" {
                    self.brightnessValue = characteristic.value as? Int
                }
                self.readingData = false
            })
        }
    }
}
Note that I also added a @Published readingData property that is turned to true while the readValue() async throws is running and then turned to false in the completion handler. It is not really needed to work, but maybe this information can be useful, for example disabling certain parts of the app's UI until the data has been successfully read and the UI has been updated.
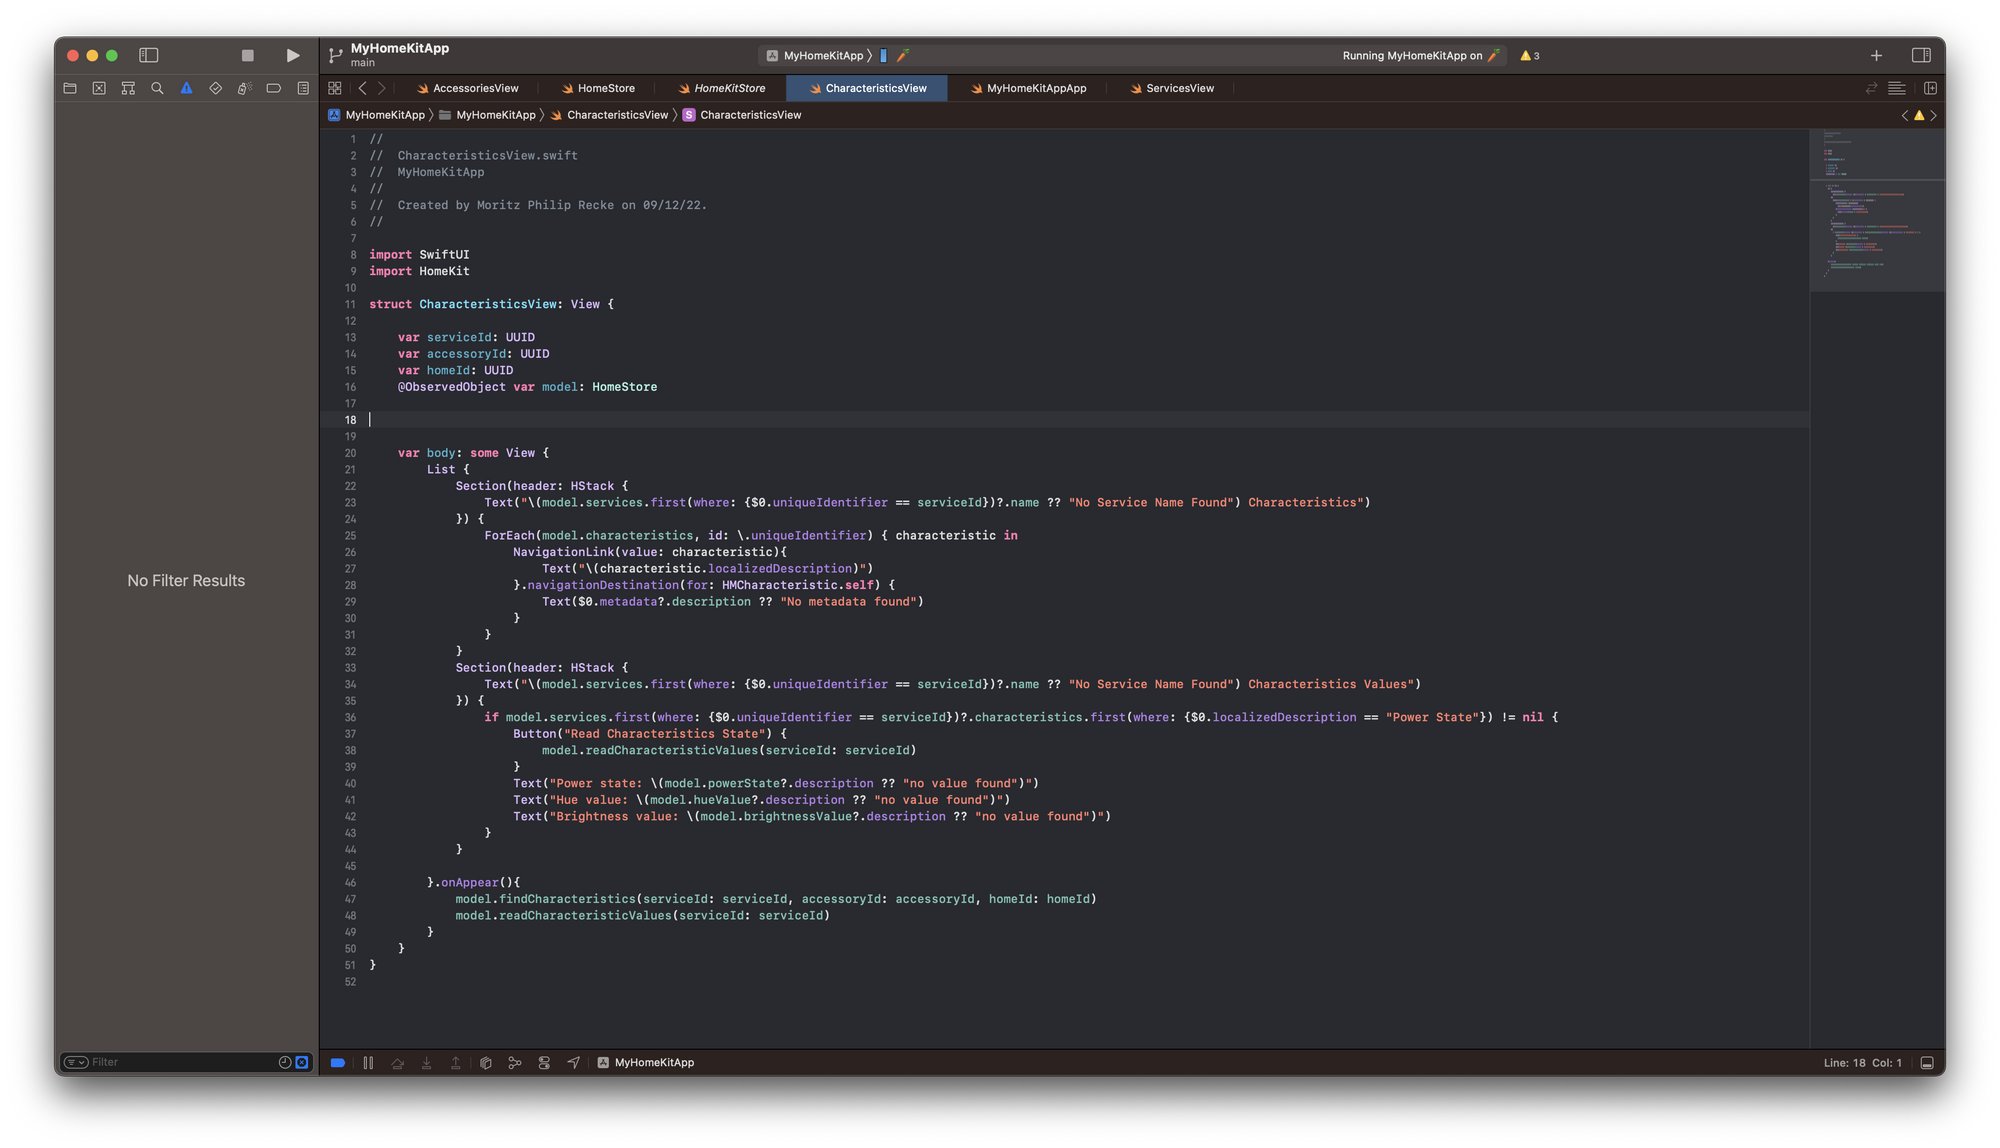
Then, we can extend our CharacteristicsView.Swift file to add another Section after the list of Characteristics to display the values we read. Here we can also check if the Service we are currently displaying actually has the Characteristics we are looking for and only display the values if this is the case. This is quite a simplification but serves to show that based on certain Characteristics being available or not, you can modify the app's UI. Lastly, in the .onAppear modifier, we can now also call the readCharacteristicValues function of the model.
struct CharacteristicsView: View {

    var serviceId: UUID
    var accessoryId: UUID
    var homeId: UUID
    @ObservedObject var model: HomeStore


    var body: some View {
        List {
            Section(header: HStack {
                Text("\(model.services.first(where: {$0.uniqueIdentifier == serviceId})?.name ?? "No Service Name Found") Characteristics")
            }) {
                ForEach(model.characteristics, id: \.uniqueIdentifier) { characteristic in
                    NavigationLink(value: characteristic){
                        Text("\(characteristic.localizedDescription)")
                    }.navigationDestination(for: HMCharacteristic.self) {
                        Text($0.metadata?.description ?? "No metadata found")
                    }
                }
            }
            Section(header: HStack {
                Text("\(model.services.first(where: {$0.uniqueIdentifier == serviceId})?.name ?? "No Service Name Found") Characteristics Values")
            }) {
                if model.services.first(where: {$0.uniqueIdentifier == serviceId})?.characteristics.first(where: {$0.localizedDescription == "Power State"}) != nil {
                    Button("Read Characteristics State") {
                        model.readCharacteristicValues(serviceId: serviceId)
                    }
                    Text("Power state: \(model.powerState?.description ?? "no value found")")
                    Text("Hue value: \(model.hueValue?.description ?? "no value found")")
                    Text("Brightness value: \(model.brightnessValue?.description ?? "no value found")")
                }
            }
        }.onAppear(){
            model.findCharacteristics(serviceId: serviceId, accessoryId: accessoryId, homeId: homeId)
            model.readCharacteristicValues(serviceId: serviceId)
        }
    }
}
When you run the app on your iPhone, the values of the Characteristics will only be displayed if you navigate to the Lightbulb Service of the TestingLight Accessory.
Writing Characteristics
Now, let's see how to change the values of the characteristics. Again, this functionality we can implement this in the HomeStore class. We can add two additional functions to effectively manage writing values to the Characteristic and then reading the new values from the Characteristic to ensure the value was set and not changed in the meanwhile.
The function setCharacteristicValue(characteristicID: UUID?, value: Any) takes a value of the type Any to work generically with all data and writes this data to a specific Characteristic. Same as with reading values, this has to be done asynchronously with the writeValue(_ value: Any?) async throws function. In the completion handler, we can then call the function readCharacteristicValue(characteristicID: UUID?) that works similarly to the previous readCharacteristicValues(serviceId: UUID) function but instead of looking up Characteristics for a Service, it looks for just one specific Characteristic through its unique identifier and then checks if it is one of the Power State, Brightness and Hue values, we are looking for.
class HomeStore: NSObject, ObservableObject, HMHomeManagerDelegate {

    [...]

    func setCharacteristicValue(characteristicID: UUID?, value: Any) {
        guard let characteristicToWrite = characteristics.first(where: {$0.uniqueIdentifier == characteristicID}) else {
            print("ERROR: Characteristic not found!")
            return
        }
        characteristicToWrite.writeValue(value, completionHandler: {_ in
            self.readCharacteristicValue(characteristicID: characteristicToWrite.uniqueIdentifier)
        })
    }

    func readCharacteristicValue(characteristicID: UUID?){
        guard let characteristicToRead = characteristics.first(where: {$0.uniqueIdentifier == characteristicID}) else {
            print("ERROR: Characteristic not found!")
            return
        }
        readingData = true
        characteristicToRead.readValue(completionHandler: {_ in
            if characteristicToRead.localizedDescription == "Power State" {
                self.powerState = characteristicToRead.value as? Bool
            }
            if characteristicToRead.localizedDescription == "Hue" {
                self.hueValue = characteristicToRead.value as? Int
            }
            if characteristicToRead.localizedDescription == "Brightness" {
                self.brightnessValue = characteristicToRead.value as? Int
            }
            self.readingData = false
        })
    }

}
For your convenience, I am adding here the complete code of the HomeStore.Swift file that contains all code blocks discussed so far.
class HomeStore: NSObject, ObservableObject, HMHomeManagerDelegate {


    @Published var homes: [HMHome] = []
    @Published var accessories: [HMAccessory] = []
    @Published var services: [HMService] = []
    @Published var characteristics: [HMCharacteristic] = []
    @Published var readingData: Bool = false

    private var manager: HMHomeManager!

    @Published var powerState: Bool?
    @Published var hueValue: Int?
    @Published var brightnessValue: Int?

    override init(){
        super.init()
        load()
    }

    func load() {
        if manager == nil {
            manager = .init()
            manager.delegate = self
        }
    }

    func readCharacteristicValues(serviceId: UUID){
        guard let characteristicsToRead = services.first(where: {$0.uniqueIdentifier == serviceId})?.characteristics else {
            print("ERROR: Characteristic not found!")
            return
        }
       readingData = true
        for characteristic in characteristicsToRead {
            characteristic.readValue(completionHandler: {_ in
                if characteristic.localizedDescription == "Power State" {
                    self.powerState = characteristic.value as? Bool
                }
                if characteristic.localizedDescription == "Hue" {
                    self.hueValue = characteristic.value as? Int
                }
                if characteristic.localizedDescription == "Brightness" {
                    self.brightnessValue = characteristic.value as? Int
                }
                self.readingData = false
            })
        }
    }

    func setCharacteristicValue(characteristicID: UUID?, value: Any) {
        guard let characteristicToWrite = characteristics.first(where: {$0.uniqueIdentifier == characteristicID}) else {
            print("ERROR: Characteristic not found!")
            return
        }
        characteristicToWrite.writeValue(value, completionHandler: {_ in
            self.readCharacteristicValue(characteristicID: characteristicToWrite.uniqueIdentifier)
        })

    }

    func readCharacteristicValue(characteristicID: UUID?){
        guard let characteristicToRead = characteristics.first(where: {$0.uniqueIdentifier == characteristicID}) else {
            print("ERROR: Characteristic not found!")
            return
        }
        readingData = true
        characteristicToRead.readValue(completionHandler: {_ in
            if characteristicToRead.localizedDescription == "Power State" {
                self.powerState = characteristicToRead.value as? Bool
            }
            if characteristicToRead.localizedDescription == "Hue" {
                self.hueValue = characteristicToRead.value as? Int
            }
            if characteristicToRead.localizedDescription == "Brightness" {
                self.brightnessValue = characteristicToRead.value as? Int
            }
            self.readingData = false
        })
    }

    func findCharacteristics(serviceId: UUID, accessoryId: UUID, homeId: UUID){
        guard let serviceCharacteristics = homes.first(where: {$0.uniqueIdentifier == homeId})?.accessories.first(where: {$0.uniqueIdentifier == accessoryId})?.services.first(where: {$0.uniqueIdentifier == serviceId})?.characteristics else {
            print("ERROR: No Services found!")
            return
        }
        characteristics = serviceCharacteristics
    }

    func findServices(accessoryId: UUID, homeId: UUID){
        guard let accessoryServices = homes.first(where: {$0.uniqueIdentifier == homeId})?.accessories.first(where: {$0.uniqueIdentifier == accessoryId})?.services else {
            print("ERROR: No Services found!")
            return
        }
        services = accessoryServices
    }

    func findAccessories(homeId: UUID) {
        guard let devices = homes.first(where: {$0.uniqueIdentifier == homeId})?.accessories else {
            print("ERROR: No Accessory not found!")
            return
        }
        accessories = devices
    }

    func homeManagerDidUpdateHomes(_ manager: HMHomeManager) {
        print("DEBUG: Updated Homes!")
        self.homes = self.manager.homes
    }
}
Now, let's add some controls to our CharacteristicsView.Swift file. Below the two existing Sections, let's add another one that allows us to turn the TestingLight on and off and set the Hue and Brightness values. While a Toggle would also work, I used a simple Button to flip the switch. For the Hue and Brightness, I used a Slider with values from 0 to 360 for the hue and 0 to 100 for the brightness, as configured in the HomeKit Accessory Simulator (HAS).
For the two Sliders, I also added @State objects for hueSlider and brightnessSlider to use @Binding to execute the sliders' closures and set the Characteristics value once the values are manipulated through the UI.
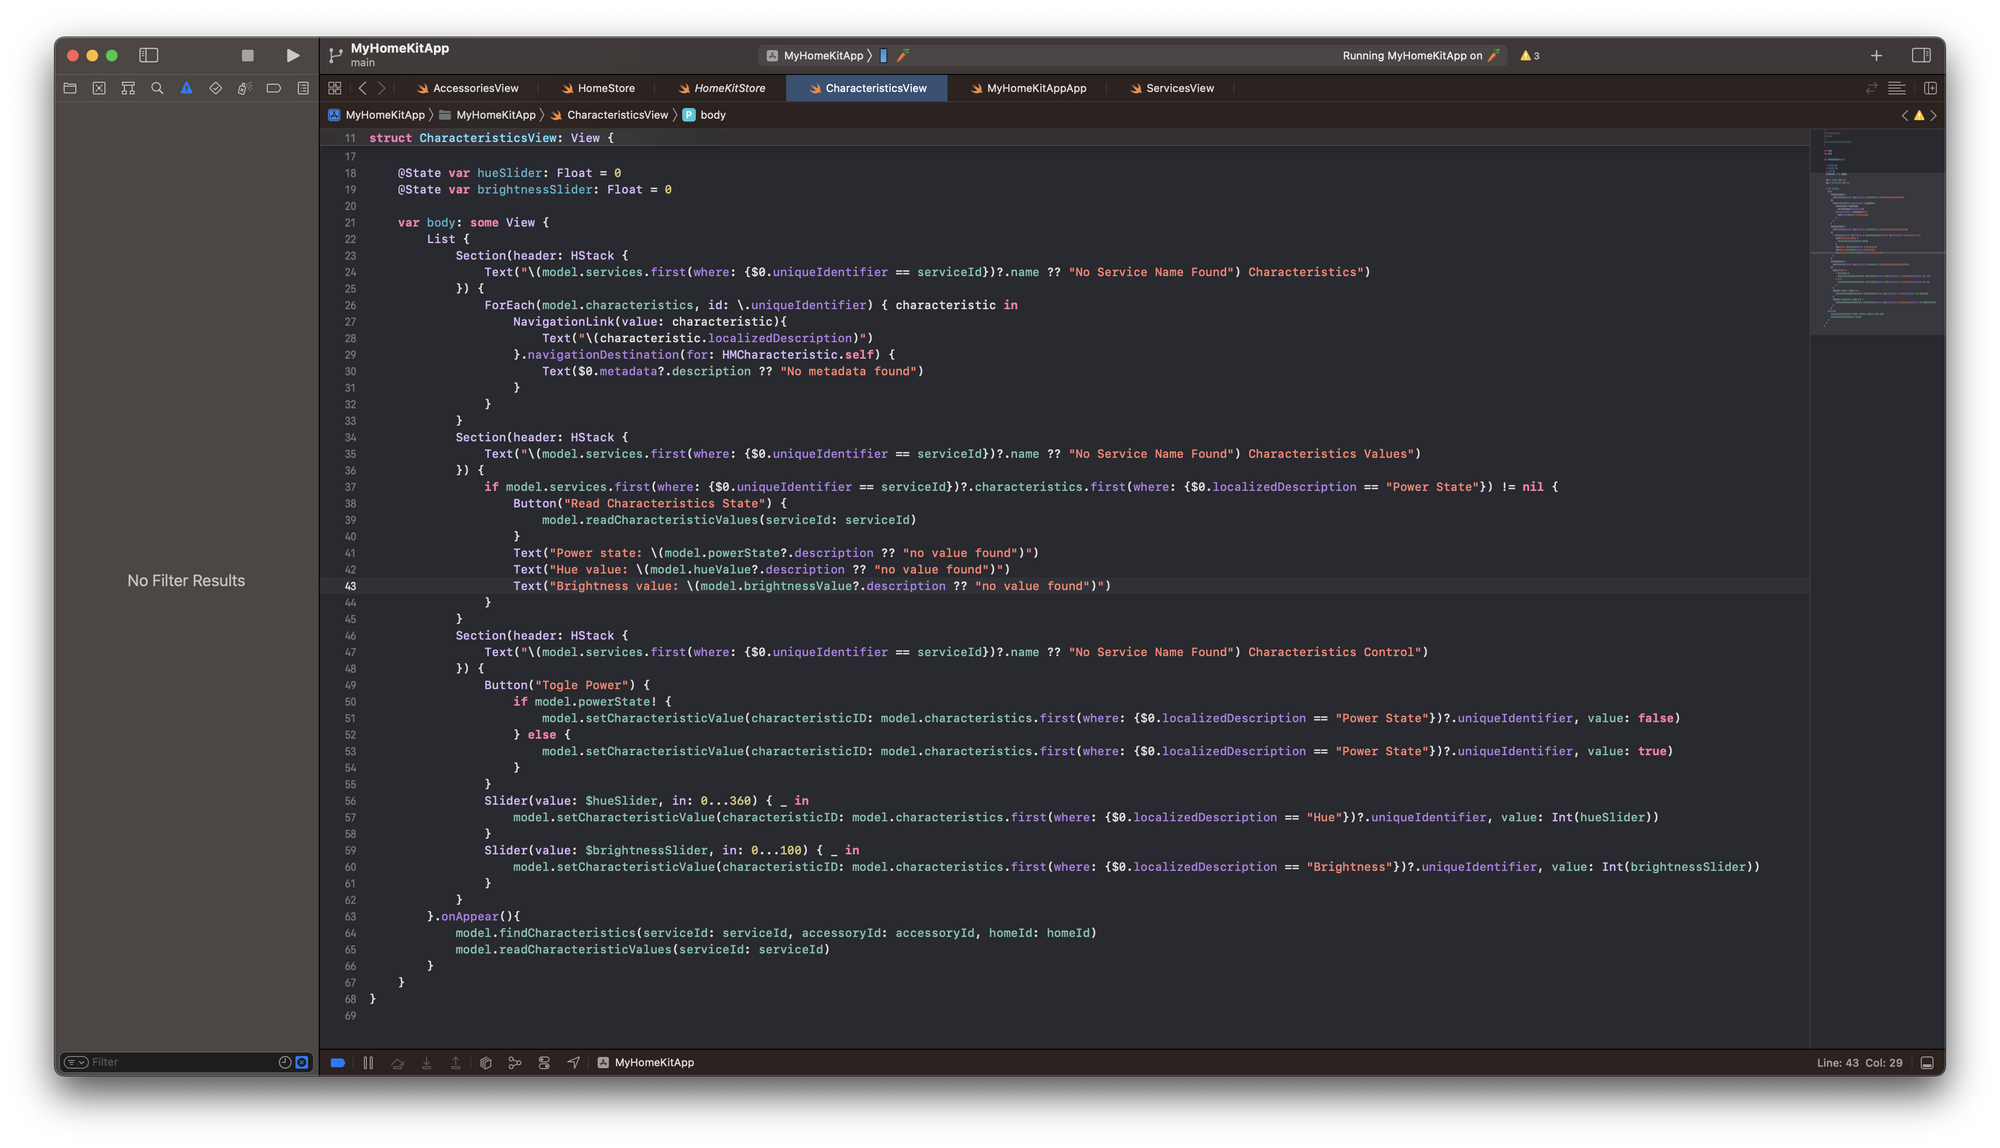
Here you find the complete code for the CharacteristicsView.Swift file that shows the sample implementation for both readings and showing as well as writing the Characteristics values. When changes are detected, the views are re-rendered to display current information. To check whether changes have been done through another device, there is also another Button that read all Characteristics values.
In a real app, this may be something the app does periodically or when specific views are entered. But it demonstrates nicely, for example by changing some of the values inside the HomeKit Accessory Simulator (HAS) and then loading the correct value inside the app.
import SwiftUI
import HomeKit

struct CharacteristicsView: View {

    var serviceId: UUID
    var accessoryId: UUID
    var homeId: UUID
    @ObservedObject var model: HomeStore

    @State var hueSlider: Float = 0
    @State var brightnessSlider: Float = 0

    var body: some View {
        List {
            Section(header: HStack {
                Text("\(model.services.first(where: {$0.uniqueIdentifier == serviceId})?.name ?? "No Service Name Found") Characteristics")
            }) {
                ForEach(model.characteristics, id: \.uniqueIdentifier) { characteristic in
                    NavigationLink(value: characteristic){
                        Text("\(characteristic.localizedDescription)")
                    }.navigationDestination(for: HMCharacteristic.self) {
                        Text($0.metadata?.description ?? "No metadata found")
                    }
                }
            }
            Section(header: HStack {
                Text("\(model.services.first(where: {$0.uniqueIdentifier == serviceId})?.name ?? "No Service Name Found") Characteristics Values")
            }) {
                if model.services.first(where: {$0.uniqueIdentifier == serviceId})?.characteristics.first(where: {$0.localizedDescription == "Power State"}) != nil {
                    Button("Read Characteristics State") {
                        model.readCharacteristicValues(serviceId: serviceId)
                    }
                    Text("Power state: \(model.powerState?.description ?? "no value found")")
                    Text("Hue value: \(model.hueValue?.description ?? "no value found")")
                    Text("Brightness value: \(model.brightnessValue?.description ?? "no value found")")
                }
            }
            Section(header: HStack {
                Text("\(model.services.first(where: {$0.uniqueIdentifier == serviceId})?.name ?? "No Service Name Found") Characteristics Control")
            }) {
                Button("Toggle Power") {
                    if model.powerState! {
                        model.setCharacteristicValue(characteristicID: model.characteristics.first(where: {$0.localizedDescription == "Power State"})?.uniqueIdentifier, value: false)
                    } else {
                        model.setCharacteristicValue(characteristicID: model.characteristics.first(where: {$0.localizedDescription == "Power State"})?.uniqueIdentifier, value: true)
                    }
                }
                Slider(value: $hueSlider, in: 0...360) { _ in
                    model.setCharacteristicValue(characteristicID: model.characteristics.first(where: {$0.localizedDescription == "Hue"})?.uniqueIdentifier, value: Int(hueSlider))
                }
                Slider(value: $brightnessSlider, in: 0...100) { _ in
                    model.setCharacteristicValue(characteristicID: model.characteristics.first(where: {$0.localizedDescription == "Brightness"})?.uniqueIdentifier, value: Int(brightnessSlider))
                }
            }
        }.onAppear(){
            model.findCharacteristics(serviceId: serviceId, accessoryId: accessoryId, homeId: homeId)
            model.readCharacteristicValues(serviceId: serviceId)
        }
    }
}
Here you can see side-by-side how the interaction with the HomeKit Accessory Simulator (HAS) works. The app correctly displays the Characteristics values and when changed through the Controls, the data inside the simulator changes, showing that the app successfully controls the TestingLight Accessory.
That's it. We covered the basics of how to get started with developing HomeKit-enabled Apps with SwiftUI. Of course, this just touched the surface but should provide enough to get things going. If you want to dive deeper, explore the massive HomeKit documentation, read our article on "Developing Apps with the HomeKit Accessory Simulator" and stay tuned for more.