Passing Data between Views in SwiftUI using @State and @Binding
By the end of this tutorial, you will be able to pass data using @State and @Binding from a primary to a secondary view using a hierarchical navigation in SwiftUI.

When you have multiple views in your SwiftUI App, you often need to share data from one view to the next one. If you've been programming for iOS/iPadOS for a while now, you know that this is something we used to do using a prepareForSegue. However, if you're a newbie, you won't have any problem following this tutorial. There is no need for any previous knowledge of UIKit to pass data between Views using SwiftUI.
This tutorial is the second of a series that explores 4 different solutions for passing data between views:
- Passing Data between Views using a property
- Passing Data between Views using @State and @Binding
- Passing data via the view’s environment
- Passing data via
@ObservedObjectand@StateObject
Last time we explored how to pass data using a property from a primary view to a modally presented secondary view in SwiftUI. This time we are going to make sure that primary and secondary views have shared data. Changing the data in the second view will mean changing it in the first view and vice versa! Let's go.
Project Setup
To demonstrate how it operates, we will consider an example where navigation from one screen to another is possible using a NavigationView and NavigationLink (Hierarchical Navigation).

Our goal is to create:
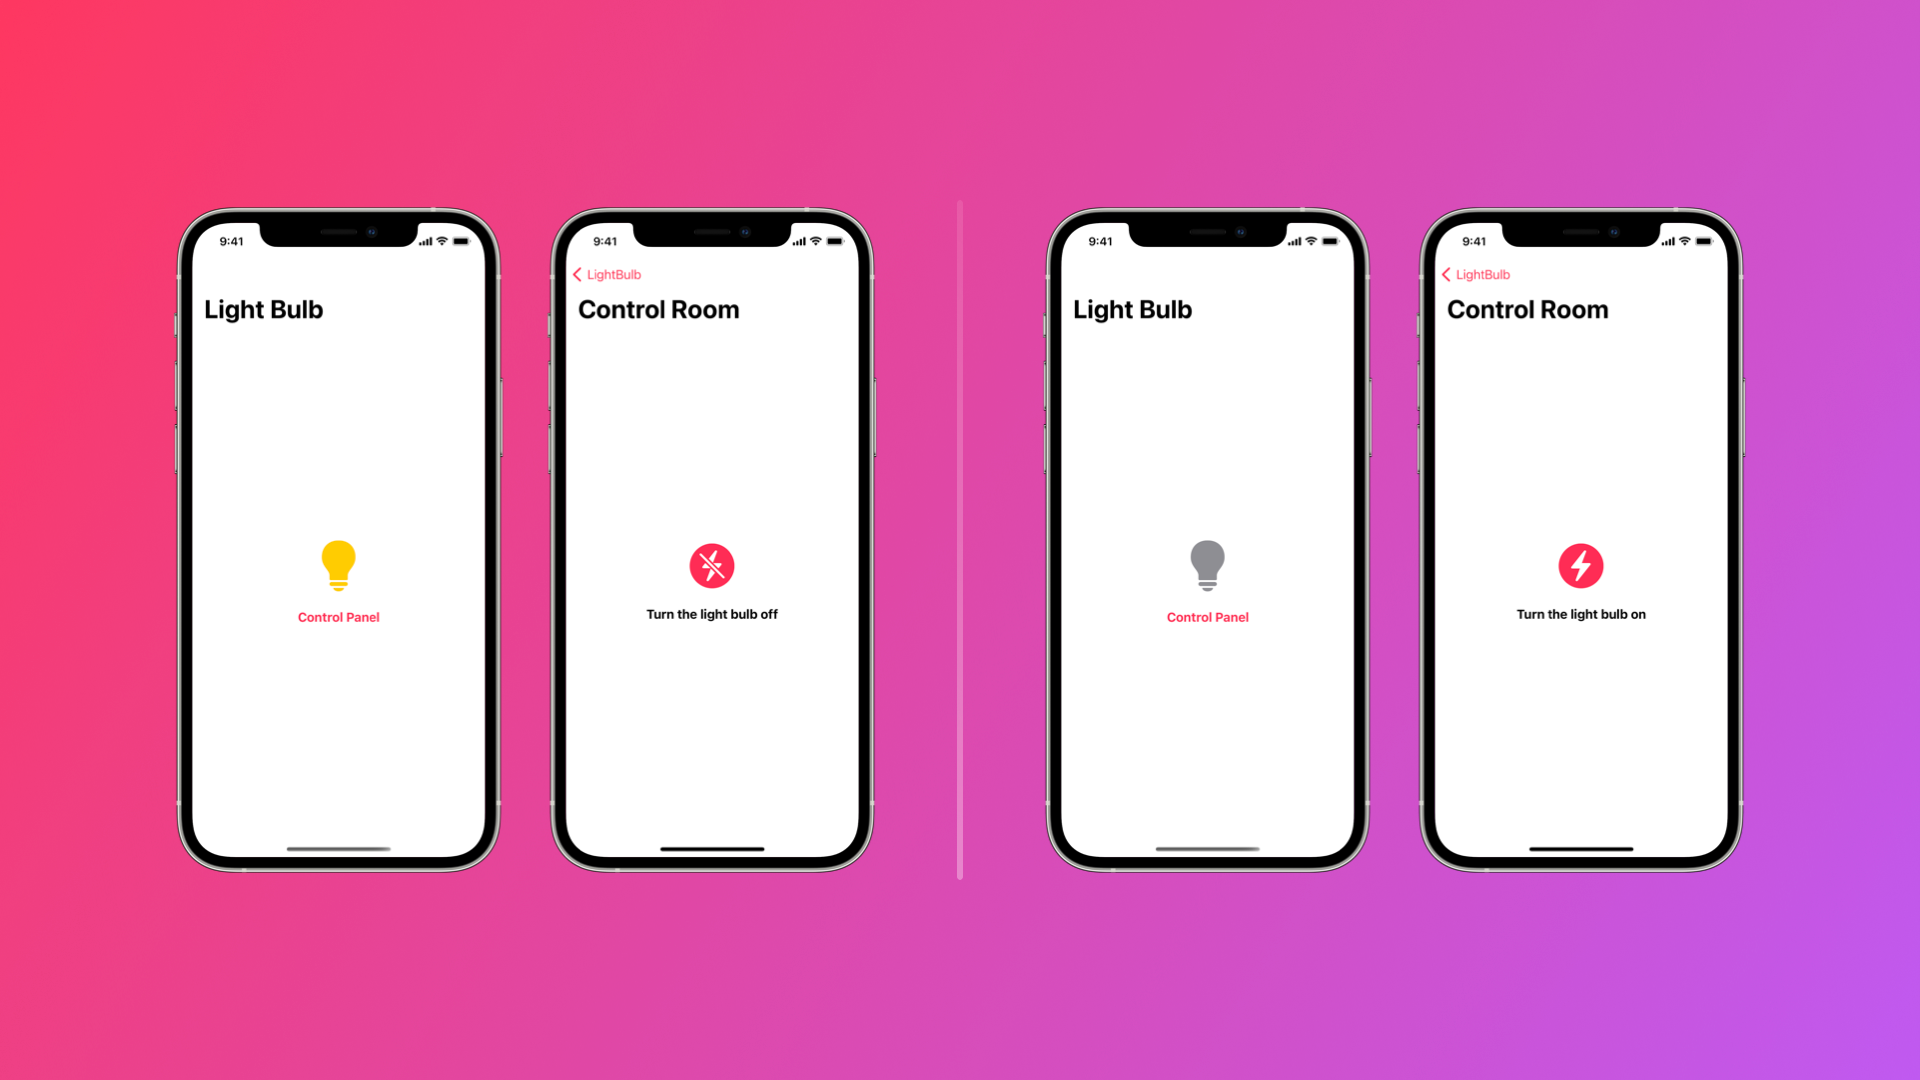
- a first View, called LightBulb, consisting of turned-on or off, the light bulb, and a link to a second View.
- a second View, called ControlRoom, that can control the switching on and off of the light bulb in the first View.
By structuring the LightBulbView and the ControlView independently and then creating a hierarchical navigation system using a NavigationLink you would probably end up with code designed more or less like the following.
struct LightBulbView: View {
    var isOn: Bool = true
    var body: some View {
        NavigationView {
            VStack(spacing: 20.0) {
                Image(systemName: "lightbulb.fill")
                    .font(.system(size: 60))
                    .foregroundColor(isOn ? .yellow : .gray)
                    .navigationTitle(Text("LightBulb"))
                NavigationLink(destination: ControlView(lightIsOn: isOn)) {
                    Text("Control Panel")
                        .fontWeight(.bold)
                }
            }
        }
    }
}
LightBulbView.swift starting point
A LightBulbView.swift consisting of:
- a
NavigationViewfor presenting a stack of views that represents a visible path in a navigation hierarchy. - a
VStackthat arranges anImageand aNavigationLinkin a vertical line.
The Image is a light bulb SF Symbol colored gray if the boolean variable isOn is false or yellow if the boolean variable isOn is true. This is obviously intended to simulate turning the light bulb on and off.
The NavigationLink allows the navigation to ControlView, using the latter as a destination of the NavigationLink. A simple Text is used as a label.
struct ControlView: View {
    @State var lightIsOn: Bool
    var body: some View {
        VStack(spacing: 20.0) {
            Button(action: {
                lightIsOn.toggle()
            }, label: {
                Image(systemName: !lightIsOn ? "bolt.circle.fill" : "bolt.slash.circle.fill" )
                    .font(.system(size: 60))
            })
            Text("Turn the light bulb \(!lightIsOn ? "on" : "off")")
                .fontWeight(.bold)
        }
        .navigationTitle("Control Room")
    }
}
ControlView.swift starting point
A ControlView.swift consisting of:
- a
VStackthat arranges aButtonand aTextin a vertical line.
The Button toggles the boolean variable lightIsOn from on to off and vice versa. A circular bolt SF Symbol is used as a label.
The Text is used as an explicit description of the action the Button will perform when tapped.
The code, as just outlined, is formally correct but logically incorrect. Tapping on the Button in the second screen has no effect on the light bulb on the first screen. LightBulbView is not responding to the change made in ControlView. Why? Let’s troubleshoot it together.
Introducing @State and @Binding
The reason for the above misbehavior is straightforward. We are passing a boolean isOn from the first to the second screen using a property. What we need is to create a stronger bond between the two. ControlView needs not only to have a copy of the property but to have a stronger link to it.
Basically, when it comes to these cases, you don't pass a boolean to the secondary view using a simple property, but you pass a binding to a boolean to the secondary view.
Let’s see how to fix our code then:
1. As a first step, we use @Binding instead of @State to define the boolean variable isOn in the ControlPanel.view
struct ControlView: View {
    @Binding var lightIsOn: Bool // 1. we need a @Binding here!
    var body: some View {
        VStack(spacing: 20.0) {
            Button(action: {
                lightIsOn.toggle()
            }, label: {
                Image(systemName: !lightIsOn ? "bolt.circle.fill" : "bolt.slash.circle.fill" )
                    .font(.system(size: 60))
            })
            Text("Turn the light bulb \(!lightIsOn ? "on" : "off")")
                .fontWeight(.bold)
        }
        .navigationTitle("Control Room")
    }
}
fixing ControlView.swift
2. Immediately after step 1, you will get an error pointing to LightBulb.swift. This has to do with the fact that we are using the initializer ControlView and we have just changed its structure. Xcode is warning us it can't convert isOn from a Bool to a Binding<Bool>. We need a preliminary step before we can solve the issue completely. We first need a property wrapper @State for the boolean variable isOn. Not only will this help solve our problem, but it also makes sense because every time that boolean isOn changes, the view is reloaded, and the light bulb SF Symbol gets colored gray (when isOn is false) or yellow (when isOn is true).
3. We can now finally pass a binding to a boolean to ControlView. We can get the binding we need from the @State we just added in step 2, just using a $ in front of isOn in the initializer pointed out by the warning message.
You can bind to property wrappers that expose a binding through their projected value. For example, every property marked with @State provides a binding via $propertyName.
struct LightBulbView: View {
    @State var isOn: Bool = true // 2. this needs to be @State
    var body: some View {
        NavigationView {
            VStack(spacing: 20.0) {
                Image(systemName: "lightbulb.fill")
                    .font(.system(size: 60))
                    .foregroundColor(isOn ? .yellow : .gray)
                    .navigationTitle(Text("LightBulb"))
                // 3. turn isOn into a Binding<Bool> by adding a dollar sign $
                NavigationLink(destination: ControlView(lightIsOn: $isOn)) {
                    Text("Control Panel")
                        .fontWeight(.bold)
                }
            }
        }
    }
}
fixing LightBulbView.swift
4. In other words, isOn is now shared between LightBulbView and the ControlRoomView view because of the binding. If you compile the code, you should be able to turn on/off the light bulb in the primary view, using the button in the secondary view.
Wrapping up
In 4 simple steps, we made sure that a secondary view, ControlRoomView, not only received data from a primary view, LightBulbView, but that these two shared this data.
For your convenience, below you find the code for both files.
Here is the complete code for both files. Have fun!
//  LightBulbView.swift

struct LightBulbView: View {
    @State var isOn: Bool = true
    var body: some View {
        NavigationView {
            VStack(spacing: 20.0) {
                Image(systemName: "lightbulb.fill")
                    .font(.system(size: 60))
                    .foregroundColor(isOn ? .yellow : .gray)
                    .navigationTitle(Text("Light Bulb"))
                NavigationLink(destination: ControlView(lightIsOn: $isOn)) {
                    Text("Control Panel")
                        .fontWeight(.bold)
                }
            }
        }
    }
}

struct LightBulbView_Previews: PreviewProvider {
    static var previews: some View {
        LightBulbView()
    }
}


//  ControlView.swift

struct ControlView: View {
    @Binding var lightIsOn: Bool
    var body: some View {
        VStack(spacing: 20.0) {
            Button(action: {
                lightIsOn.toggle()
            }, label: {
                Image(systemName: !lightIsOn ? "bolt.circle.fill" : "bolt.slash.circle.fill" )
                    .font(.system(size: 60))
            })
            Text("Turn the light bulb \(!lightIsOn ? "on" : "off")")
                .fontWeight(.bold)
        }
        .navigationTitle("Control Room")
    }
}

struct ControlView_Previews: PreviewProvider {
    static var previews: some View {
        NavigationView {
            ControlView(lightIsOn: .constant(true))
        }
    }
}
Complete code for LightBulbView.swift and ControlView.swift
This is not the only way to proceed, and we invite you to keep an eye on the site for the next tutorials in the series.