
Using the ARKit coaching view in a SwiftUI AR application
Learn how to use the AR coaching view from ARKit on your augmented reality app in SwiftUI


To start an AR experience on your application the app must scan the real-world environment to detect anchors and understand the placement of objects and other elements relevant to the frameworks responsible for making the magic happen.
ARKit needs the application user to move the device around to evaluate the surroundings and detect surfaces that will be used for the experience.
Creating an app in SwiftUI using RealityKit and ARKit
On Apple’s Human Interface Guidelines for Augmented Reality, it is made clear that to provide a better experience to the user the application must guide them through a process called coaching. This straightforward and user-friendly onboarding instructs the user on what to do and should provide them with feedback during this initialization process.
ARKit already has a view implemented you can use to coach your users called ARCoachingOverlayView. By configuring it correctly it will automatically appear once the ARView session starts.
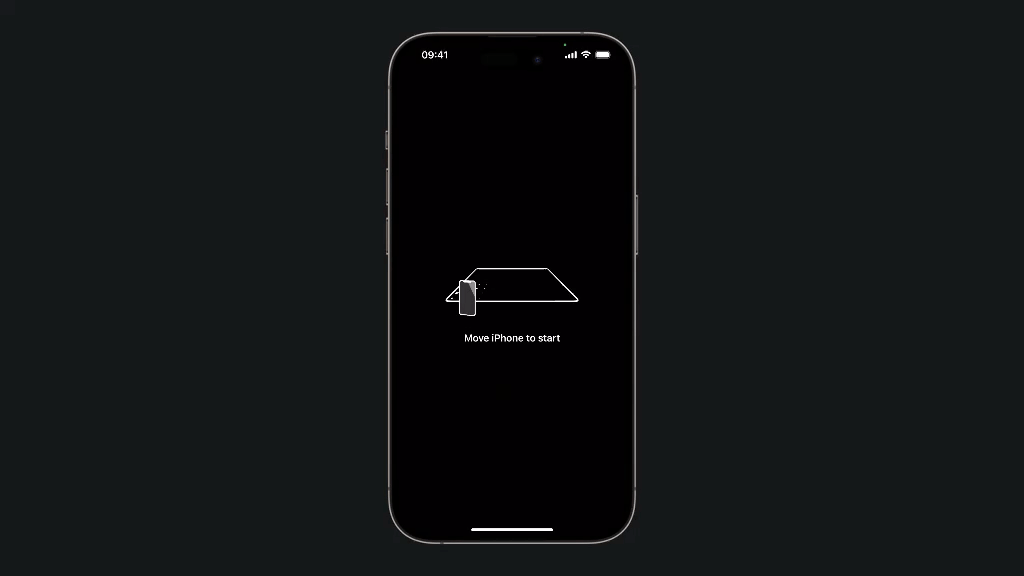
ARCoachingView works when presented in an iOS appHow to implement it in SwiftUI
To implement the ARCoachingOverlayView we need to create an extension of the ARView class. In this extension define a method called addCoaching().
extension ARView: ARCoachingOverlayViewDelegate {
	func addCoaching() {
		...
	}
}
Extending the ARView class to conform to the ARCoachingOverlayViewDelegate protocol
In the addCoaching method we set some of the ARCoachingOverlayView properties.
func addCoaching() {
    let coachingOverlay = ARCoachingOverlayView()

    // Goal is a field that indicates your app's tracking requirements.
    coachingOverlay.goal = .horizontalPlane

    // The session this view uses to provide coaching.
    coachingOverlay.session = self.session

    // How a view should resize itself when its superview's bounds change.
    coachingOverlay.autoresizingMask = [.flexibleWidth, .flexibleHeight]

    self.addSubview(coachingOverlay)
}
Set ARCoachingOverlayView properties
So in this specific case, we set the goal property of the ARCoachingOverlayView to help users find a horizontal plane, but there are other alternatives:
.anyPlane: a plane of any type.tracking: coaching overlay won't hide until the user has moved their device in a way that facilitates ARKit starting up a basic world tracking session..verticalPlane: requires a vertical plane..geoTracking: a precise geographic location.
Add the onboarding to the AR session
Once you set everything, go to the file where you declare the ARView object that displays the rendered 3D model and add this line of code after running the AR session in the makeUIView method.
arView.addCoaching()If you are using the tutorial project you can go into the ARViewContainer() file.
The makeUIView() method should look like this:
func makeUIView(context: Context) -> ARView {
    let arView = ARView(frame: .zero)

    let config = ARWorldTrackingConfiguration()
    config.planeDetection = [.horizontal,.vertical]
    config.environmentTexturing = .automatic
    arView.session.run(config)

    // Adding the coaching overlay on the AR View
    arView.addCoaching()

    return arView
}
With this implementation, the entire AR experience will become more intuitive and user-friendly with just a few lines of code. Coaching will also reduce the time it takes to place an object on a surface because users will start scanning the world immediately after the camera opens.