Adding New Homes and Rooms to HomeKit within a SwiftUI app
Understand how to add or remove Homes and Rooms to the HomeKit environment within a SwiftUI app.

Even though it is most convenient to manage the general configuration of your HomeKit setup through the native Home app on iOS, iPadOS, or macOS, you might also want to add some general capabilities to your HomeKit-enabled app.
For example, beyond interacting with smart home Accessories, you may also want to add additional Rooms or even Homes to your HomeKit environment. This article shows how to list any Home and its Rooms and how to add additional Rooms or Homes to the configuration. When adding accessories through the default HomeKit workflow, they can then be assigned to a Home and Room.
To develop a HomeKit-enabled app you need to add the HomeKit capability to your Xcode project. This can be done in the Project Settings and the Signing & Capabilities pane of your target. Also, you have to add an entitlement to your projects info.plist to ask the user for permission to access HomeKit. In your project settings Info pane, you can add a new entry for the Custom iOS Target Properties. Provide a meaningful description of why you need access to HomeKit for the NSHomeKitUsageDescription key. To learn more about these requirements, follow our tutorial "Creating a HomeKit-enabled App with SwiftUI".
Let's explore how to display any number of Homes available in HomeKit and any Rooms configured inside. Then, let's also understand how we can add and also remove additional Homes and Rooms to the HomeKit environment.
Finding Available Homes
In this example, we will use a HomeStore class to manage access to HomeKit and reference it from the SwiftUI views throughout the app as a reference type. It uses a private instance of HMHomeManager, which serves as the primary manager for any number of Homes of a user. To monitor changes made to any Home, we adopt the HMHomeManagerDelegate Protocol to track the state of the home network.
The HomeStore also comes with a @Published array of HMHome, which is the primary unit of living space inside HomeKit, that can be composed of Rooms organized in Zones. With this simple setup, we can start exploring the HomeKit configuration for available Homes.
import Foundation
import HomeKit
import Combine

class HomeStore: NSObject, ObservableObject, HMHomeManagerDelegate {


    @Published var homes: [HMHome] = []
    private var manager: HMHomeManager!

    override init(){
        super.init()
        load()
    }

    func load() {
        if manager == nil {
            manager = .init()
            manager.delegate = self
        }
    }


    func homeManagerDidUpdateHomes(_ manager: HMHomeManager) {
        print("DEBUG: Updated Homes!")
        self.homes = self.manager.homes
    }
}
In a HomeView SwiftUI view you can then display a List of Homes like this:
import SwiftUI
import HomeKit

struct HomeView: View {

    @ObservedObject var model: HomeStore

    var body: some View {
        List {
            Section(header: HStack {
                Text("My Homes")
            }) {
                ForEach(model.homes, id: \.uniqueIdentifier) { home in
                        Text("\(home.name)")
                }
            }
        }
    }
}
Adding and Removing Homes
Now, if you want to add an additional Home to the configuration, you can extend the HomeStore with a simple function addHome(). In this example, we give it a randomized name with a UUID, in a real app this could be provided by the user. To delete a home, a similarly simple function removeHome(home: HMHome) can be added that takes a HMHome as a parameter.
class HomeStore: NSObject, ObservableObject, HMHomeManagerDelegate {

    [...]

    func addHome() {
        manager.addHome(withName: "NewHome \(UUID())") { [weak self] (home, error) in
            guard let self = self else {return}
            self.homeManagerDidUpdateHomes(self.manager)

        }
    }

    func removeHome(home: HMHome) {
        manager.removeHome(home) { [weak self] error in
            guard let self = self else {return}
            self.homeManagerDidUpdateHomes(self.manager)
        }
    }
}
Then, within our SwiftUI view, we could add a simple Button that calls an addhome() function that accesses the newly created function in the HomeStore to add a new Home to the List.
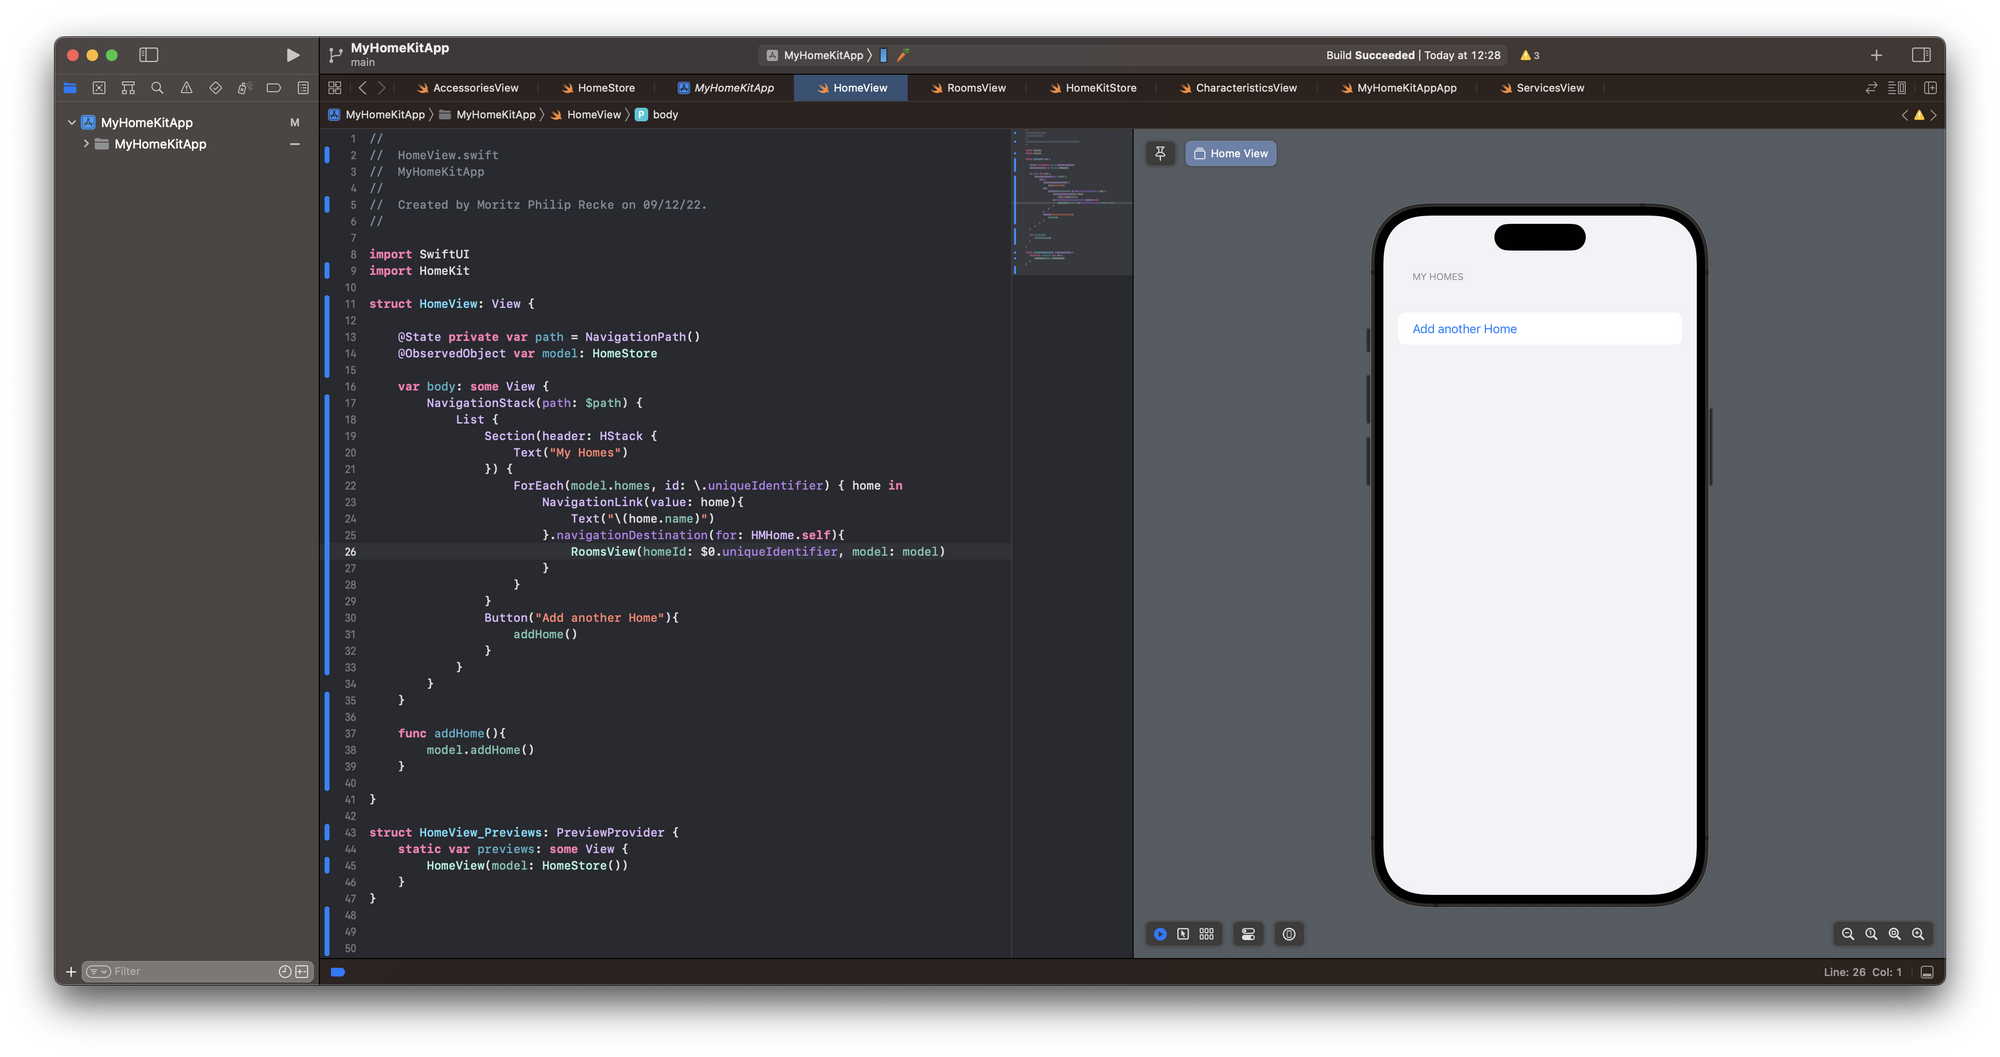
struct HomeView: View {

    @State private var path = NavigationPath()
    @ObservedObject var model: HomeStore

    var body: some View {
        NavigationStack(path: $path) {
            List {
                Section(header: HStack {
                    Text("My Homes")
                }) {
                    ForEach(model.homes, id: \.uniqueIdentifier) { home in
                        NavigationLink(value: home){
                            Text("\(home.name)")
                        }.navigationDestination(for: HMHome.self){
                            RoomsView(homeId: $0.uniqueIdentifier, model: model)
                        }
                    }
                }
                Button("Add another Home"){
                    addHome()
                }
            }
        }
    }

    func addHome(){
        model.addHome()
    }

}
While we are at it, let's add a detailed view for the List, so we can display a Button to remove the Home from HomeKit. The RoomView could look like this:
struct RoomsView: View {

    var homeId: UUID
    @ObservedObject var model: HomeStore

    var body: some View {
    	Button("Remove this Home"){
        	removeHome()
    	}
	}

	func removeHome(){
        guard let thisHome = model.homes.first(where: {$0.uniqueIdentifier == homeId}) else {
            print("ERROR: No Home was found!")
            return
        }
        model.removeHome(home: thisHome)
    }
}
Now that we established how to work with Homes, let's explore how we can find, add, and remove Rooms in HomeKit.
Finding Rooms
To now explore the Home and find any available Rooms, we can further extend the functionality of the HomeStore with a simple findRooms(homeId: UUID) function. It takes the unique identifier of a Home as a parameter and then filters the array of homes for the Rooms. All identified Rooms are then made available using another @Published array rooms of the HMRoom type.
class HomeStore: NSObject, ObservableObject, HMHomeManagerDelegate {

    @Published var homes: [HMHome] = []
    @Published var rooms: [HMRoom] = []

    [...]

    func findRooms(homeId: UUID) {
        guard let foundRooms = homes.first(where: {$0.uniqueIdentifier == homeId})?.rooms else {
            print("ERROR: No Roome was found!")
            return
        }
        rooms = foundRooms
    }
}
With this information, we can then extend the RoomView to show a List of all available Rooms. For matters of simplicity, there is a .onAppear() modifier that calls the findRooms(homeId: homeId) of the HomeStore to load the available Rooms in the selected Home.
struct RoomsView: View {

    var homeId: UUID
    @ObservedObject var model: HomeStore

    var body: some View {
        List {
            Section(header: HStack {
                Text("My Rooms")
            }) {
                ForEach(model.rooms, id: \.uniqueIdentifier) { room in
                    Text(room.name)
                }
            }
            Button("Remove this Home"){
                removeHome()
            }
        }.onAppear(){
            model.findRooms(homeId: homeId)
        }
    }
    func removeHome(){
        guard let thisHome = model.homes.first(where: {$0.uniqueIdentifier == homeId}) else {
            print("ERROR: No Home was found!")
            return
        }
        model.removeHome(home: thisHome)
    }
}
Adding and Removing Rooms
Now, if you want to add an additional Room to the configuration, you can extend the HomeStore with a simple function addRoom(homeId: UUID). Through the unique identifier of the Home, we can add the new Room with a randomized name with a UUID, even though in a real app this could be provided by the user. To delete a room, a similarly simple function removeRoom(homeId: UUID, room: HMRoom) can be added that takes the unique identifier of a Home and an HMHome as a parameter.
class HomeStore: NSObject, ObservableObject, HMHomeManagerDelegate {

    [...]

    func addRoom(homeId: UUID) {
        guard let home = homes.first(where: {$0.uniqueIdentifier == homeId}) else {
            print("ERROR: No Home was found!")
            return
        }
        home.addRoom(withName: "NewRoom \(UUID())") { [weak self] (room, error) in
            guard let self = self else {return}
            self.findRooms(homeId: homeId)
            self.homeManagerDidUpdateHomes(self.manager)
        }
    }

    func removeRoom(homeId: UUID, room: HMRoom){
        manager.homes.first(where: {$0.uniqueIdentifier == homeId})?.removeRoom(room){ [weak self] error in
            guard let self = self else {return}
            self.findRooms(homeId: homeId)
            self.homeManagerDidUpdateHomes(self.manager)
        }
    }
}
Then, within our SwiftUI view, we could add a simple Button that calls an addRoom() function that accesses the newly created function in the HomeStore to add a new Room to the List. Let's also navigate to a detail view for the List, so we can display a Button to remove the Room from HomeKit. The RoomView could look like this:
struct RoomsView: View {
    var homeId: UUID
    @ObservedObject var model: HomeStore

    var body: some View {
        List {
            Section(header: HStack {
                Text("My Rooms")
            }) {
                ForEach(model.rooms, id: \.uniqueIdentifier) { room in
                    NavigationLink(value: room){
                        Text("\(room.name)")
                    }.navigationDestination(for: HMRoom.self) {
                        AccessoriesView(homeId: homeId, roomId: $0.uniqueIdentifier ,model: model)
                    }
                }
                Button("Add another room"){
                    addRoom()
                }
            }
            Button("Remove this Home"){
                removeHome()
            }
        }.onAppear(){
            model.findRooms(homeId: homeId)
        }
    }
    func addRoom(){
        model.addRoom(homeId: homeId)
    }
    func removeHome(){
        guard let thisHome = model.homes.first(where: {$0.uniqueIdentifier == homeId}) else {
            print("ERROR: No Home was found!")
            return
        }
        model.removeHome(home: thisHome)
    }
}
Then, the RoomDetailView could look like this, showing just the Button to delete the Room by calling the function in the HomeStore.
struct RoomDetailView: View {

    var homeId: UUID
    var roomId: UUID
    @ObservedObject var model: HomeStore

    var body: some View {
        List {
            Button("Remove this Room"){
                removeRoom()
            }
        }
    }
    func removeRoom(){
        guard let thisRoom = model.rooms.first(where: {$0.uniqueIdentifier == roomId}) else {
            print("ERROR: No Home was found!")
            return
        }
        model.removeRoom(homeId: homeId, room: thisRoom)
    }
}
That's basically how this works. Here you find the complete code of the HomeStore that contains all functions to find all Homes and Rooms inside HomeKit and then to add and remove both Homes and Rooms.
class HomeStore: NSObject, ObservableObject, HMHomeManagerDelegate {
@Published var homes: [HMHome] = []
@Published var rooms: [HMRoom] = []
private var manager: HMHomeManager!
override init(){
super.init()
load()
}
func load() {
if manager == nil {
manager = .init()
manager.delegate = self
}
}
func findRooms(homeId: UUID) {
guard let foundRooms = homes.first(where: {$0.uniqueIdentifier == homeId})?.rooms else {
print("ERROR: No Roome was found!")
return
}
rooms = foundRooms
}
func addRoom(homeId: UUID) {
guard let home = homes.first(where: {$0.uniqueIdentifier == homeId}) else {
print("ERROR: No Home was found!")
return
}
home.addRoom(withName: "NewRoom \(UUID())") { [weak self] (room, error) in
guard let self = self else {return}
self.findRooms(homeId: homeId)
self.homeManagerDidUpdateHomes(self.manager)
}
}
func removeRoom(homeId: UUID, room: HMRoom){
manager.homes.first(where: {$0.uniqueIdentifier == homeId})?.removeRoom(room){ [weak self] error in
guard let self = self else {return}
self.findRooms(homeId: homeId)
self.homeManagerDidUpdateHomes(self.manager)
}
}
func addHome() {
manager.addHome(withName: "NewHome \(UUID())") { [weak self] (home, error) in
guard let self = self else {return}
self.homeManagerDidUpdateHomes(self.manager)
}
}
func removeHome(home: HMHome) {
manager.removeHome(home) { [weak self] error in
guard let self = self else {return}
self.homeManagerDidUpdateHomes(self.manager)
}
}
func homeManagerDidUpdateHomes(_ manager: HMHomeManager) {
print("DEBUG: Updated Homes!")
self.homes = self.manager.homes
}
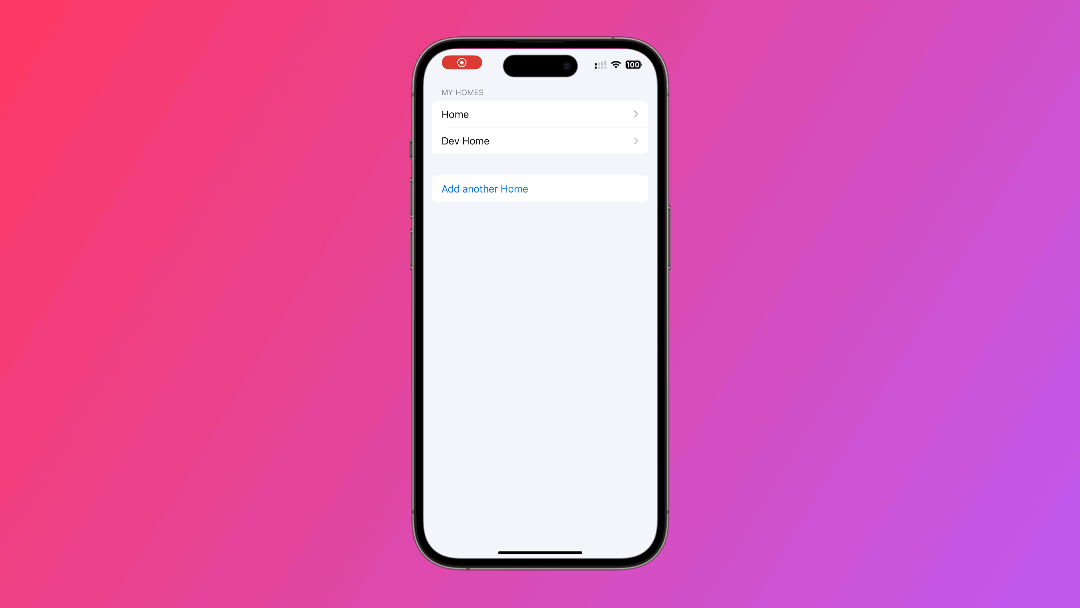
}Combined, the app should behave like this:
Working with Zones
HomeKit also allows you to group any number of Rooms in Zones. Similar to the Rooms, you could look up the Zones in any Home and make them available in the HomeStore as a @Published array of HMZone. Within any HMHome you use the addZone(named zoneName: String) async throws -> HMZone and the removeZone(_ zone: HMZone, completionHandler completion: @escaping (Error?) -> Void) functions to manage the Zones. Then, similarly to Homes, Zones have any number of Rooms, which then contain Accessories and their Services and Characteristics.
If you want to learn more about developing HomeKit-enabled apps, check out our other articles: