Preparing your App for VoiceOver: Accessibility Actions
Ensure the interactions with the interface elements of your app are possible with assistive technologies


Some features and interactions of our app's interface might not be accessible through assistive APIs, maybe because you created new accessible elements to group semantic views or, simply, might not be easy to interact with it. However, we can still perform some operations by leveraging the UIAccessibilityAction informal protocol. This protocol allows accessibility elements to perform specific actions.
According to the official Apple Documentation, accessibility actions are:
A set of methods that accessibility elements can use to support specific actions.
Apple Documentation
Accessibility Actions are fundamental for assistive technologies:
- VoiceOver is informed that actions are available and the user can activate them by double tapping. If more actions are available VoiceOver will announce ‘Actions available’ and allow users to swipe vertically to hear the available options and interact with the view.
Custom Accessibility Actions in the Mail app using VoiceOver
- Switch Control users are presented a menu of all the available actions.

Before exploring how to use accessibility actions it's important to know that there are different kinds of actions available to the user via assistive technologies. In this article, we will focus just on some of them.
How to use them
Both in UIKit and SwiftUI, you have the flexibility to define custom actions for our accessibility elements.
SwiftUI
In SwiftUI, you can take advantage of a few modifiers that will help you customize the accessible user experience regarding interactions.
If the interaction is not that complex you can use the .accessibilityAction(_:_:) modifier directly on the View.
// Perform a simple action when the accessibility action is triggered

import SwiftUI

var body: some View {
    AccessibleView()
        .accessibilityAction {
            print("Action Performed")
        }
}
You can even use the.accessibilityAction(named:_:) to give a name to the action. Switch control will display the name in the menu while VoiceOver will announce that actions are available so the user can swipe up or down to know the name.
If you need to define a set of actions that can be performed you can use the .accessibilityActions(_:) modifier. This will add multiple accessibility actions to the view.
// Creating a SwiftUI view defining multiple accessibility actions

import SwiftUI

var body: some View {
    AccessibleView()
        .accessibilityActions {
            Button {
                // Perform first action here
            } label: {
                Text("First Action")
            }
            Button {
                // Perform second action here
            } label: {
                Text("Second Action")
            }
        }
}
As written in the Apple documentation this modifier can also attach a dynamic number of actions to a view. The user will access each one of these actions through vertical swipes or contextual menu depending on the accessibility API.
Another scenario may be views in which the user can increase values inside the view. You can easily increase a value in the view with swipe-up or swipe-down gestures by using an Adjustable Action with the .accessibilityAdjustableAction(_:) modifier.
// Creating a SwiftUI view with a control that can be adjusted with the .accessibilityAdjustableAction modifier

import SwiftUI

struct ContentView: View {
    @State var value: Double = 0.0

    var body: some View {
        AccessibleView(value: $value, in: 0.0...100.0)
            .accessibilityAdjustableAction { direction in
                switch direction {
                case .increment:
                    value += 1.0
                case .decrement:
                    value -= 1.0
                @unknown default:
                    break
                }
            }
    }
}
UIKit
Similar to SwiftUI, in UIKit, we can define a set of actions linked to the single accessible element, using an array of custom actions to display along with the built-in actions. The array will contain one or more UIAccessibilityCustomAction objects defining the supported actions.
// Defining and adding accessibility actions to a view in UIKit


import UIKit

class AccessibleViewController: UIViewController {


    override func viewDidLoad() {
        super.viewDidLoad()
        // Set up the accessibility custom actions after loading the view.
        setupAccessibilityActions()
    }


    func setupAccessibilityActions() {
        let actionOne = UIAccessibilityCustomAction(name: "First Action", actionHandler: { _ in
            // Implement the action for "First Action"
            print("First Action performed")
            return true
        })

        let actionTwo = UIAccessibilityCustomAction(name: "Second Action", actionHandler: { _ in
            // Implement the action for "Second Action"
            print("Second Action performed")
            return true
        })

        accessibilityCustomActions = [actionOne, actionTwo]
    }

}
By creating a custom subclass of the component, we can override certain methods within the UIAccessibilityAction protocol. For instance, if we intend to associate a simple action with a label, subclassing the UILabel class and overriding the accessibilityActivate() method allows you to achieve this.
// Creating a UILabel subclass with overridden accessibilityActivate method

import UIKit

class ActionLabel : UILabel {
    override func accessibilityActivate() -> Bool {
        print("Accessibility action performed")
        return true
    }
}
In case you are using a slider or some other component with a value that needs to be adjusted you can override the accessibilityIncrement() and accessibilityDecrement() method inside your class.
// Creating a UISlider subclass implementing custom accessibility behavior

import UIKit

class CustomAccessibleSlider: UISlider {

    override func accessibilityIncrement() {
        super.accessibilityIncrement()
        print("increment performed")
    }

    override func accessibilityDecrement() {
        super.accessibilityDecrement()
        print("decrement performed")
    }
}
You must provide an implementation of these two methods for every Accessibility Element that has the adjustable trait.
You can check the accessibility actions available also with the Accessibility Inspector.
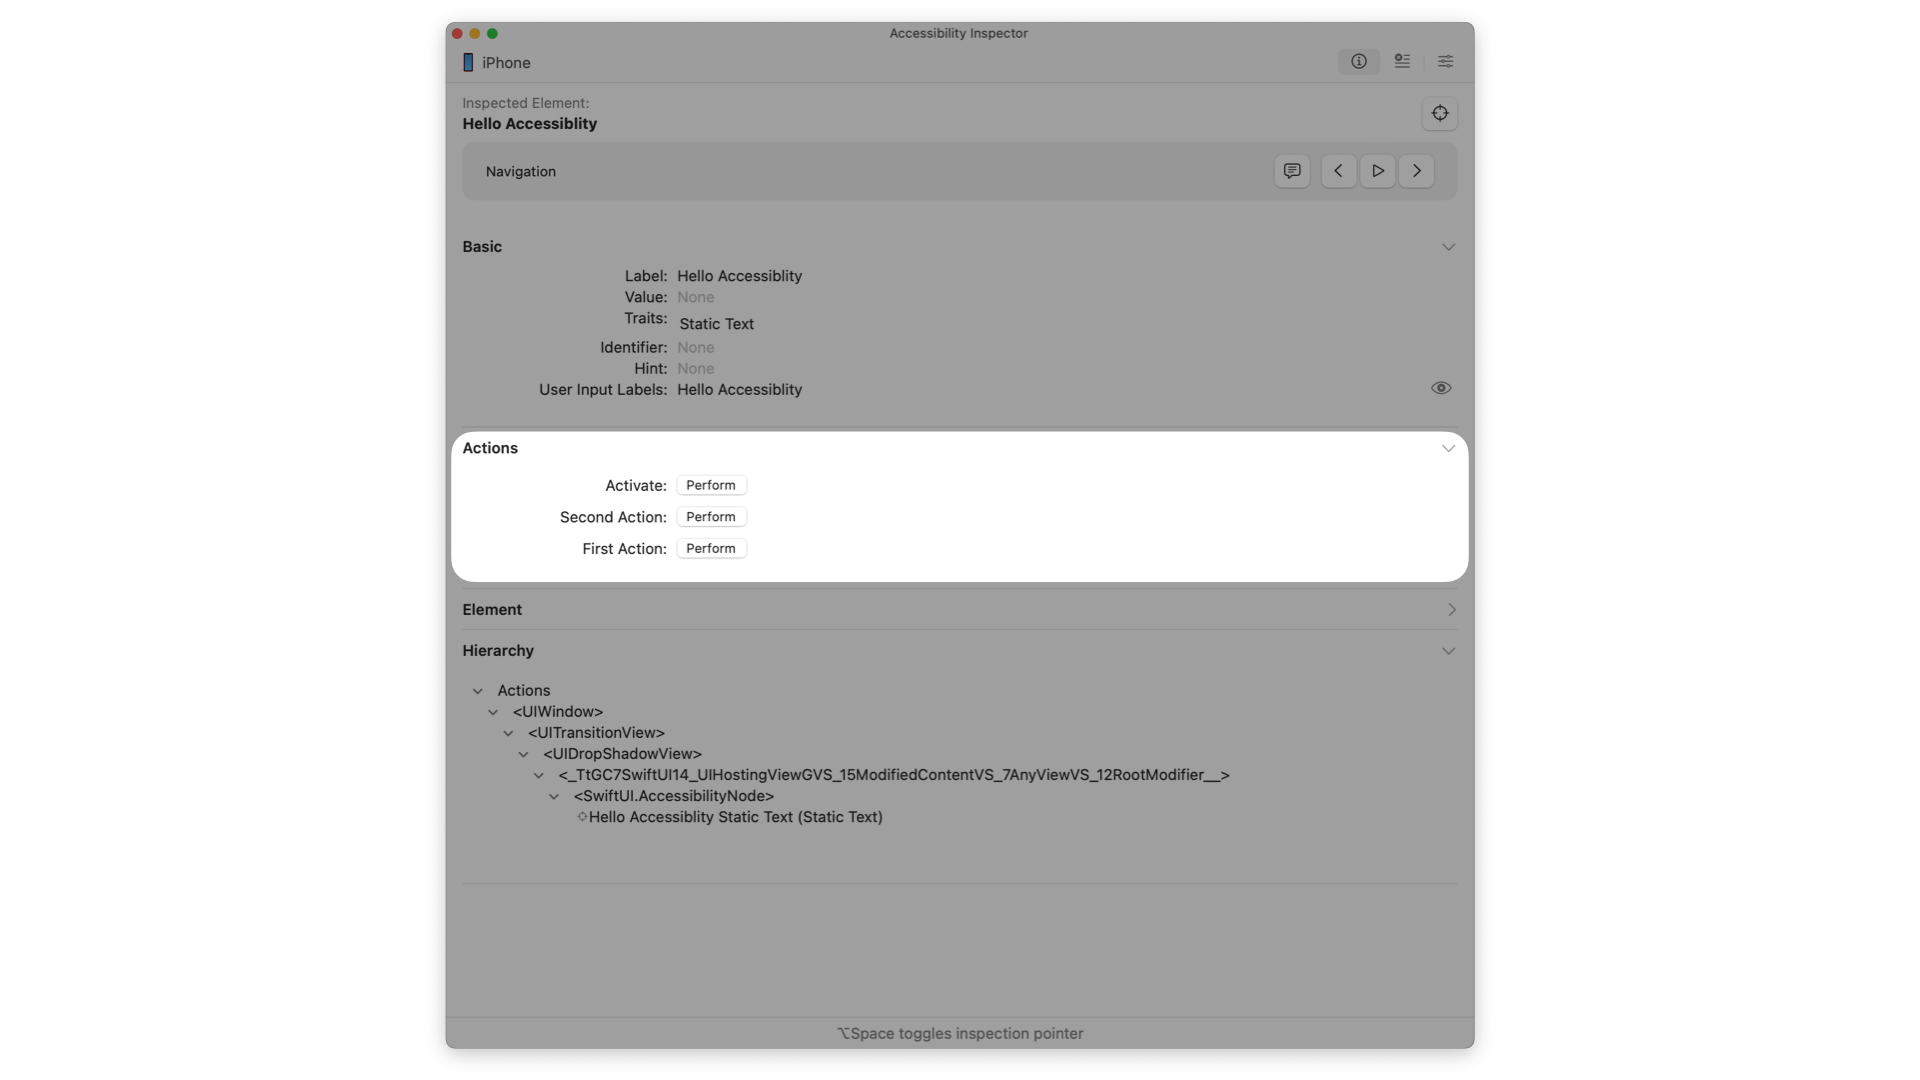
To know more about the Accessibility Inspector, check out the article:

When to use them
The interaction is not performable through Assistive Technologies
Custom actions become necessary when certain functionalities within an application aren't accessible through assistive technologies. An example may be the Mail app, the Phone app or any app containing a list.
When VoiceOver is enabled, the interaction to access swipe actions on a list row changes. Instead of swiping horizontally, which is used in VoiceOver to navigate the interface, the user can swipe vertically to access the same actions. This ensures that users relying on assistive technologies can seamlessly navigate and interact with the app's features. Another similar example is actions that are available with long presses.
Simplify complex interactions
Some functionalities within an application might be accessible but not easily actionable through assistive technologies. For example for Switch Control users, some actions like drag-and-drop or long press can be challenging. To make it easier, the functionalities associated with these interactions can be provided directly on the view through accessibility actions. An example of a simplified action could be a rating view like the one present in the App Store app.
Custom Actions in the App Store app using VoiceOver
When not to use them
Too many custom actions
Introducing too many custom actions alongside existing native accessibility features can overwhelm users' cognitive load. It might lead to confusion or difficulty in selecting the appropriate action affecting also the overall usability of the app with assistive technologies.
Compliance with Web Content Accessibility Guidelines
In the WCAG 2.2 (Web Content Accessibility Guidelines), the industry-standard accessibility reference, we can see the following guidelines:
Operable
"User interface components and navigation must be operable."
Guideline 1.3 Adaptable
"Information, structure, and relationships conveyed through presentation can be programmatically determined or are available in text."
Guideline 4.1 Compatible
"Maximize compatibility with current and future user agents, including assistive technologies."
You can have more information about the WCAG in the following article: